Applies to:
![]()
Inspecting the Lid and Lid Lock
Some locations may choose to do this procedure on a more frequent basis (i.e., quarterly, semi-annually, or other frequency).
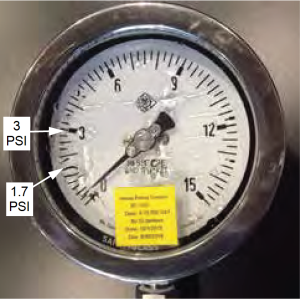
Using the calibrated test fixture 140463, verify the lid lock remains locked until the pressure in the vat drops below 1.7psi. Evaluate the existing pressure gauge.
-
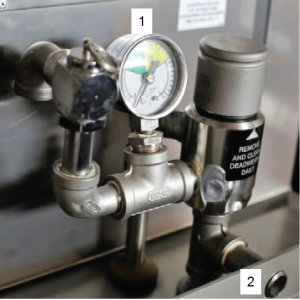
Remove the pressure gauge (1) using an adjustable wrench. Make sure the plumbing is clean and clear of obstruction between the pressure outlet (2) in the vat through to the pressure gauge. If oil build up or obstructions are found, remove them by either cleaning the components or replacing the components prior to proceeding with the test.
-
Remove the reducer with an adjustable wrench.
-
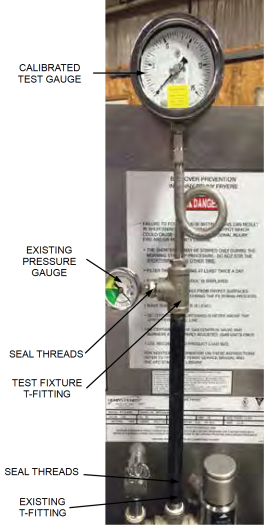
Thread the calibrated test gauge fixture into the existing t-fitting. Seal the threads with pipe thread sealant. You may have to slightly adjust the t-fitting by pulling it toward the front of the fryer with an adjustable wrench to thread in the test fixture.
-
Thread the existing pressure gauge into the test fixture T-fitting. Seal the threads with pipe thread sealant.
During the test procedure, use the calibrated test gauge to collect measurement data for the inspection form. Also monitor the existing pressure gauge from the fryer to make sure that it is functioning within a similar range to the gauge of the test fixture. If no function from the existing gauge, a sticking gauge, or one that does not indicate zero when no pressure in the fryer, it will need to be replaced with a new gauge #16910 after the test.

-
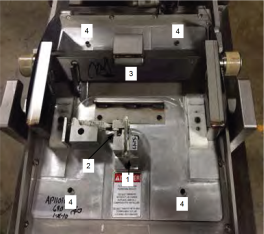
Remove the four screws (two on each side of the lid) and remove the lid cover from the lid.
-
Visually inspect the pressure pin (1), lid lock assembly (2) and lid handle weldment (3) for any broken or missing parts. If any of the aforementioned are true, stop. Take the fryer out of service until a new lid assembly can be installed.
-
Next, visually inspect for oil migrating into the top of the lid through the lid lock assembly or vent holes (4). If either of these are true, this fryer will not pass inspection and the lid will need to be replaced ASAP. The store however will be able to temporarily continue to use this lid as long as it passes the pressure pin engagement / disengagement procedure.
-
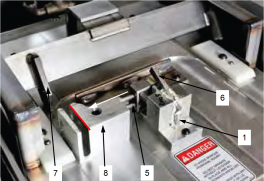
Clean and lube the pressure pin (1) , locking pins (5) and linkage (6) with spindle lube.
-
Have the store bread and cook either a 4, 6, or 8-head load of Original Recipe in the pressure fryer and start the appropriate timer. The lid handle should be fully in the locked position during this test.
-
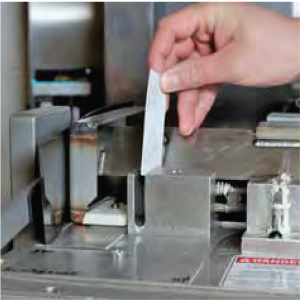
Once the calibrated test gauge reads greater than 3psi, check to make sure the locking pin (5) is engaged in the lid handle weldment (7). To do this, insert a business card where indicated by the red line.
-
If the business card will not slide between the right side of the lid handle weldment and the locking block (8), then the pin is engaged and the lid handle is locked.
-
If you are able to slide the business card between the right side of the lid handle weldment and the locking block, then the lid handle is unlocked. STOP! Take this fryer out of service until a new lid assembly is installed and do not open the lid until the pressure gauge reads zero psi.
If pressure exceeds 12psi during the test, wait until all pressure safely exhausts from the vat and then make sure the deadweight and plumbing are clean and free from obstruction.
-
-
Depending on the cook load selected, pressure will release somewhere between the last one to two minutes of the cook load. As pressure releases, verify the pressure (as viewed on the pressure gauge) when the lid locking pin fully disengages the lid handle.
To do this, use a business card and try to repeatedly slide this between the locking block and the right side of the lid handle locking weldment.
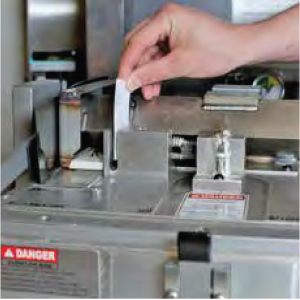
Once you are able to fully slide the business card between these two components, immediately note the pressure from the calibrated test gauge. This is the point when the lid is unlocked.
-
If this pressure was less than 1.7psi this lid passes inspection. Move to step 13. If the pressure when the lid locking pin disengages was greater than 1.7 psi, stop. Take the fryer out of service until the lid assembly can be replaced. Record your results in the inspection form.
If pressure does not drop below 1.7psi when the timer reaches 0:00, wait for all pressure to release from the vat, then make sure the pressure solenoid is working freely and unobstructed as well as all related pressure release plumbing.
-
Have the store remove the product from the fryer.
-
Re-install the lid cover.
-
Remove Existing Pressure gauge from the test fixture and then remove the test fixture from the fryer.
-
Replace the reducer in the T-fitting and re-install the existing pressure gauge if it passed inspection. Otherwise replace with #16910. Seal threads with pipe thread sealant.
For part numbers, refer to Lid and Cover Assembly.