Inspecting the Pilot Assembly
Some locations may choose to do this procedure on a more frequent basis (i.e., quarterly, semi-annually, or other frequency).
Remove breading, dust and debris from pilot assemblies to prevent flame sense issues due to plugged pilot orifices, or a plugged pilot venturri. It is best to perform this procedure when cleaning the burners (see burner cleaning instructions). Pilot and pilot orifice part numbers can be found in Gas Burner Assembly.
Cleaning Pilot Assemblies
-
Disconnect the fryer from power.
-
Shut off the gas supply to the fryer.
-
Remove each pilot assembly (two pilot assemblies per fryer total).
-
Disconnect the flame sensor.
-
Disconnect the spark ignitor.
-
Disconnect the pilot gas line.

-
-
Remove the two mounting nuts (1) on each pilot assembly.
-
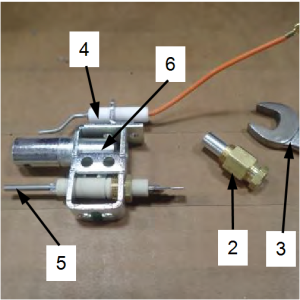
Remove the pilot orifice (2) using a ½” wrench (3).
-
Remove any debris or carbon build up from the spark ignitor (4) and flame sensor (5).
-
Remove breading, dust and debris from the venturri (6) and pilot orifice. If the orifice is plugged, either remove with a very small wire or orifice cleaning tool or replace the pilot orifice.
-
Reinstall in reverse order steps 5 - 1.