FM01-738 Replacing the HHC 900 Blower Assembly, 240V, International
crosshead screwdriver
5/64 inch Hex key wrench
Kit number
Estimated Time
60 minutes

|
To avoid electrical shock or property damage, disconnect power before installing or servicing equipment. A qualified technician must perform the service procedures. |
-
Turn off power switch, and unplug the unit or turn off the wall circuit breaker.
-
Remove the four screws located on the control panel.
-
Remove the five screws located on the rear panel of the control panel.
-
Remove the six screws (three on each side) securing the top cap to the unit.
-
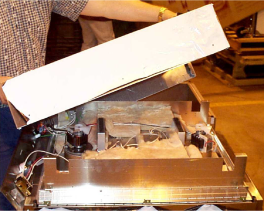
Carefully remove the top cap from the unit.
-
Locate the existing motor and blower assembly on the blower box assembly.
-
Locate the three screws that secure the motor assembly in place.

-
Remove the screws and remove the motor assembly from the blower box assembly.
-
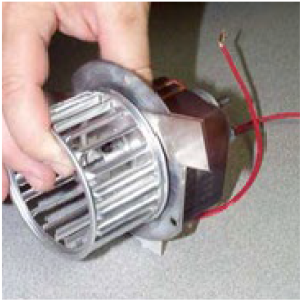
After removing the old motor assembly, examine the existing blower wheel.
-
Measure the height of the blower wheel.
-
Included are two blower wheels, their heights are 1-7/8 inch and 1-1/2 inch.
-
After identifying the height of the existing blower wheel, secure the corresponding blower wheel of the same height.
-
Using a 5/64 inch allen wrench, make sure that the set screw on the blower wheel is backed out so that the blower wheel can slide onto the shaft.
-
Slide the blower wheel onto the shaft.
-
Do one of the following:
-
For the 1-7/8 inch Blower Wheel
Before tightening the set screw, place one 1/8 inch spacing bars between the motor mounting plate and the blower wheel. This will ensure 1/8 inch spacing.
-
For the 1-1/2 inch Blower Wheel
Before tightening the set screw, place two 1/8 inch spacing bars between the motor mounting plate and the blower wheel. This will ensure 1/4 inch spacing.
-
-
Secure the new blower motor assembly.
-
Place the new gasket onto the blower housing and mount the new blower motor assembly onto the housing using the existing screws.
-
Replace the top cap and control panels by reversing steps 2-5.
-
Restore power to the unit.