Troubleshooting
To isolate a malfunction, proceed as follows:
-
Clearly define the problem (or symptom) and when it occurs.
-
Locate the problem in the Troubleshooting table.
-
Review all possible causes. Then, one-at-a-time, work through the list of corrections until the problem is solved.
| Problem | Cause | Solution |
|---|---|---|
| Product not holding temperature
|
||
|
Control temperature set too low |
Increase air temperature |
|
| Heat settings too low | Remove front cover and adjust shelf and base heat settings | |
|
Heat settings too low |
Have heat zones set to factory default temperatures |
|
|
Door gasket damaged or worn |
Replace bad door gaskets |
|
|
Bad air heater |
Check heaters and replace if bad See Tech Mode items 10 and 16 |
|
| Bad air heater | Check heaters and replace if bad | |
| Blower not working | Check blower and replace if bad | |
| Blower not working | Check blower and replace if bad See Tech Mode item 18 | |
|
Bad air heater, or blower relays |
Replace relay See Tech Mode items 10 and 16 |
|
| Bad high limit | Check high limit and replace if bad | |
|
Low or improper voltage |
Compare receptacle voltage to data plate voltage |
|
| Air probe faulty, open (“E-6A”), or shorted (“E-6B”) | Check probe resistance and replace, if necessary | |
|
Doors/drawers left open |
Keep doors/drawers closed except to load and serve product |
|
|
Product held too long |
Hold product only for recommended times |
|
| Product not placed correctly in unit | Place product in unit as per operation instructions. | |
|
Control temperature set too low |
Increase air temperature (CDT control only) or Increase thermostat setting by removing hole plug on control panel and turning the shaft clockwise with a screwdriver |
|
|
Product not hot when placed in unit |
Place prepackaged hot food in unit |
|
| Cabinet steaming product soggy | Humidity setpoint too high | Decrease humidity setpoint |
| Water heater probe faulty, open (“E-12A”), or closed (“E-12B”) | Check probe resistance and replace, if necessary | |
|
Bad humidity sensor (“E-17”) |
Replace humidity sensor |
|
| Relay stuck closed | Replace relay | |
|
Vent stuck closed (“E-80”) |
|
|
| Vent not set properly (units with vent adjustment only) | Adjust vent | |
| Product dry
|
Humidity set too low |
Increase humidity setpoint |
|
No water in pan |
|
|
| Bad float switch | Replace float switch | |
|
Bad water heater high limit |
Replace high limit |
|
| Bad water heater | Check heater and replace if bad; see Tech Mode item 18 | |
|
Vent stuck open ("E-80") |
|
|
| Unit not reaching set temperature
|
Doors left open |
Keep doors closed except to load and serve product |
|
Door gasket damaged or worn |
Replace bad door gaskets |
|
| Thermometer not indicating true temperature | Check cabinet temperature with another thermometer; have thermometer replaced if necessary | |
| Blower not working | Check Blower and replace if bad | |
| Blower not working | Check Blower and replace if bad; see Tech Mode item 18 | |
|
Bad air heater |
Check heaters and replace if bad; see Tech Mode item 18 |
|
| Bad air heater, or blower relays | Replace relay | |
| Defective high limit on one of heaters | Check high limit; replace | |
|
Unit not heating
|
Bad high limit |
Check high limit; replace if bad |
|
Bad control board |
Replace control board |
|
|
Bad air heater or blower relays |
Replace relay |
|
|
Bad air heater |
Check heaters and replace if bad; see Tech Mode item 18 |
|
| Bad air heater | Check heaters and replace if bad | |
|
Faulty wiring |
Check for loose connections or broken wires |
|
| Blown fuse | Change 15 amp fuse. | |
| Faulty thermostat | Check thermostat | |
| Unit not heating |
Bad control board |
Check set point reading; if unit for heat below setpoint and not calling for heat, control board defective. Replace control board |
|
Blower not working |
Check blower and replace if bad; see Tech Mode item 18 |
|
| Faulty contactor | Check contactor and replace if necessary | |
| Relay stuck closed | Replace relay | |
| Unit not heating
|
Bad air heater | Check heaters and replace if bad |
|
Faulty wiring |
Check for loose connections or broken wires |
|
| Faulty solid-state relay (CDT units only) | Replace solid-state relay | |
| Faulty control board (CDT units only) | Replace control board | |
|
Faulty thermostat |
Check thermostat and replace if needed |
|
| Unit not heating | Control board not calling for heat | Verify set-point reading; if zone (see Zone Positions at left) tempeature is below setpoint and not calling for heat (no 5 vdc), control board defective |
|
Water does not drain |
Drain clogged |
Remove drain obstruction |
| With switch in ON position the cabinet is completely inoperative | Unit not connected to electrical supply | Plug cord into electrical outlet |
| Open breaker or fuse | Reset breaker or install new fuse in junction box | |
|
Faulty cord or plug |
Check cord and plug |
|
| Faulty power switch | Check power switch | |
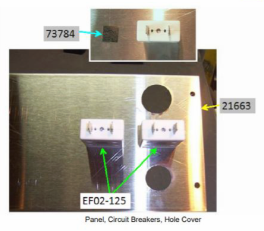
| In-unit resettable breakers |
Press on each white resettable breaker button.
|
|
| With power switch in POWER position, unit
is completely
inoperative (no power)
|
Open circuit |
Check to see that unit is plugged in. Check breaker or fuse at supply box. Check control panel fuses per Replacing the Fuse and Fuse Holder. Check voltage at wall receptacle. Check POWER switch; replace if defective. Check cord and plug for loose connections. |
|
Control board defective |
Check for 12 volt input from transformer; replace if defective |
|
| Transformer defective | Check input and output voltage; replace if defective | |
| Shelf won't heat
|
Shelf not plugged into receptacle properly | Check that the shelf plug is firmly pushed into receptacle in the interior of the unit. |
| Faulty shelf heat relay | Check and replace if necessary | |
| Faulty shelf heater | Check and replace if necessary | |
|
Unit not preheated |
Preheat unit before loading product |
|
| Faulty PC board | Replace PC board | |
| Temperature setting “OFF” | Remove front cover and increase shelf heat setting | |
| Unit overheating
|
Faulty thermostat | Check thermostat; replace thermostat |
|
Faulty blower |
Check blowers; replace blower |
|
| Faulty control board (CDT units only) | Replace control board. | |
|
Faulty blowers |
Check blowers; replace blower |
|
| No base heat
|
Faulty base heat relay | Check and replace if necessary |
|
Faulty base heater |
Check and replace if necessary |
|
| Unit not preheated | Preheat unit before loading product | |
| Faulty PC board | Replace PC board | |
| No light(s)
|
Faulty contactor | Check contactor and replace if necessary |
| Light socket shorted | Replace light socket | |
|
Faulty fluorescent light bulb |
Replace fluourescent light bulb |
|
| Faulty lamp ballast | Replace ballast | |
| With power switch turned on, the blower and fan operate, but the power light is off and the unit won’t heat | Open high limit |
With unit cool, check high limit If the high limit opened because of overheating, refer to Unit Overheats section of Troubleshooting Guide |
| Red LED, when should be green, or vice versa | Polarity reversed on LED wires | Access the LED wires on side of unit and reverse wires at wire nuts |
| Front LED does not light | Faulty LED | Access LED wires on side of unit and check for dc voltage; if no voltage, check for voltage at control board; if voltage present, replace LED |
| Individual zone does
not heat
|
Faulty heat relay |
Testing for proper relay operation:
To avoid electrical shock, make connections before applying power, take reading, and remove power before removing meter leads. The following checks are performed with the wall circuit breaker closed and the main power switch in the ON position.
|
|
Faulty heater |
Refer to wiring diagrams and with the outputs on, check across terminal #1 of the appropriate relay and the neutral wire (#N5 on 554 or #N2 on 1L or 22) at the transformer. If meter shows full voltage (120V), but heater is not heating, replace heater and liner assy. Refer to wiring diagrams and disconnect 15-pin connector at control board. With an ohm meter, check between the appropriate terminals on connector and the corresponding terminal on the terminal block. Meter should read 35 to 41 ohms at room temperature. Replace liner and heater assy if necessary |
|
| Faulty heater RTD | Refer to wiring diagram and disconnect 15-pin connector at control board. With an ohm meter, check between the appropriate terminals on connector, based upon which RTD is being checked. Meter should read about 1080 ohms at room temperature. Replace liner and heater assy. if necessary. |