Unpacking

|
Shock Hazard To avoid property damage, do not puncture unit with tools during unpacking. |
|
|
Heavy Object Take care when moving the fryer to prevent personal injury. The fryer weighs approximately: |
|
NOTICE - |
Any shipping damage should be noted in the presence of the delivery agent and signed prior to his or her departure.
|
|
NOTICE - |
To avoid equipment damage, remove filter pan
|

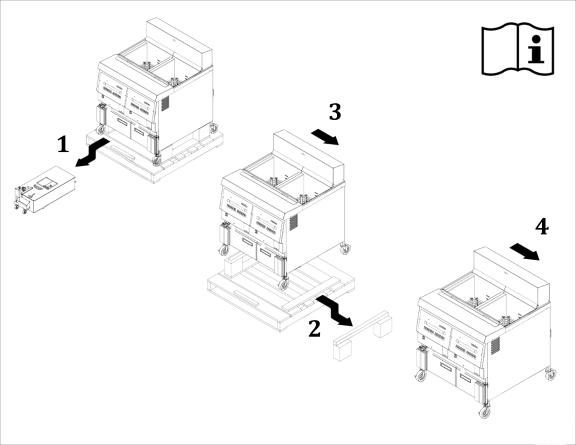 Figure 1
-
Cut and remove the metal bands from the carton.
-
Remove carton lid and lift the main carton off the fryer.
-
Remove corner packing supports.
-
If necessary, cut the stretch film from around the carrier/rack box and remove it from the top of the fryer lid.
-
Cut and remove the bands holding the fryer to the pallet, and remove fryer from pallet.
-
Carefully hold onto the lid as it opens and remove contents inside the vat.
Required ToolsTin snips, Sledgehammer, Crowbar, hydraulic floor jacks
WARNING! Falling Load / Strain Hazard Fryer may shift or drop during removal from pallet, causing serious injury. Always use two people. Keep hands clear of pinch points and lower fryer slowly with coordinated control.
-
Carefully cut bands from cardboard using tin snips, remove cardboard top, inside cardboard supports and lift the remaining cardboard packaging up and off the fryer
-
Remove filter pan from the fryer (Figure 1. Step 1). NOTICE: The filter pan must be removed otherwise damage to the underside of the fryer will result.
-
If necessary, cut the stretch film from around the carrier/rack box and remove it from the top of the fryer lid.
-
If necessary, cut and remove the bands holding the fryer to the pallet.
-
Position hydraulic floor jacks under fryer frame members to raise or tilt the right side of the fryer off wood block support.
-
Using a sledgehammer and crowbar, knock and pry the wood block support from the right side of the pallet (Figure 1. Step 2).
-
With two people, carefully roll the unit to the right and slowly lower the right side of the unit until both casters touch the ground. Continue rolling until all four casters touch the ground (Figure 1. Step 4).