Applies to:
![]()
Inspecting the ATO Reservoir and Testing the ATO Pump
Some locations may choose to do this procedure on a more frequent basis (i.e., quarterly, semi-annually, or other frequency).

|
Only perform this procedure when the unit is cool or severe burns may result. |
|
NOTICE - |
During installation and reassembly be sure to apply oil to all O-rings to lubricate and to help prevent tears and oil loss. Visually inspect O-rings and replace if worn or damaged.
Every 90 days replace O-rings. Remove O-rings from their groove and install new O-rings by gently rolling into place and lubricating with oil.
Use a small blunt object to gently pry O-rings from their groove to inspect for damage. Install by lubricating then gently rolling them in to place. |
Ensure the ATO reservoir is undamaged and working within specification by doing the following:
-
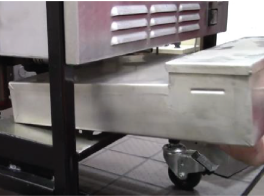
Pull the ATO reservoir out as far as it can go.
-
Slide it slightly to the right and lift. INFO: This step releases the reservoir from the track beneath it, allowing the ATO reservoir to slide the rest of the way out. Be careful not to spill oil.

-
Inspect the three o-rings at the rear of the reservoir and replace o-rings that are missing, excessively worn, or damaged.
-
Reinstall the ATO reservoir by lining up the guides at the bottom of the reservoir with the tracks.
-
Press and hold the menu button until *MAIN* appears on the display.
-
Press the number one product button to enter the filter menu.

-
Press the right arrow until 6. FILL <- ATO displays.
-
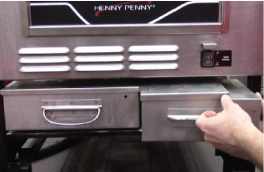
Reinstall the condensation drain pan.
-
Continue to the next inspection or reinstall components as applicable.