Applies to:
![]()
Manually Testing the Lid Pressure Pin Switch
Some locations may choose to do this procedure on a more frequent basis (i.e., quarterly, semi-annually, or other frequency).

|
Burn Risk To avoid severe burns:
|

|
To avoid electrical shock or property damage, move the power switch to OFF and disconnect power. |
|
|
Only perform this procedure when the unit is cool or severe burns may result. |
Ensure the lid pressure pin switch is undamaged and working within specification by doing the following:
-
Press and hold the menu button until *MAIN* appears on the display.
-
Press the number two product button to select INFO MODE.
-
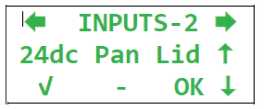
Press the right arrow until INPUTS-2 displays. OK should be displayed under Lid.
OK indicates the switch is closed and no pressure exists in the vat. PR indicates the lid pressure pin switch is open indicating pressure in the vat.
-
Manually lift the upper pressure pin until the microswitch changes position .
-
Verify that OK changes to PR on the display. This means the switch is working properly. If OK remains on the display and does not change to PR, take the fryer out of service because this means the switch is NOT working properly.
-
Troubleshoot the switch, wiring and control, and repair or replace as required.
-
Once the switch is working correctly, continue to the next inspection or reinstall components as applicable.