Inspecting for Oil Leaks
Some locations may choose to do this procedure on a more frequent basis (i.e., quarterly, semi-annually, or other frequency).

|
To avoid electrical shock or property damage, move the power switch to OFF and disconnect power. |
|
|
Burn Risk To avoid burns, use PPE when filtering oil or cleaning vat.
|
Inspecting for Plumbing Leaks during Filtration
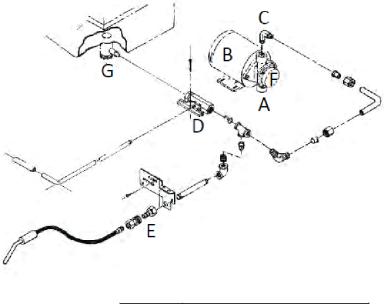
A = suction side of pump
C = pressure side of pump
E = optional filter rinse hose connection
-
Remove the right side panel from the fryer.
-
Use a flashlight to inspect the fittings of the filtration plumbing and between the filter pump (F) and motor (B) for oil leaks.
-
Drain about half the vat of oil to the filter pan.
-
Ensure the drain pan cover is present and in working order. Missing drain pan covers is a cause of oil accumulation on operating components along with leaks.
NOTE: This step fails if the drain pan cover is missing and / or oil is accumulated on the components, until corrected.
-
Turn the power switch to the pump position to pump the oil back up to the vat.
-
While the oil is pumping, use a flashlight to inspect for oil leaks.
-
If leaks are detected with plumbing, disassemble, clean, and reassemble the fittings using high temperature PTFE pipe thread sealant on threaded fittings, or replacing any worn sleeve fittings on compression fittings.
-
If leaks are detected between the filter pump motor and the filter pump, replace the seal kit.
Inspecting for Plumbing Leaks during Cooking
-
Before test, disconnect the dairy unit where the filter pan connects to the oil return line.
-
While the fryer is pressurized to 12 psi, inspect both the drain valve and the dairy union connection for significant leakage. Significant leakage is any amount more than an occasional drop of oil.
-
If significant leakage is detected from the drain valve (G), then replace it.
-
If significant leaking is detected from the oil return line (D), then replace it.
-