Cleaning the Water Valve
wrench
screwdriver
-
Disconnect electrical supply to unit.
-
Shut off water supply.
-
Disconnect the water supply tubing from the water strainer.
-
Remove the cabinet top.
-
Label wires then remove the wires from water valve.
-
Disconnect the water tubing from the outlet side of water valve.
-
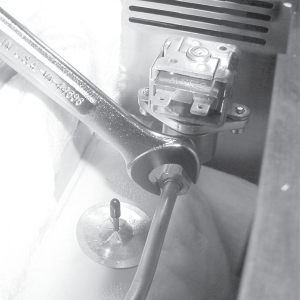
Loosen large nut holding the fittings on the inside, back wall of the cabinet.
-
Pivot the water valve against the side wall of the cabinet. Hold the brass fitting on the inlet side of the valve with a wrench, and then turn valve counterclockwise until the valve is free from the fitting.
-
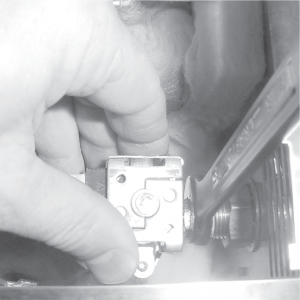
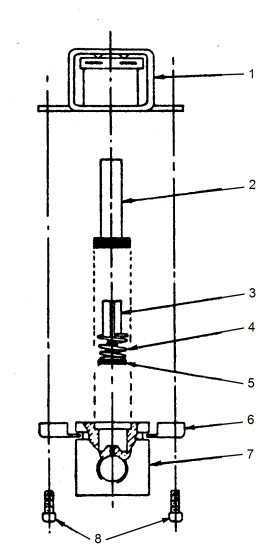
Remove the two screws (8) from the coil retainer (6).
-
Remove the retainer and pull the coil (1) off of the valve to expose the stem.
-
Remove the stem by carefully pulling upward. The plunger (3), spring (4), and seat (5), are now exposed.
-
Remove the plunger, spring, and seat, and check the rubber seat for dirt.
-
Clean the valve body (7) and the rubber seat if necessary by flushing them with clean water. Let water run both ways through the body to flush any dirt from the valve.
-
Carefully place the seat, spring, and plunger back into the valve body. Be sure the large diameter of the spring is pointed up.
-
Place the stem over the plunger and lightly press the stem seal into place.
-
Replace the coil and press it firmly against the body.
-
Position the coil terminals so they line up with the outlet of the water valve.
-
Position the coil retainer with open side up, and fasten with the two screws removed earlier.
-
Remount the water valve and reconnect the tubing in reverse order of disassembly.
-
Reconnect the wires to the valve.
-
Replace the cabinet top.
-
Reconnect the water supply tubing to the water strainer and turn on the water supply.
-
Reconnect the electrical supply to the cabinet.