Replacing the Thermometer
screwdriver
silicone rubber sealant
thermometer

|
To avoid electrical shock or property damage, disconnect power before installing or servicing equipment. A qualified technician must perform the service procedures. |
-
Disconnect the electrical supply to the cabinet.
-
Remove the access panel from the top of the module.
-
Remove the four screws from the control panel and pull it down.
-
Remove the four nuts that hold the blower box to the cabinet.
-
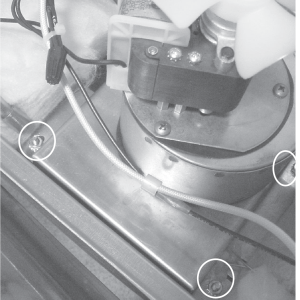
Lift the blower box up to expose thermometer and thermostat bulbs.

-
While holding the blower box, remove the two nuts that secure the bulb retaining clamps and remove the thermometer bulb from the clamps.

-
Remove the two nuts that hold the mounting brackets on the back of the thermometer body.

-
Remove the thermometer by pulling the body and capillary tube through the control panel.
-
Install a new thermometer in reverse order.
-
Reposition the blower box and secure it with the four nuts previously removed.
NOTICE -
Be sure that both the thermometer and thermostat capillary tubes pass through the notches in the front corners of the blower box. Failure to do so could permanently damage the thermometer or thermostat and cause improper operation of the cabinet.
-
Reseal the notches in the blower box corners with silicone rubber sealant.
-
Replace the access panel to the top of the module.
-
Push the control panel back in place and put in screws.
-
Reconnect the electrical supply to the cabinet.