Replacing the Firebox Insulation
Required tools
-
Medium paint brush (for applying glue)
-
Solvent (e.g., isopropyl alcohol) for cleaning
-
Scraper or putty knife (for removing old insulation and glue)
-
Clean rags or paper towels
-
Safety gloves and goggles
Required parts
All parts listed below are included in kit. This kit does not include washer retainer or weld pin.
-
Side Panel Insulation
-
Back Panel Insulation
-
Bottom Panel Insulation
-
Front Panel Insulation Kit
Kit number
Cleanliness is critical. The cleaner the sheet metal, the better the glue and insulation will adhere.
- Carefully peel or scrape off all old insulation and glue using a scraper or putty knife.
- Wipe the surface thoroughly with a clean rag and a solvent like isopropyl alcohol.
- Dry the surface completely and ensure it is residue-free. Apply Adhesive
-
Using a small paint brush, apply glue evenly to the clean metal surfaces.
-
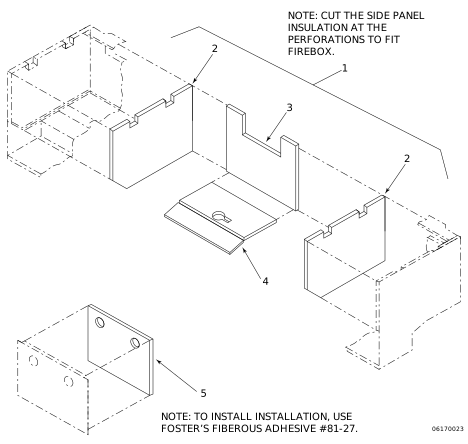
Press each piece of insulation firmly into place:
- Side panels (callout 2)
- Back panel (callout 3)
- Bottom panel (callout 4)
- Front panel (callout 5)
Ensure each piece is aligned and fully adhered.
-
Install firebox
Remove Old Insulation
Clean the Sheet Metal
Install New Insulation