Calibrating and Replacing the Humidity Sensor
crosshead screwdriver
calibration board

|
To avoid electrical shock or property damage, disconnect power before installing or servicing equipment. A qualified technician must perform the service procedures. |
The humidity sensor relays the cabinet humidity to the controls. If it becomes faulty, “E-17”, then “HUMIDITY SENSOR FAILED” shows on the display.
Replacing
Replace sensor as follows:
-
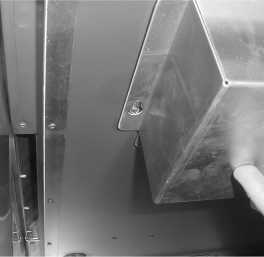
Open top, operator side door of full-size units, or operator door of 1/2 size units.
-
Using a crosshead screwdriver, remove the front screw and loosen the 2 side screws securing the sensor cover. Slide cover towards you and over loosened screws.
-
Using a crosshead screwdriver, remove the 4 screws securing the sensor to the box.
-
Pull the sensor assembly from the box and disconnect the wires.
-
Connect wires of new sensor and attach the sensor to the box. Follow the calibration instructions below before reattaching the sensor cover.
-
Once the calibration is complete, slide the cover over the crosshead screws and tighten. Unit is now ready for use.
Calibrating
Calibrate the humidity sensor after a sensor or control replacement. A calibration board is supplied with each control kit and humidity sensor kit, but can also be ordered separately.
-
If not already done, open the cabinet door, and remove the humidity sensor cover at top of unit.
-
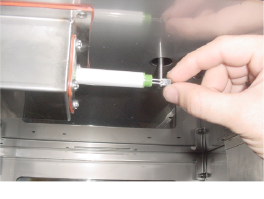
While holding the white tube, unscrew the silver cap from the humidity sensor.
-
Remove the two pronged sensor by grasping the edges.
Use caution not to touch the flat edge, as it will throw the reading off.
-
Push and hold the PROG button until “Level 2” appears in display.
-
Press the PROG button to step through the menu until “TECH’ is displayed.
-
Using the timer buttons (10) enter code of 11221122.
-
Press the PROG button to step through menu to step 15.
-
Insert the two prongs of the calibration board marked 20% into the humidity sensor.
-
Press and hold 1, then press the Down arrow button. Release both buttons. 20% should then show in display.
-
Reverse calibration board and insert the two prongs marked 80% into humidity sensor.
-
Push and hold 2 then press the Down arrow button. Release both buttons. 80% should then show in display.
-
Push PROG button to step 16.
-
Find the offset number on the mounting plate of the humidity sensor.
When changing the control board on units with serial number IV178JB and below, no offset will be found. Leave offset at 0.
-
Push and hold 2, then press the Up arrow button and the Down arrow button to enter the offset number.
-
Press and hold the PROG button to exit Tech Mode.
-
Reinstall two pronged sensor into humidity sensor.
-
Reinstall silver cap and sensor cover, and unit is now ready for use.
Related Content
Replacing the Water Heater High Limit
HHC 99X Troubleshooting Low Water Level
HHC 99X Troubleshooting the E-12 Water Heater Sensor Failure Error Code
Replacing the Water Heater High Limit
Replacing the Water Valve Solenoid (Auto-fill Units)
Cleaning the Water Strainer (Auto-fill Units)
HHC 98X Troubleshooting No Water, Float Switch Failed
HHC 98X Troubleshooting Water Level Low, Please Add Water
HHC-98X Troubleshooting the E-12 Water Heater Sensor Failed Error Code
HHC 98X Troubleshooting the E-17 Humidity Sensor Failed Error Code
Reference