Troubleshooting an E-82 Error Code
multimeter
screwdriver
Overview
| Error Code | Description |
|---|---|
| E-82A | Selector valve not detected. Jumper not detected on pins 1 &2 of 6 pin selector valve wiring harness. |
| E-82B | Home Switch failed, Position Switch still working. Selector valve will not operate |
| E-82C | Both switches failed, Valve will not operate. |
| E-82D |
Position switch failed, Valve will not operate. Note: In versions prior to July 2012, if the Home Switch is working but the Position Switch has failed (E- 82D), the selector valve defaults to “timing mode” and the error message at control power-up or failed calibration sequence is: *NOTICE*POSITION SWITCH FAULT, TIMING MODE IN USE |
Checking the Voltage

|
SHOCK HAZARD To avoid electrical shock, perform relay checks or transformer checks as described as instructions. |
The following checks are performed with the wall circuit breaker closed and the main power switch in the ON position. Extreme caution should be taken. Make connections before applying power, take reading, and remove power before removing meter leads, or electrical shock could result.
-
Power fryer off and back on with the main power switch.
-
Listen for the selector drive motor.
-
If it is not running, turn the main power switch off.
-
Lower the control.
-
Unplug the supply voltage connector to the drive motor.
-
Attach the test leads and turn voltage meter to DC voltage.
-
Turn the main power switch on and check the voltage. Voltage should read 24-28 volts DC range.
-
If voltage is within range, refer to Replacing the Selector Valve Drive Motor to replace the drive motor.
Checking the Calibration
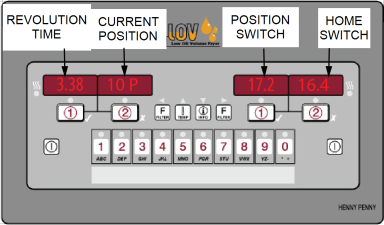
Refer to Operating Components for button and indicator descriptions and locations.
-
Power fryer off and back on with the main power switch.
-
Listen for the selector drive motor to rotate.
-
Open fryer door and look at selector drive motor shaft.
-
If the shaft is rotating, on the control enter the calibration menu.
-
Press and hold both Filter buttons at the same time.
-
Press a Filter button until Pumps and Valves displays.
-
Press the Info button to select this menu.
-
Press the number 3 product button and then press the number 1 confirm button to begin the calibration.
A blue light flashes for Home switch and a Yellow light flashes for the Position switch. If neither light flashes during calibration, then the motor isn’t turning or there is a problem with the switches.
-
-
Ensure the position switch number is begin 12 and 18.
A zero on either or both switches indicates a faulty switch assembly.
If you have a number outside the 12-18 range, adjust the selector valve switch.
Exit the calibration menu by pressing and holding both filter buttons at the same time.
Troubleshooting Intermittent Issues
-
Lower the control, to check the connections behind the control panel.
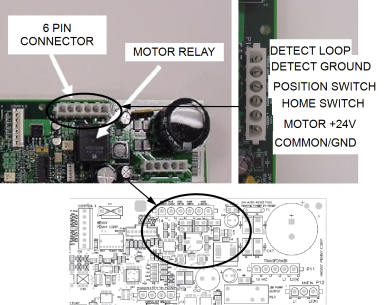
-
On the AIF board, unplug the six pin connector supplying voltage and the switch and plug these back in.
-
Unplug the drive motor wiring connector and plug it back in.
-
Unplug the communication cable and plug it back in.
Related Content
Adjusting the Drain Valve Actuator
Troubleshooting Oil Not Pumping
Replacing the Flange Filter Pump and Motor Assembly
Replacing the Hubmounted Filter Pump and Motor Assembly
Replacing the Selector Valve Drive Motor
LVG 20X Troubleshooting the E-18 Level Probe Failure Error Code
LVG 20X Troubleshooting the Oil Not Pumping
LVG 200 Generation 2 to Generation 4 Selector Valve Retrofit
Reference