Replacing the Elements
The fryers are equipped with as few as two heating elements or as many as eight elements. If one of the small elements in the middle needs replacement, one or two of the elements must also be removed to gain access to the faulty element.

|
To avoid electrical shock or property damage, move the power switch to OFF and disconnect power. |
Removing
-
Drain oil from vat containing faulty element and any adjoining split vats from which heaters must be removed to gain access to defective element.
-
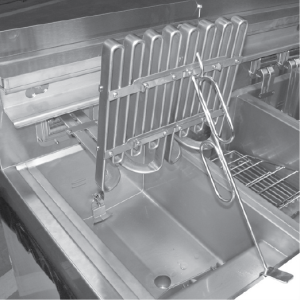
Using lift tool, raise the affected heating elements to assist in replacement of the faulty element and support them using vat lids or piece of lumber.
-
Using crosshead screwdriver, remove 6 screws and rear shroud.
-
Using a 1/2 inch wrench, remove eight cap screws and two pivot blocks holding faulty heater in place.
NOTE: Carefully gather up any slack in the lead wires for the heaters in the adjoining vats at the back of the fryer to minimize the amount of disassembly of the pivot blocks and heaters to keep from disconnecting all the wires but allow the defective heater to be replaced.
-
As needed, repeat previous step to remove any other pivot blocks for adjoining split vats that help hold the faulty heater in place.
-
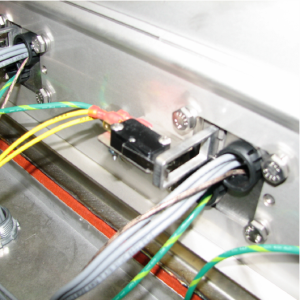
Remove element sense switch arm from heater pin and separate heater from pivot blocks.
-
Using 3/8 inch socket, remove nut and ground wire from stud.
-
Disconnect three heater wires from corresponding contactor in controls area behind control panels. Pull 2 leads to rear of fryer. Leave one lead in place to pull new leads through.
-
Disconnect two sensor wires from high temperature limit control in panel beside JIB. Pull one lead to rear of fryer.
-
Record routing of lead wires through pivot blocks and fryer sheet metal for use when installing new element.
-
Cut the two leads left in place and pull all remaining lead wires through pivot block. Remove heating element.
-
Inspect and replace defective pivot block seals and O-rings.
Installing
-
Position new element between pivot blocks and route lead wires through blocks and sheet metal as recorded earlier.
-
Assemble heater elements, pivot blocks, and switch arms making sure arms fully engage the pins on the elements and that no wire leads are pinched or severely kinked.
-
Working from the center out, install all pivot blocks making sure arms are located over switches and secure each block with four screws. Tighten screws finger tight only.
-
Tape new thermocouple leads to old lead left in place, route to panel beside JIB, and connect lead wires to high limit control.
-
Tape new power leads to old lead left in place and route to controls area at front of fryer and connect to contactor.
-
Align pivot blocks and heaters straight across front of fryer and snug screws. Lower elements into vats and adjust each so no elements rub sides of vat. Make sure wires are clear and element sense switches operate properly.
-
Torque each heater retaining bolt to 70 inch pounds.
-
Connect ground wires, install panel, restore power, and test operation of fryer.
Related Content
Replacing the Temperature Probe
Replacing the Element Sense Switch
Troubleshooting Solid State High Limit
LVE 20X Troubleshooting the E-5 Oil Overheating Error Code
LVE 20X Troubleshooting the E-6 Temperature Probe Failure Error Code
LVE 20X Troubleshooting the E-10 High Limit Error Code
LVE 20X Troubleshooting the E-18 Level Probe Failure Error Code
LVE 20X Troubleshooting the E-20A Fan Sensor Stuck On Error Code
LVE 20X Troubleshooting the E-21 Heat Recovery Failure Error Code
LVE 20X Troubleshooting the E-22 No Heat Error Code
LVE 20X Troubleshooting the E-31 Elements Up Error Code
Reference