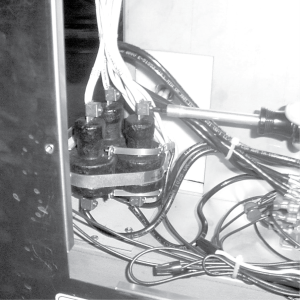
The electric fryer requires two switching contactors: a primary and a heat contactor.
Primary Contactor
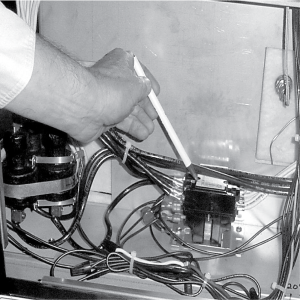
The primary contactor energizes (contacts close) any time the POWER/PUMP switch is in the POWER position, and the temperature of the oil is below 420° F ( 215° C). The high limit cuts power at the primary contactor if the temperature of the oil is above 420° F ( 215° C). The primary contactor supplies power to one side of the heat contactor.
Heat Contactor
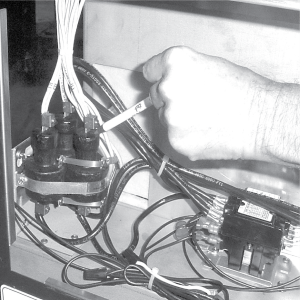
The heat contactor is controlled by the computer controller. When the controller calls for heat, the heat contactor applies power to one side of the heating elements. When the heat contactor and primary contactor are energized (contacts closed) the electric heating elements heat the oil.
The photo shows a mercury heat contactor, but CE countries will have an electromechanical heat contactor.
Checkout

|
To avoid electrical shock or property damage, move the power switch to OFF and disconnect power. |
-
Remove electrical power supplied to the fryer.
-
Remove the control panel.
-
Label and remove wires from contactors and perform a check on both contactors as follows:
Test Points Results From 23 to 29 open circuit From 24 to 28 open circuit From 25 to 27 open circuit From 30 to 34 open circuit From 31 to 35 open circuit From 32 to 36
open circuit From 33 to 37 ohm reading 1700 From 22 to 26 ohm reading 415 
-
With power reapplied and in a heat-up mode, check the power going to both contactor coils. This is to be sure power is going to the contactors.
If no voltage is found going into the primary contactor coil, check wiring, high limit, and drain switch. If no voltage at heat contactor coil check wiring and connections at PC board.
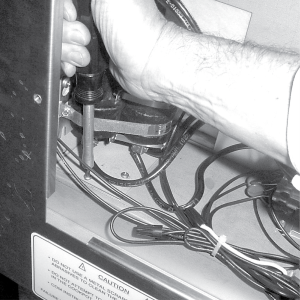
Replacement
If either contactor proves defective, replace as follows:
|
|
To avoid electrical shock or property damage, move the power switch to OFF and disconnect power. |
-
Label and remove only those wires directly connected to the contactor being replaced.
Removing the left side panel may be helpful in replacing the heat contactor.
-
Remove the mounting screws on the base plate of the primary contactor and remove contactor. Proceed to step 5.
-
Remove the screws securing the mercury contactor bracket to the mounting plate and remove bracket and contactor.
-
Remove the screws securing the contactor to the bracket and remove contactor from bracket.
-
Install new contactor in reverse order.
-
Install control panel and reconnect power to the fryer and test for proper operation.
Related Content
Replacing the High Temperature Limit Control
Replacing the Temperature Probe
Replacing the Heating Elements
Electric Power Cord Routing and Attachment Installation Instructions
Troubleshooting the PFE 591 E-5 Oil Overheating Error Code
Troubleshooting the PFE 591 E-6 Temperature Probe Error Code
Troubleshooting the PFE 591 E-10 High Limit Error Code
Reference