Specifications
|
Height: |
61” (155 cm) |
|
Width: |
24” (61 cm) |
|
Depth: |
41¾” ( 107 cm) |
|
Floor Space: |
Approximately 7 sq. ft. (0.65 sq. m.) |
|
Vat Capacity: |
8 head of chicken - 21 lbs (9.5 kg) 100 lbs oil (45 Kg) |
|
Electrical: |
208 VAC, 3 Phase, 50/60 Hz, 17 KW, 47.2 Amps 240 VAC, 3 Phase, 50/60 Hz, 17 KW, 40.9 Amps 200 VAC, 3 Phase, (Delta), 50/60 Hz, 17 KW, 49.1 Amps 240 VAC, 3 Phase, (Delta), 50 Hz, 17 KW, 40.9 Amps 380 VAC, 3 Phase, 50 Hz, 17 KW, 25.8 Amps 415 VAC, 3 Phase, 50 Hz, 17 KW, 23.7 Amps |
|
Heating: |
Two 8,500 watt electric immersion elements |
|
Shipping Weight: |
Approximately 758 lbs. (344 kg.) |
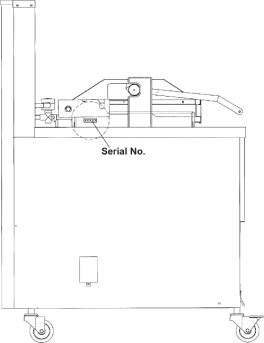
Data Plate Location
A data plate, located on the right side panel, gives the information of the type of fryer, serial number, warranty date, and other information pertaining to fryer.
In addition, the serial number is stamped on the outside of the counter top.
Concept Information
Related Content
Information about the 591 Fryers
Troubleshooting the 591 Fryers
Inspecting Counterweight Cables
Cleaning the Safety Relief Valve
Testing and Replacing the Fuse Holders
PFE 590 and 591 Electronic Control Retrofit Computron 7000 to New Electronic Controls
PFE 592 (FAST Controls) to 590 (Henny Penny Controls) Retrofit Instructions
Retrofit Control Instructions 290-590 KFC to 291-591 GM
Retrofit 292-592 Fast KFC to 291-591 Controls Instructions
FM08-481 8 Head Replacing the Control
Troubleshooting the PFE 591 E-41 Control Programming Lost Error Code
Replacing the High Temperature Limit Control
Replacing the Temperature Probe
Replacing the Heating Elements
Electric Power Cord Routing and Attachment Installation Instructions
Troubleshooting the PFE 591 E-5 Oil Overheating Error Code
Troubleshooting the PFE 591 E-6 Temperature Probe Error Code
Troubleshooting the PFE 591 E-10 High Limit Error Code
Testing and Replacing the Power/Pump Switch
Replacing the Drain Microswitch
Replacing the Drain Valve and Extension
Direct-Connect Retrofit Instructions (For use on fryers after SN: 290-BE0401001 & 591- LG014JC)
Filter Rinse Hose Retrofit Instructions
Troubleshooting the PFE 591 E-15 Drain Open Error Code
Troubleshooting the PFE 591 Oil Not Pumping Error Code
Replacing the Lid Counterweight Cables
Troubleshooting the PFE 591 E-20A Pressure Switch Stuck Closed Error Code
PFE 590 and 591 Installing Optional Crumb Basket
Label Application and Location for the 8 Head Fryer
Reference