Replacing the CFE 410 and 420 WiFi Harness
 Required tools
-
Crosstip screwdriver or drill
-
5/16" (8 mm) wrench
Kit contents
-
Control Harness - TX, T, RX, R, DCG
Kit number
141005
Estimated Time
10 minutes
Follow these instructions to replace the CFE 410/420 Wi-Fi harness.
If connection issues continue after completing the Wi-Fi Verification and Troubleshooting Instructions, follow the steps below to diagnose if the wire harness within the control is causing the issue and replace if needed.

|
Only perform this procedure when the unit is cool or severe burns may result. |
Checking Communication
-
Press PROG + INFO buttons simultaneously. INFO MODE will flash on the display screen.
-
Press PROG or INFO buttons to navigate to the RADIO INFO menu.
-
Press the DOWN button repeatedly until the MAC ADDRESS menu is displayed.
-
If the radio is detected and communicating, MAC XXXXXXXX will be displayed with the X digits being specific to the installed radio. The harness is functioning properly.
-
If the radio is not detected and communicating, MAC UNKNOWN will be displayed. Replacing the harness may resolve the issue. Follow the steps below.
-
Preparing Fryer
-
Turn power switch off.
-
Remove power from the unit.
Replacing Harness
-
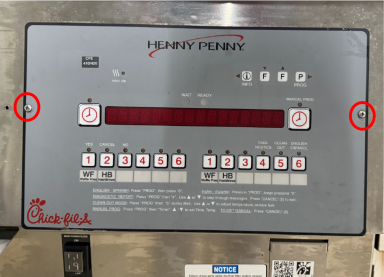
Remove the screw on each side of the panel to lower the panel assembly. Set screws aside for reuse later.
-
Remove the four nuts holding the rear control cover in place. Set nuts aside for reuse later.
-
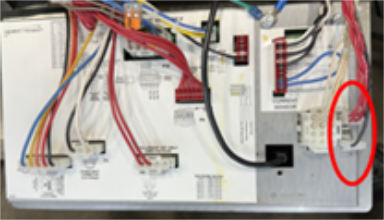
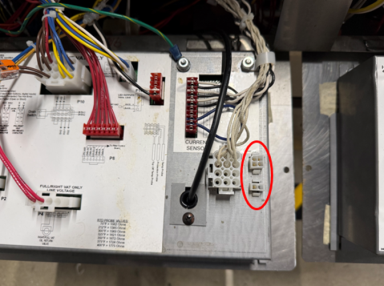
Disconnect the two radio communication connectors from the rear of the control by pinching the tabs on each side of the connector and pulling away from the control.
-
Remove the radio communication headers from the rear control cover by pressing the tabs on each side and pushing the connectors back through the cover.
-
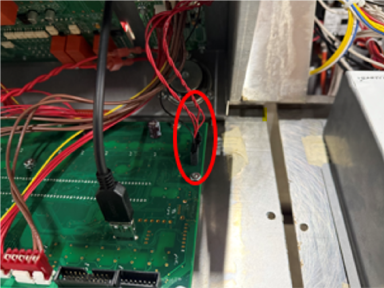
On the opposite end of the harness, disconnect the harness from the PCB board by pressing the tab on the side of the connector and pulling away from the PCB. The removed harness can be discarded.
-
Connect the new harness to the PCB by pushing the connector into the back of the PCB and pushing the connectors on the opposite end up through the rear control cover.
-
Reinstall four nuts to hold the rear control cover in place.
-
Reconnect the two radio communication wires by pressing them into the mating connectors in the rear control cover.
-
Reinstall the control panel.
-
Restore power to the unit and repeat steps 1-3 in Checking Communication section to verify the control and radio are now communicating.
-
After restoring power and allowing the unit to start up, an additional power cycle may be required for the control(s) and the radio to sync. To do this:
-
Locate the two circuit breaker buttons under the front panel to the left of the drain knob.
-
Press and hold both buttons for approximately 2 seconds. While pressing the buttons, the control LED display will turn off.
-
Return fryer to operation.
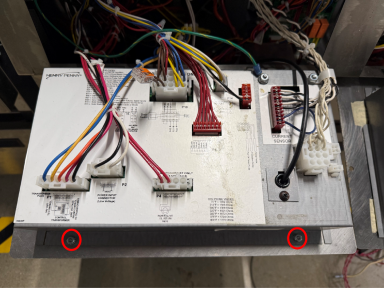
NOTE: Two additional nuts (not shown) are on the other side of the cover toward the fryer.
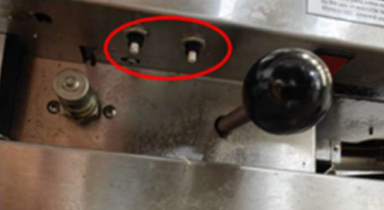
NOTE: For CFE 420, the power cycle needs to be performed on the right vat circuit breakers to ensure the radio is also cycled.
Related Content
Replacing the Circuit Breakers
Replacing the Control Board Transformer
Replacing Complete Control Panel
CFE 410/420 Troubleshooting the E-41 Programming Settings Lost Error Code
CFE 410/420 Troubleshooting the E-60 AIF Communication Failure Error Code
Reference