Replacing the Drain Valve

|
To avoid electrical shock or property damage, move the power switch to OFF and disconnect power. |
|
|
Burn Risk Using PPE, remove hot oil from fryer before performing procedure or personal injury may occur. |
|
|
Burn Risk Do not attempt this procedure while the fryer is in use or the vat is hot. Severe burns may result. Only perform this procedure when the fryer is cool and disconnected from the power source. |
Drain Valve Removal Procedure
This procedure has two main steps, remove the drain valve assembly from the vat's drain and then disassemble the drain valve.
Remove the Old Drain Valve
-
Ensure the oil is drained from the vat and filter pan, remove the filter pan and set aside, and then remove the power from the fryer.
-
Use a cross-tip head screwdriver to remove the left-side panel to access the drain valve.
-
Disconnect the wires (connector) from the micro switch on the drain valve lever. Do not remove the micro switch.
-
Disconnect the drain rod from the drain valve lever.
-
Use an adjustable wrench to remove the drain valve from the drain.
Disassemble the Old Drain Valve
Notice the orientation of the components attached to the drain valve. Take note of the sequence of parts stacked on the stem. Notate the position of all the components before disassembly.
-
Note the order of parts on the valve stem.
-
Remove all the hardware from the stem stack. Do not remove the switch from the bracket.
-
Remove the O-ring form the inside top of the drain valve.
Drain Valve Installation Procedure
This procedure has two main steps assemble the drain valve and then install the drain valve assembly to the vat's drian
Assemble the New Drain Valve
The new drain valve is shipped with two washers and a nut installed on the drain stem. Technicians should replace the old parts with the new parts during the assembly of the drain valve.
-
Remove the nut and washers from the drain valve stem and set aside.
-
Insert O-ring in to the bottom of the drain valve.
-
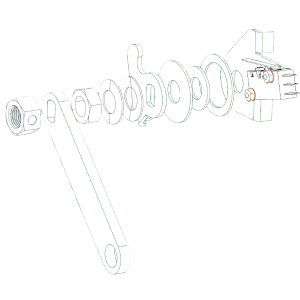
Install the following components on the drain valve in the following order:
-
Switch bracket with micro switch.
-
Containment washer.
-
Teflon thrust washer.
-
Compression washer.
-
Valve rotation stop / trigger.
-
Belleville washers.
-
Nut 1/2-20.
-
-
Tighten the 1/2-20 nut to snug (zero torque) on the drain valve stem.
-
Add 1/4 to 1/2 half turn with a wrench. Do not overtighten.
-
Install linkage arm, and then lock nut on the drain valve stem.
-
Tighten the lock nut to snug (zero torque) on the drain valve stem.
-
Add 1/4 to 1/2 half turn with a wrench. Do not overtighten.
-
Ensure the linkage can move smoothly through the entire range of motion.
Installing the New Drain Valve
Ensure the drain valve stem is orientated toward the notch in the insulation tray.
-
Use white Loctite and an adjustable wrench to install the drain valve to the drain.
-
Ensure the drain valve stem is oriented toward the notch in the insulation tray that is on the bottom of the vat.
-
Connect the drain rod to the drain valve lever.
-
Connect the wires (connector) to the micro switch on the switch bracket.
-
Install the filter pan and fill vat with oil.
-
Return power to the fryer.
-
Test the drain valve operation.
-
Use a cross-tip head screwdriver to install the left-side panel.