Calibrating and Replacing Humidity Sensor
crosshead screwdriver
1-3/16" wrench
The humidity sensor detects the cabinet humidity and relays that information to the controls. If it becomes faulty, "E-17", then "HUMIDITY SENSOR FAILED" displays. Replace sensor as follows:

|
To avoid electrical shock or property damage, disconnect power before installing or servicing equipment. A qualified technician must perform the service procedures. |
Replacement:
-
Using a crosshead screwdriver, remove the four screws securing the control panel.
-
Lower control panel, remove connectors from the back, and remove panel from unit.
-
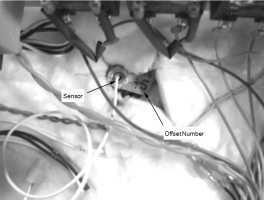
Pull the sensor assembly from the top of the cabinet.
-
Connect wires to control panel and re-install panel. Perform sensor calibration using below instructions before installing sensor cover.
-
After calibration is complete, install cover.
Calibrating:
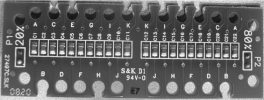
Calibrate the humidity sensor after a sensor or control replacement. A calibration board is supplied with each control kit and humidity sensor kit, but can also be ordered separately under part number 14391.
AHC-993 ONLY (AHC-990 continue onto step 12)
-
Unscrew the silver cap from humidity sensor.
-
Remove the two pronged sensor by grasping the edges.
Touching the flat side will throw the reading off. Try not to touch the flat side.
-
Press and hold PROG button
 until "Level 2" displays.
 -
Press PROG button
to step through the menu until "TECH' displays.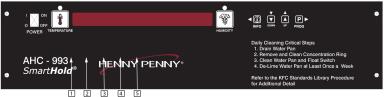
-
Using the hidden buttons, enter code of 11221122.
-
Press PROG button
to step through menu to "HUMIDITY--CIRCUIT CAL". -
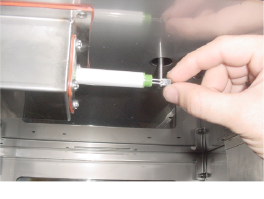
Insert the two prongs of the calibration board marked 20% into the humidity sensor.
-
Press and hold hidden button 1, then press Down arrow button
 . Release both buttons. a 4-digit number between 55.00 & 75.00 should display.
 -
Reverse calibration board and insert the two prongs marked 80% into humidity sensor.
-
Press and hold hidden button 2 then press Down arrow button
. Release both buttons. a 5-digit number around 110.00 & 130.00 should display. -
Press PROG button
until "HUMIDITY SENSOR -- CALIB/OFFSET" displays.
-
Find the offset number on the mounting plate of the humidity sensor.
-
Press and hold hidden button 2, and press Up arrow button
 or Down arrow button to enter offset value.
 -
Press and hold PROG button
to exit Tech Mode. -
Remove calibration board from controller and replace with humidity sensor connector.
-
Reinstall controller on unit and unit is ready for operation.