Replacing the Elements

|
To avoid electrical shock or property damage, move the power switch to OFF and disconnect power. |
-
Drain the oil from the vat :
-
Press and hold a Filter button until *FILTER* *MENU* displays.
-
Then, once “1.AUTO FILTER” displays, press the Down arrow button three times until “4. DRAIN TO PAN” displays.
-
Press √ button and “DRAIN TO PAN” “YES NO” displays.
-
Press √ button again display shows “DRAINING”, and oil drains from vat.
-
Once oil has drained, display shows “VAT EMTY” “YES NO”. Visually check that vat is empty and press √ button, display shows “DRAIN CLOSING...” and drain closes.
NOTICE -
To avoid equipment damage, do not use element lifting tool near the high limit bulb.
-
-
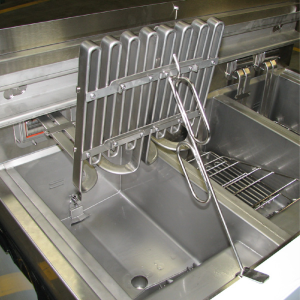
Using the lift tool, lift the hinged element from the vat and position tool to support and keep the element raised up.
-
Remove two screws, two high limit guards, and high limit sensing bulb from heating elements as needed.
-
Remove remaining four or six screws, spreader straps, element feet, and spreader bars from the heater being replaced.
-
Remove two screws and front and rear capillary brackets if replacing left heater of a full vat or a split vat heater.
-
Using a crosshead screwdriver, or screw gun, remove nine screws and rear panel.
-
Trace lead wires of heater element to be replaced, to its respective contactors, tag each wire, and disconnect heater lead wires from contactors.
-
Remove fasteners and cable clamps, wire ties, and cable wrap from heater lead wires as needed.
-
Remove two screws, and while raising heater element up out of vat, carefully pull lead wires through pivot housing to remove heater element.
-
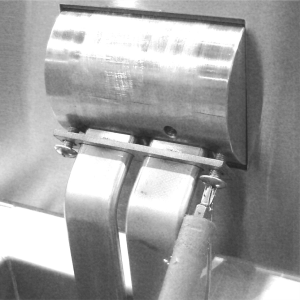
Install new o-rings over new heater lead wires and position them against the heater mounting plate.
-
Place new heater element near vat, pass lead wires through pivot housing, lower heater into vat, align holes of heater retainer plate with the holes in the pivot housing and install two screws.
-
Route lead wires to contactors and connect the wires to each contactor terminal.
NOTICE -
Route and gather the excess heater element wiring to eliminate any strain to the wires, or the wire leads may pull out of the heating element causing element failure and electrical shorts.
-
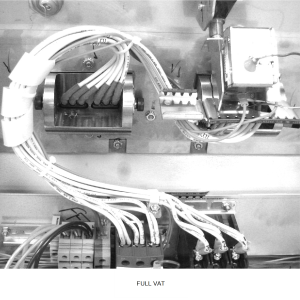
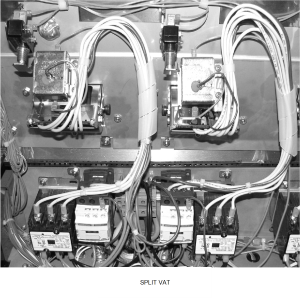
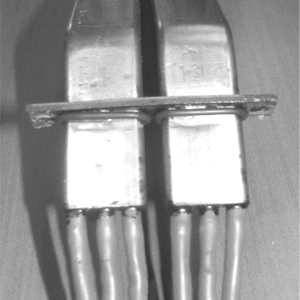
Gather any slack in the lead wires as close to element pivot housing as possible similar to the arrangements shown at left for a full vat or split vat. This will allow the leads to move freely with the normal up and down movement of the heating element.
-
Install cable wraps, cable clamps and fasteners, and new wire ties in the same general locations from where they were removed in step 8.
-
Reassemble the remaining parts in the reverse order and turn power on to the fryer.
-
Fill the vat:
-
Press and hold a Filter button until *FILTER* *MENU* displays.
-
Then, once “1.AUTO FILTER” displays, press the Down arrow button four times until “5.FILL POT FROM DRN PAN” displays.
-
Press √ button; “FILL POT FROM DRN PAN” “YES NO” displays.
-
Press √ button again, display shows “FILLING” “STOP?”and oil fills vat.
-
Press √ button again, display shows “FILL POT FROM DRN PAN” “YES NO”. When vat is full, press X twice to return to normal operation.
-
Related Content
Replacing the Temperature Probe
Replacing the Element Safety Switch
LVE 10X Troubleshooting the E-5 Oil Overheating Error Code
LVE 10X Troubleshooting the E-6 Temperature Probe Failure Error Code
LVE 10X Troubleshooting the E-10 High Limit Error Code
LVE 10X Troubleshooting the E-18 Level Probe Failure Error Code
LVE 10X Troubleshooting the E-20A Fan Sensor Stuck On Error Code
LVE 10X Troubleshooting the E-21 Heat Recovery Error Code
LVE 10X Troubleshooting the E-22 No Heat Error Code
LVE 10X Troubleshooting the E-31 Elements Up Error Code
Reference