Replacing the Temperature Probe
The temperature probe relays the actual oil temperature to the control. If it becomes disabled, “E-6” displays. Also, if the temperature is out of calibration more than 10°F, or 10°C, the temperature probe should be replaced.
An Ohm check can be performed also.
| Temperature (Fahrenheit) | Temperature (Celsius) | Resistance Ohms |
|---|---|---|
| 50 | 10,00 | 1 039,02 |
| 60 | 15,56 | 1 060,65 |
| 70 | 21,11 | 1 082,24 |
| 80 | 26,67 | 1 103,80 |
| 90 | 32,22 | 1 125,32 |
| 100 | 37,78 | 1 146,81 |
| 110 | 43,33 | 1 168,26 |
| 120 | 48,89 | 1 189,67 |
| 130 | 54,44 | 1 211,05 |
| 140 | 60,00 | 1 232,39 |
| 150 | 65,56 | 1 253,70 |
| 160 | 71,11 | 1 274,97 |
| 170 | 76,67 | 1 296,20 |
| 180 | 82,22 | 1 317,40 |
| 185 | 85,00 | 1 327,99 |
| 190 | 87,78 | 1 338,57 |
| 200 | 93,33 | 1 359,69 |
| 210 | 98,89 | 1 380,79 |
| 212 | 100,00 | 1 385,00 |
| 220 | 104,44 | 1 401,84 |
| 230 | 110,00 | 1 422,86 |
| 240 | 115,56 | 1 443,85 |
| 250 | 121,11 | 1 464,79 |
| 260 | 126,67 | 1 485,71 |
| 270 | 132,22 | 1 506,58 |
| 280 | 137,78 | 1 527,43 |
| 290 | 143,33 | 1 548,23 |
| 300 | 148,89 | 1 569,00 |
| 310 | 154,44 | 1 589,73 |
| 320 | 160,00 | 1 610,43 |
| 325 | 162,78 | 1 620,77 |
| 330 | 165,56 | 1 631,09 |
| 340 | 171,11 | 1 651,72 |
| 350 | 176,67 | 1 672,31 |
| 360 | 182,22 | 1 692,86 |
| 365 | 185,00 | 1 703,13 |
| 370 | 187,78 | 1 713,38 |
| 380 | 193,33 | 1 733,87 |
| 390 | 198,89 | 1 754,31 |
| 400 | 204,44 | 1 774,72 |
| 410 | 210,00 | 1 795,10 |
| 420 | 215,56 | 1 815,44 |
| 430 | 211,11 | 1 835,74 |
| 440 | 226,67 | 1 856,01 |
Checkout

|
To avoid electrical shock or property damage, move the power switch to OFF and disconnect power. |
-
Support control panel bottom with one hand, loosen retaining screw at panel top, slide panel down slightly to clear screw, push panel bottom up, then swing panel top out and down.
-
Referring to the decal on the rear of the control panel, locate the 12-pin probe connector in the upper, right-hand corner. (An ohm chart is also shown on the decal.)

-
Pull the connector from the panel and using a multimeter, take an ohm reading on the appropriate oil temp pins. If ohm reading is significantly different than the chart, continue with replacement instructions.
Replacing
-
Drain oil from the vat:
-
Press and hold Filter button until *FILTER* *MENU*displays.
-
Then once “1.AUTO FILTER” displays, press three times until “4. DRAIN TO PAN” displays.
-
Press √ button and “DRAIN TO PAN” “YES NO” displays.
-
Press √ button again display shows “DRAINING”, and oil drains from vat. Once oil has drained, display shows “VAT EMTY” “YES NO”.
-
Visually check that vat is empty and press √ button, display shows “DRAIN CLOSING...” and drain closes.
-
-
Remove eight screws and rear, bottom panel (8 screws).
-
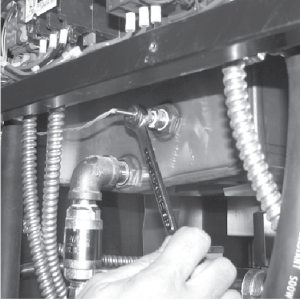
Using a 1/2 inch wrench, remove nut on compression fitting.
-
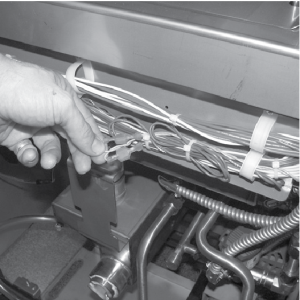
Using a terminal extractor, remove the probe terminals from the connector and remove the temperature probe from the vat.
-
Follow the probe wires and disconnect the two probe connectors. (These may be found behind control panel or behind the side panels, depending upon which vat is being serviced.)
-
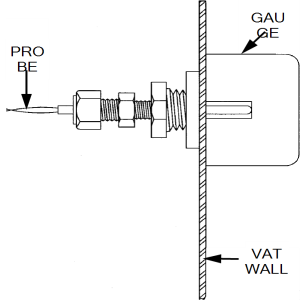
Place gauge against vat wall as shown.
-
Push temperature probe through until it makes contact with gauge.
-
Tighten temperature probe in place.
-
Connect new temperature probe to the two fryer connections.
-
Replace rear cover and reconnect power to vat.
-
Fill vat by pressing and holding a Filter button until *FILTER* *MENU* displays. Then once “1.AUTO FILTER” displays, press four times until “5.FILL POT FROM DRN PAN” displays. Press √ button; “FILL POT FROM DRN PAN” “YES NO” displays. Press √ button again, display shows “FILLING” “STOP?”and oil fills vat. Press √ button again, display shows “FILL POT FROM DRN PAN” “YES NO”. When vat is full, press X twice to return to normal operation.

|
Excess force will damage the temperature probe. |
Related Content
Replacing the Element Safety Switch
LVE 10X Troubleshooting the E-5 Oil Overheating Error Code
LVE 10X Troubleshooting the E-6 Temperature Probe Failure Error Code
LVE 10X Troubleshooting the E-10 High Limit Error Code
LVE 10X Troubleshooting the E-18 Level Probe Failure Error Code
LVE 10X Troubleshooting the E-20A Fan Sensor Stuck On Error Code
LVE 10X Troubleshooting the E-21 Heat Recovery Error Code
LVE 10X Troubleshooting the E-22 No Heat Error Code
LVE 10X Troubleshooting the E-31 Elements Up Error Code
Reference