Replacing the Transformers
These components drop the line voltage to low voltage components such as, control board, AIF board and contactors.

|
To avoid electrical shock or property damage, move the power switch to OFF and disconnect power. |
Checkout:
-
Perform Power Section troubleshooting:
-
Check to see that unit is plugged in
-
Ensure exhaust hood is operational
-
Check interlock circuit
-
-
Loosen the screw securing the top of the control panel.
-
Pivot the top of the panel down, allowing panel to be supported by 2 brackets in the slots in control shroud.
SHOCK HAZARD
To avoid electrical shock, perform relay checks or transformer checks as described as instructions.
The following checks are performed with the wall circuit breaker closed and the main power switch in the ON position. Extreme caution should be taken. Make connections before applying power, take reading, and remove power before removing meter leads, or electrical shock could result.
-
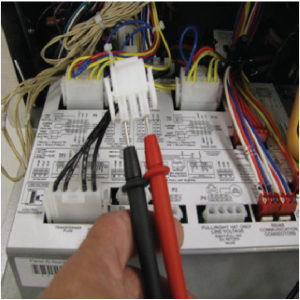
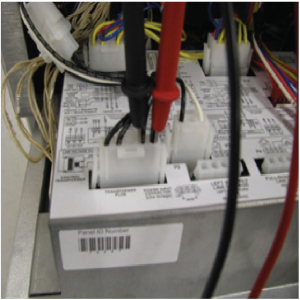
Remove 3 pin connector (P2) from back of control panel.
-
Set multi-meter to AC volts. With power ON, take voltage reading on 2 outside pins. Voltage should be 120VACDom. or 230VAC-Int’l. If no voltage, perform step 1.
-
Reconnect 3 pin connector to the back of control panel.
-
With power ON and 5 pin connector (P1) still connected, insert meter probes into back of P1 at positions 4 and 5. Voltage should be 120VAC-Dom. or 230VAC-Int’l.
-
With power ON and P1 still connected, insert probes into back of P1 at positions 1 and 2. Voltage should be 24VAC.
-
If proper voltage is present at positions 4 & 5 of P1 and no voltage at positions 1 and 2, replace the transformer.
-
If proper voltage is present at positions 1, 2, 4, & 5 of P1 and control panel has no display, unplug each connector from control panel, inspect pins and wire connections, repair as needed, and firmly plug each connector into panel.
-
If control panel still does not display, replace panel with a known good control panel. If problem follows control panel, replace panel.
Replacing
|
|
To avoid electrical shock or property damage, move the power switch to OFF and disconnect power. |
![]()
![]()
-
Loosen the screw securing the top of the control panel and lower the control panel.
-
Label and remove wires from (AIF) transformer, or disconnect white connector on the control transformer.
-
Using a 5/16 inch socket, remove nuts securing transformer and remove transformer.
-
Replace transformer in reverse order.
Related Content
Replacing the Temperature Probe
Replacing the Air Pressure Switch
Replacing the Ignitor and Flame Sensor
Replacing the Ignition Modules
Replacing the Pressure Transducer
LVG 10X Troubleshooting the E-5 Oil Overheating Error Code
LVG 10X Troubleshooting the E-6 Temperature Probe Error Code
LVG 10X Troubleshooting the E-10 High Limit Error Code
LVG 10X Troubleshooting the E-20A Fan Sensor Stuck On Error Code
LVG 10X Troubleshooting the E-20B No Draft Check Fan Error Code
LVG 10X Troubleshooting the E-20D Ignition Failure Error Code
Reference