Configuring the Serial Number
The serial number must be added correctly into the control or the WiFi module cannot receive or transmit data, including automated software updates.
Verify The Serial Number
-
Set the power switch to the off position.
-
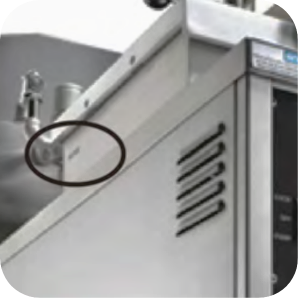
Locate the machine data plate on the inside of the filter pan door, and then record the serial number displayed on it. The serial number may be etched in the rear top left corner of the vat. Serial numbers may be one of two formats.
-
AAXXXXXXX (AA followed by seven digits)
-
BCXXXDE (Two letters followed by three digits followed by two more letters)
-
-
Press and hold "P" or "PROG" for 7-8 seconds until "L-2 LEVEL 2" displays and "CFA PROG / ENTER CODE" displays.
-
Press "P" or "PROG" twice, then "SET UP / ENTER CODE" will display.
-
Using the left product buttons, press 1, 2, 3 "SETUP MODE" will briefly display.
-
Compare the serial number displayed in SM-1 with the number you recorded.
-
Perform one of two actions:
-
If the serial number matches, press and hold "P" or "PROG" until "OFF" displays. The control will resume normal operation.
-
If the serial number is missing or does not match, follow either the 9 or 7 character serial number correction procedure.
-
Adding or Correcting a 9 Character Serial Number
You only need to enter the first four and last three digits; the "AA" is already populated.
-
Press the left-side clock button.
-
Press the right-side "1" for standard (STD).
-
Press the product keys to enter the first four digits of the serial number you recorded. The value of each product key is represented by the number below the product key.
-
Press "P" or "PROG" to continue.
-
Press the product keys to enter the last three digits of the serial number recorded.
-
Press "P" or "PROG" and "SAVE?", yes and no will display.
-
Do one of the following:
-
If the serial number is correct, press the right side "1" for "YES".
-
If the serial number is incorrect, press the right side "4" for "NO", and then repeat the previous steps.
-
-
Press and hold "P" or "PROG" until "OFF" displays. The control will resume normal operation.
Adding or Correcting a 7 Character Serial Number
-
Press the left-side clock button.
-
Press the "4" on the right side for custom (CUST). "EDIT" will appear and the current serial number displays.
-
Press either the up or down arrow once. The "1" and "INFO" and "P" or "PROG" LEDs will flash rapidly.
-
Press either the up or down arrow to find the letters and digits corresponding to the serial numbers recorded.
-
Once you have the correct letter or digit displayed press "P" or "PROG" to go back to a previous letter or digit, press "INFO". If "1", "INFO" or "P" LEDs stop flashing, restart process.
-
After entering the 7th character of the serial number, press the up or down arrows to find the underscore (_) which acts a space character. Enter the space character in the last two places.
-
For Example if your serial number is IB018JC, after entering all nine characters, "IB018JC " will display. There will be two trailing spaces after the serial number.
-
-
Press "P" or "PROG" until SM-1 and the serial number you entered will display.
-
Press and hold "P" or "PROG" until "OFF" displays. The control will resume normal operation.
Related Content
Second Level Programming for Chick-fil-A
Diagnostic Mode for Chick-fil-A
Setting the Clock for Chick-fil-A
PFE 500 C7000 One Button Programming
C2000 Special Programming for Wendy's
C8000 Default Product Settings
C8000 Program Settings Worksheet
C8000 Programming the Products
C8000 Copying and Erasing the Product Settings
Reference