Replacing Heating Element

|
To avoid electrical shock or property damage, move the power switch to OFF and disconnect power. |
Checkout
If the oil temperature recovery is very slow or at a slow rate than required, this may indicate defective heating element(s). An ohmmeter will quickly indicate if the elements are shorted or open.
- Remove Electrical power supplied to the fryer.
- Remove control panel.
- Disconnect the wires from the element and perform an ohms check on one element at a time. If the resistance is not within tolerance replace the element. (Refer to the table).
| Voltage | Wattage | Resistance (cold) |
|---|---|---|
| 208 | 7333 | 5.6 Ohms |
| 240 | 7333 | 7.5 Ohms |
| 480 | 7333 | 31.4 Ohms |
Replacement
-
Drain the oil from the vat.
-
Remove the high limit bulb holder from the heating element inside the fryer.
-
Remove the heating element wires from the terminals by removing the nuts and washers. Label each so it can be replaced on the new element in the same position.
-
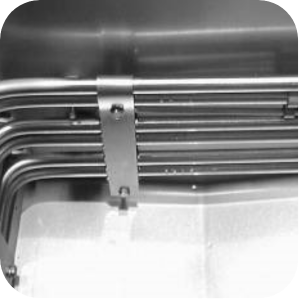
Remove the bolts form the five element spreaders. The element spreaders will now pull off the elements.
-
Remove the brass nuts and washers which secure the ends of the elements through the vat wall.
-
Remove the heating elements from the fryer as a group by lifting the far end and sliding them up and out toward the rear of the fryer.
-
Install new heating elements with the new O-rings terminal end first at approximately a 45° angle slipping the terminals through the front wall of the fryer.
-
Replace the brass nuts and washers on the element terminals, apply 30 foot lbs of torque when tightening nuts.
-
Evenly space the element spreaders on the sides of the elements and reinstall bolts.
-
Place the fifth spreader in the front of the elements as to protect the temperature probe.
-
Replace the high limit bulb holder on the top element.
-
Position the bulb between the top and second element midway from side to side.
-
Tighten the screw that holds the bulb in place.
-
Reconnect the wires to the appropriate terminal as labeled when they were removed.
-
Replace the front control panel.
-
Connect the power cord to the wall receptacle or wall circuit breaker.
Related Content
Replacing the High Limit Module
CFE 410/420 Troubleshooting the Solid State High Limit
Temperature Probe Gauge Instructions
CFE 410/420 Troubleshooting the E-5 Oil Overheating Error Code
CFE 410/420 Troubleshooting the E-6 Temperature Probe Error Code
CFE 410/420 Troubleshooting the E-10 High Limit Error Code
CFE 410/420 Troubleshooting the E-20A Fan Sensor Stuck On Error Code
CFE 410/420 Troubleshooting the E-26 Heat Amps Locked On Error Code
CFE 410/420 Troubleshooting the E-27 Amps Too Low Error Code
CFE 410/420 Troubleshooting an E-29 Error Code
CFE 410/420 Troubleshooting the Voltage Conversion
CFE 410/420 Troubleshooting the W-1 Low Voltage Error Code
CFE 410/420 Troubleshooting the W-2 Slow Heating Error Code
CFE 410/420 Troubleshooting the W-3 Was Not Ready Error Code
CFE 410/420 Troubleshooting the W-4 Slow Cooking Error Code
CFE 410/420 Troubleshooting the W-5 Slow Cooking Error Code
CFE 410/420 Troubleshooting the W-6 Slow Cooking Error Code
CFE 410/420 Troubleshooting the W-7 Low Amps Error Code
CFE 410/420 Troubleshooting the W-9 Discard Product Error Code
CFE 410/420 Troubleshooting the E-92 24V Current Limiter Fuse Tripped Error Code
Reference