cross tip screwdriver
Loctite 680 (green)
flat tip screwdriver
50 in-lbs torque wrench with cross-tip screwdriver
Plastic mallet
Loctite 680 (green)
Estimated Time
30 minutes
-
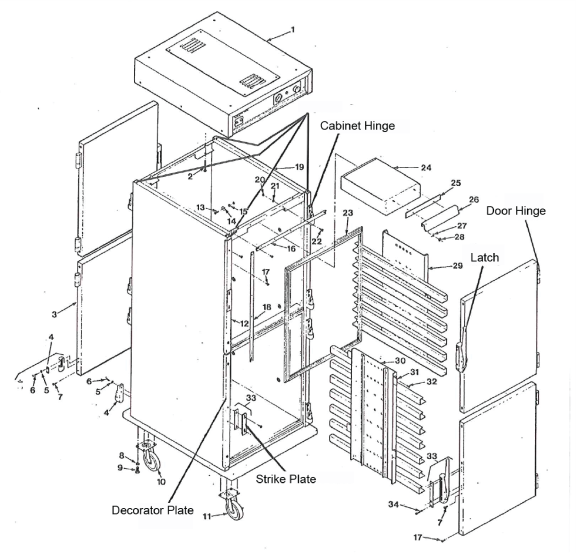
Remove the doors from the cabinet.
-
Reversing the door latch:
-
Remove the four screws from the handles.
-
Remove the latch, latch mounting plate, then clean parts and door surface under the latch mounting plate.
-
Flip latch and latch plate so that the handle faces the opposite direction (i.e. if the handle was down, reverse it so it faces up)
-
Apply Loctite 680 to the screws of the latch and reinstall.
-
Torque screws to 36 inch-lbs.
-
-
Reversing the door hinges:
-
Remove two screws from each hinge.
-
Remove hinge and adjustment plate, then clean and surface of the door under the adjustment plate.
-
Flip hinges and adjustment plates in opposite direction.
-
Apply Loctite #680 to each screw and reinstall.
-
Torque screws to 36 inch-lbs.
-
-
Reversing the strike plates:
-
Remove the strike plate.
-
Remove the two filler screws and door stop and reinstall these on the opposite side of the door opening.
-
Install the strike plate on the opposite side of the door opening.
-
-
Reversing the hinge:
-
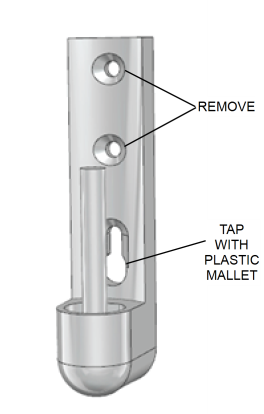
Remove only the two top screws from the cabinet hinges. Use a plastic mallet and tap the hinge up off of the bottom screw. Then, remove the bottom screw.
-
Remove filler screws from hinge mounting holes on opposite side of cabinet. Install these to plug holes where hinges were previously mounted.
-
Install the bottom hinge screw on the opposite side of the cabinet with Loctite #680. Leave the screw out far enough to slide the slotted hole of the hinge over it.
-
Apply Loctite #680 to each remaining screw. Torque screws to 36 inch-lbs.
-
Use a flat blade screwdriver to twist the white nylon part of the cabinet hinge around so that the slant is toward the inside of the cabinet.
-
-
Apply petroleum jelly to the white nylon of each cabinet portion of the hinge.
-
Hang doors on cabinet.
-
Ensure door makes a tight seal with gasket. If adjustment is needed, loosen hinge screws and slide adjustment plate accordingly.