Applies to:
![]()
PQE 500 Replacing High Limit Thermocouple
Crosstip screwdriver
Needle nose pliers
1/2 inch wrench
Torque wrench

|
Only perform this procedure when the unit is cool or severe burns may result. |
Follow these instructions to replace the left side High Limit "J-Type" Thermocouple.
-
Remove hot oil from the fryer.
-
Turn power switch off.
-
Ensure fryer is cool to the touch before moving.
-
Pull out the fryer and unplug from power source.

-
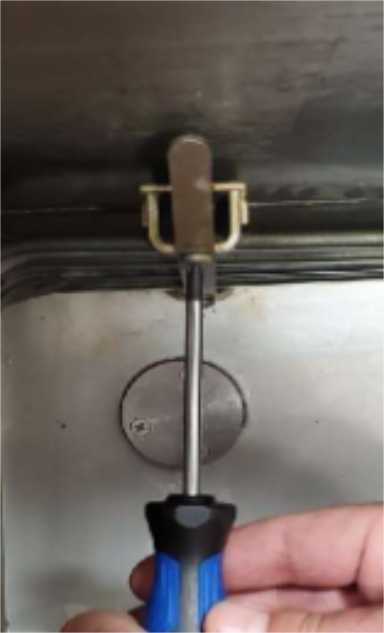
Using a crosstip screwdriver, remove the screws securing the left side panel.
-
Then, remove screws from control panel and carefully lower the control towards you.
-
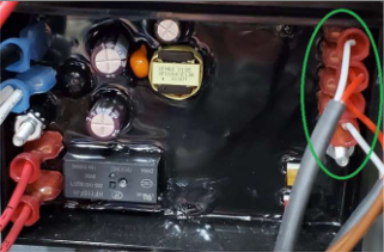
Access the left high limit module and carefully disconnect the thermocouple wires using needle nose pliers.
-
Access the elements and loosen the two crosstip head screws from the front left bracket securing the probe. Remove the bracket.
-
Using a 1/2 inch wrench, remove the compression bushing and high limit probe from the vat.
-
Apply High-Temp Loctite to new High Limit probe.
-
Install and tighten down main compression bushing making sure the bend of probe goes downward. NOTE: Do not tighten compression nut
-
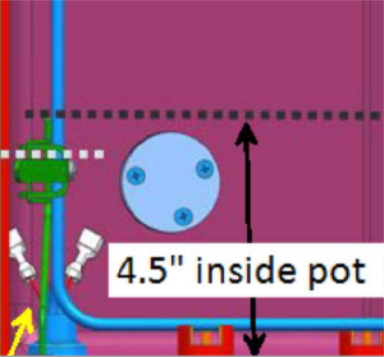
Install probe into bracket and snug bracket screws. NOTE: Do not fully tighten. Measure 4.5 inches from the vat (pot) wall to end of probe and adjust probe accordingly.
-
Tighten bracket screws to 22in-lbs.
-
Tighten High Limit compression nut to snug and then one 3/4 turn.
-
Working in reverse, complete steps 6 through 1 and return the fryer to service.

|
Do not over tighten compression nut. This can damage the probe. |
Related Content
Troubleshooting the E1 Low Oil Error Code
Troubleshooting the E5 Oil Too Hot Error Code
Troubleshooting the E-6 Main Temperature Probe Failed Error Code
Troubleshooting the E-10 (A-Y) High Limit Tripped Error Code
Troubleshooting the E-19 Protection Probe Failed Warning
Troubleshooting the E-25 Heat Amps Too High Error Code
Troubleshooting the E-26 Heat Amps Locked On Error Code
Troubleshooting the E-70B Power Switch or Wiring Failure Error Code
Troubleshooting the E-75 Contactor Near End-of-Life Error Code
Troubleshooting the W-2 Slow Heat Up Warning
Troubleshooting the W-4 Slow Cooking Warning
Troubleshooting the W-6 Slow Cooking Warning
Troubleshooting the W-7 Low Amps Warning
Troubleshooting the W-9 Discard Product Warning
PQE 500 Replacing Heating Element
Reference