Activating Setup Mode
Setup Mode is used to program the following fryer configuration settings:
-
Fryer Serial Number - It is critical that the serial number be set correctly. This establishes proper RIoT connectivity to the control.
-
Month, Date, Year - The current date is set automatically by the Wi-Fi radio. However, if the internet connection is unavailable, use this item to set the current date.
-
Time of Day - The current time is set automatically by the Wi-Fi radio. However, if the internet connection is unavailable, use this item to set the current time.
-
Clock Mode, Daylight Savings Time, and Time Zone - Use this item to set the local time settings and how it should be displayed.
Setup Mode can be automatically or manually activated. Refer to the information below for activating Setup Mode and programming each item.
Enabling Automatic Activation
Setup Mode automatically activates the first time the power switch is turned on for a new fryer or a newly installed replacement control. When pressing the power switch to ON:
-
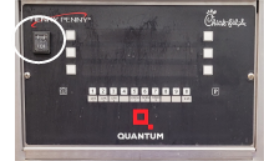
The control panel will display HENNY PENNY QUANTUM SERIES and CFA PRESSURE.
-
The SETUP MODE screen will display followed by the first programming item.
-
Make adjustments to the item, as needed, and navigate to the next item. After reaching the last item, navigate forward to exit Setup Mode and return the fryer to normal operation. Be sure to navigate through all items before exiting Setup Mode.
If Setup Mode activates each time the fryer is powered on, the setup was exited before completing all the items. Be sure to navigate through all the items, even if no adjustments are needed, before exiting Setup Mode.
Enabling Manual Activation
Setup Mode can be manually activated from the Programming menu. The Setup Mode will operate the same as automatic activation. To enter Setup Mode:
-
Press and hold the P (Prog) button until the Main Menu appears. Then, release the button.
-
Press and release the P (Prog) button again to access menu page 2.
-
Select 4. PROG option to activate the Programming menu.
-
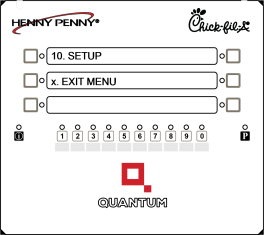
Press and release the P (Prog) button three times to access menu page 4.
-
Select 10. SETUP option to activate Setup Mode.
-
Enter manager access code (1-2-3).
-
Navigate through all the items and make adjustments, as needed.
-
To exit Setup Mode, press and hold the P (Prog) button. Other ways to exit are to press and hold the I (Info) button and P (Prog) button at the same time, or press and release the P (Prog) button and select 1. EXIT PROG.
IMPORTANT: When Setup Mode has not been completed and the fryer is ON, the control repeatedly beeps every few seconds to alert the user. This is in case the user walks away, assuming the fryer is heating. The beep notifies the user that the fryer is not heating and the control is waiting on the setup to be completed.
IMPORTANT: When Setup Mode has not been completed and the fryer is ON, the control repeatedly beeps every few seconds to alert the user. This is in case the user walks away, assuming the fryer is heating. The beep notifies the user that the fryer is not heating and the control is waiting on the setup to be completed.
Setting Fryer Serial Number
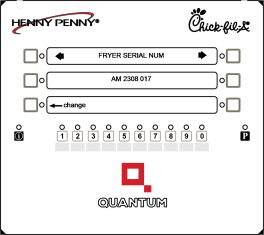
The fryer serial number must be set correctly. This is critical for establishing the proper RIoT connection to the control. If the serial number is incorrect:
-
Press the change arrow button. The CHANGE S/N screen will display.
-
Select STD (standard serial number). Then, AM will automatically display to indicate this is a Quantum Pressure fryer.
-
Using the number buttons, enter the last two digits of the year and month (YYMM) of the serial number. Press ✓ to advance to the next step.
-
Using the number buttons, enter the sequence number part of the serial number. Leading 0's can be omitted. For example, if the number is 005, just enter 5. Press ✓ to advance to the next step.
-
A confirmation screen will display. If the serial number shown in the middle is correct, press the YES button.
Setting Month, Date, Year

In case the Wi-Fi radio is unable to connect to the internet, the month, date, and year can be set by:
-
Press the right or left arrow to select SET MONTH, SET DATE, or SET YEAR.
-
Press the + or - button to adjust the month, date, or year, as needed.
Setting Time of Day

The time-of-day is usually set by the Wi-Fi radio. In case of internet connectivity issues, to set the time-of-day:
-
Press the right or left arrow to select SET HOUR or SET MINUTE.
-
Press + or - button to adjust the hour or minutes, if needed. For SET HOUR, notice the A (am) or P (pm) in the time as you scroll through the hour values. Set A or P correctly. For SET MINUTES, the displayed seconds value will reset to :00 each time the minutes value is adjusted.
Note: If the time setting seems to be off by a few hours, make sure the Daylight Savings Time and Time Zone options are set correctly. The (dst) appears on the screen to indicate the control is operating in Daylight Savings Time.
Setting Clock Mode, Daylight Savings Time, and Time Zone
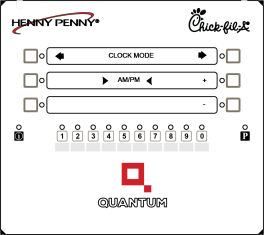
To set the Clock Mode, Daylight Savings Time (dst), and Time Zone:
-
Press the right or left arrow to select CLOCK MODE, DAYLIGHT SAVINGS, OR TIME ZONE.
-
Press + or - button to adjust each option.
-
For CLOCK MODE, select AM/PM or 24-HR. This affects how the time is displayed and does not adjust the current time.
-
For DAYLIGHT SAVING, selelct 1. NONE if no DST adjustment is needed. Otherwise, select the appropriate Daylight Savings Time.
-
For TIME ZONE, select the Time Zone offset from UTC. This is important when depending on internet date and time from the Wi-Fi radio.
-
Seeing Wi-Fi Radio Connectivity

The STORE NETWORK screen shows the IP address of the store Wi-Fi Access Point. When the IP address is shown, it indicates the control is connected to the store's Wi-Fi network.
-
Press the right or left arrow button to locate the STORE NETWORK option.
Related Content
Filling the Fresh Oil Tank (ATO)
Cleaning the Safety Relief Valve
Checking and Tightening Element Spreader Bars
Reference