SMS Control Special Programming
SMS Controls and Indicators
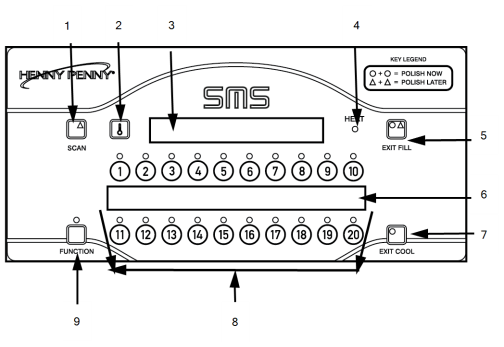
|
Item No. |
Description |
Function |
|---|---|---|
|
1 |
SCAN button |
Allows the operator to toggle through any running multiple timers. |
| 2 | Temperature Button | Allows the operator to read the temperature of the oil while in a Cook Cycle. |
|
3 |
Digital Display |
Shows all the functions of the Cook Cycle, Program Modes, Diagnostic Modes, and alarms |
| 4 | HEAT indicator | Illuminates whenever the control calls for heat; when oil temperature is reached, the heat light goes off. |
|
5 |
EXIT FILL button |
After filtering the fryer, if in the Filter Lockout Mode, the display reads “FILL” and the EXIT FILL button must be pressed. |
|
6 |
Menu Strip |
Shows the name of the product associated with each product button. |
|
7 |
EXIT COOL button |
After cooking or filtering the fryer automatically goes into cool mode (this keeps oil at a lower temperature to preserve oil life). The EXIT COOL button must be pressed to heat the oil to setpoint temperature. |
|
8 |
Product Select buttons |
Are used to select the product for cooking; to use them to start Cook Cycles. |
| 9 | FUNCTION button | Used in the programming of the controls |
Special Programming
Review Usage
- Press and hold the FUNCTION button for two seconds until “REG PROGRAM” displays. As soon as “REG PROGRAM” displays, press and release the FUNCTION button 1 time until “REVIEW USE” displays.
- “DAILY” displays. Press any of the product buttons to view the usage of that product. Press and hold the FUNCTION button to exit Special Program mode.
Reset Usage
- Press and hold the FUNCTION button for two seconds until “REG PROGRAM” displays. As soon as “REG PROGRAM” displays, press and release the FUNCTION button 2 times until “RESET USE” shows in display.
- When “CODE” displays, press 1-3-5. “DAILY will show in the display, and press any of the Product buttons to reset them to 0.
Factory Presets (F/C, Gas/Electric, Speaker Volume, Speaker Frequency, Codes, Initialize System)
Before attempting to change the other modes in the Factory Preset Mode, please call the Henny Penny Technical Service Department at 1-800-417-8417, or 1-937-456-8400.
- Press and hold the FUNCTION button for two seconds until “REG PROGRAM” displays. As soon as “REG PROGRAM” displays, press and release the FUNCTION button 3 times until “FAC PRESET” displays.
- When “CODE” shows on the display, enter 2-9-5-7. “DEG” and “MODE” flashes in the display. Press any of the product buttons to toggle from ºF to ºC, and vice versa.
- Press and release the FUNCTION button and “TYPE” and “FRYR” flashes in the display. Press any of the product buttons to toggle from “GAS” to “ELEC”, or vice versa.
- Press and release the FUNCTION button twice, and “SPKR” and “VOL” flashes in the display. The volume can be changed from 01 to 10, 10 being the loudest.
- Press and release the FUNCTION button 3 times, and “SPKR” and “FREQ” will flash in the display. The frequency can be set from 100 to 2000.
- Press and release the FUNCTION button 10 times, and “INITIALIZE SYSTEM” scrolls across the display. Press and hold any of the product buttons and the display will count down from 5. Once the display counts down, release the product button, and the control will set factory preset parameters into the controls.
Tech I/O Mode
- Press and hold the FUNCTION button for two seconds until “REG PROGRAM” displays. As soon as “REG PROGRAM” displays, press and release the FUNCTION button 4 times until “TECH I-O” displays.
- When “CODE” displays, press 2-4-6 (1-7-7-6 for CE units). “HEAT’, and “PUMP” shows alternately in the display. Also, the LEDs over 1 and 3 flashes alternately.
- To test the heat circuit, press and hold the 1 button.
-
To test the pressure system, press and hold the 2 button.
- To test the pump system, press and hold the 3 button.
Heat Control
- Press and hold the FUNCTION button for two seconds until “REG PROGRAM” displays. As soon as “REG PROGRAM” displays, press and release the FUNCTION button 6 times until “HEAT CNTRL” displays.
- When “CODE” displays, press 1-2-3-4. “MELT”, “EXIT”, and “TEMP” flashes in the display, along with the oil temperature at which the unit will exit the melt cycle. This should be set at 180º F (82º C), and should not be changed until the factory is consulted.
- Press and release the FUNCTION button and ”MELT”, “CYCLE”, and “100s” shows alternately in the display, along with the period (pulse) length of 4000. This should not be changed until the factory is consulted.
- Press and release the FUNCTION button twice and “MELT”, “ON-”, “TIME”, and “100s”, shows alternately in the display, along with the length of time the heat is on. This should be set at 1700, and should not be changed until the factory is consulted.
- Press and release the FUNCTION button three times and “COOL”, “SET-”, and “POINT” shows alternately in the display, along with the temperature at which the control exits the melt cycle. This is set at 250º F (121º C), and should not be changed until the factory is consulted.
- Press and release the FUNCTION button four times and “AUTO”, and “IDLE” shows alternately in the display, along with “OFF”. This should not be changed until the factory is consulted.
- Press and release the FUNCITON button five times and “AUTO”, “IDLE”, and “MMSS” shows alternately in the display, along with “0:00”. This should not be changed until the factory is consulted.
- The last 3 functions in the Heat Control Mode are used by the factory only, and should not be changed.
Related Content
Reference