Troubleshooting the E-6A Error Code Temp Probe Open
-
Cross tip screwdriver
-
Multimeter
-
Shelf heater assembly
-
Heat Sink Probe
-
I/O Board assembly
Refer to UHC 600 Universal Holding Cabinet for part numbers.
Overview
If an RTD has an open circuit failure, then the system will generate the E-6A error code. Error text will indicate either the top shelf probe, bottom shelf probe, ambient or heat sink failure. Shelf will be disabled from use. Upon resolution, the shelf will be enabled for usage, all product on that shelf will transition to discard status.
Call Avoidance
Perform this step first to avoid travel to the restaurant, reducing cost and adding value for your customer. Turn the main power switch off for a few moments, and then turn it back on. Wait. If the issue doesn't resolve itself, continue the troubleshooting steps below, on-site.
Field Troubleshooting

|
To avoid electrical shock or property damage, disconnect power before installing or servicing equipment. A qualified technician must perform the service procedures. |
-
Remove power from unit by unplugging the main power cord.
-
Remove the top cover of the unit to gain access to the electrical components.
-
Remove the left side panel (when facing the front) to gain access to heater probe wiring.
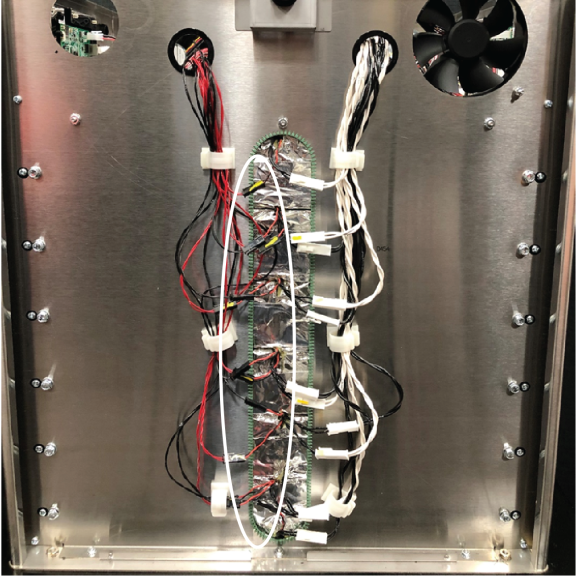
/>
-
Behind the left side panel, check the suspected probe connections for the heaters at the 2 pin connectors and the main connector at the I/O board.
 />
/>
-
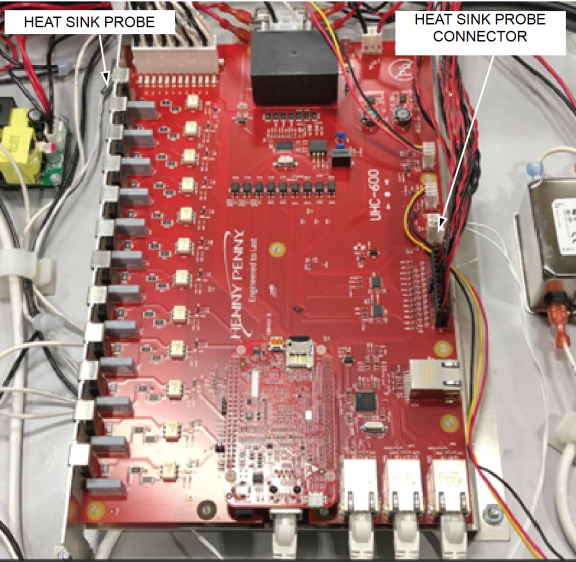
For the heat sink probe, check the connector at the I/O board and the wiring.
-
Unplug and plug back in connectors to clean contacts.
-
Reconnect power and turn on the main power switch.
-
Do one of the following:
-
If issue is not resolved, use a multimeter to check the resistance of the probe in question and determine if it is an open circuit.
-
If issue is resolved, do one of the following:
-
If the shelf temperature probes are faulty, replace the heater assembly for them.
-
If the heat sink probe was faulty, then replace heat sink probe.
-
-
-
If all probes check correctly, then replace I/O board.
Other Possibilities
-
Check wiring and pins inside the connector to ensure proper contact when plugged in.
-
Unplug the Heat Sink Probe connector from J9 at I/O board.
-
Ohm out the probe using the RTD Chart below.
-
If the reading of the probe is within +/-5F of the heat sink probe surface temp reading, check for loose or faulty connection to I/O.
-
If connection is tight and a new probe produces same result, then replace I/O board.
-
If the ohm reading from the probe is +/- 5F from the surface temperature reading, replace probe.
-
| Temperature (Fahrenheit) | Temperature (Celsius) | Resistance Ohms |
|---|---|---|
| 50 | 10,00 | 1 039,02 |
| 60 | 15,56 | 1 060,65 |
| 70 | 21,11 | 1 082,24 |
| 80 | 26,67 | 1 103,80 |
| 90 | 32,22 | 1 125,32 |
| 100 | 37,78 | 1 146,81 |
| 110 | 43,33 | 1 168,26 |
| 120 | 48,89 | 1 189,67 |
| 130 | 54,44 | 1 211,05 |
| 140 | 60,00 | 1 232,39 |
| 150 | 65,56 | 1 253,70 |
| 160 | 71,11 | 1 274,97 |
| 170 | 76,67 | 1 296,20 |
| 180 | 82,22 | 1 317,40 |
| 185 | 85,00 | 1 327,99 |
| 190 | 87,78 | 1 338,57 |
| 200 | 93,33 | 1 359,69 |
| 210 | 98,89 | 1 380,79 |
| 212 | 100,00 | 1 385,00 |
| 220 | 104,44 | 1 401,84 |
| 230 | 110,00 | 1 422,86 |
| 240 | 115,56 | 1 443,85 |
| 250 | 121,11 | 1 464,79 |
| 260 | 126,67 | 1 485,71 |
| 270 | 132,22 | 1 506,58 |
| 280 | 137,78 | 1 527,43 |
| 290 | 143,33 | 1 548,23 |
| 300 | 148,89 | 1 569,00 |
| 310 | 154,44 | 1 589,73 |
| 320 | 160,00 | 1 610,43 |
| 325 | 162,78 | 1 620,77 |
| 330 | 165,56 | 1 631,09 |
| 340 | 171,11 | 1 651,72 |
| 350 | 176,67 | 1 672,31 |
| 360 | 182,22 | 1 692,86 |
| 365 | 185,00 | 1 703,13 |
| 370 | 187,78 | 1 713,38 |
| 380 | 193,33 | 1 733,87 |
| 390 | 198,89 | 1 754,31 |
| 400 | 204,44 | 1 774,72 |
| 410 | 210,00 | 1 795,10 |
| 420 | 215,56 | 1 815,44 |
| 430 | 211,11 | 1 835,74 |
| 440 | 226,67 | 1 856,01 |
Related Content
Troubleshooting the E-4A Cabinet Control Enclosure Overheating
Troubleshooting the E-4B Heat Sink Probe Overheated
Troubleshooting the E-5 Error Code Shelf Temperature Too Hot
Troubleshooting the E-210 Cooling Fan Failure
Troubleshooting the E-216 Shelf temp too low
Installing the Power Cord Anti-Rotation Bracket
Replacing the UHC 600 Power Supply
Reference