Replacing the Heater Plate
Cross tip bit
3/8 Socket driver
S2 Square bit
3/32 Allen wrench
Needle nose pliers
Utility knife
Shelf heater - 240v 400w
2 Bezel removal tools
2 Set screw
Aluminum foil tape

|
Only perform this procedure when the unit is cool or severe burns may result. |
|
|
Heavy Object Take care when moving the unit to prevent personal injury. The units weigh approximately 225 lbs (102 kg). |
Replace a shelf heater if persistent E215, E216 errors occur, or plate failure.
Prepare the Cabinet
-
Turn the power switch off and then unplug from the power source.
-
Remove all accessories and trays from cabinet.
-
Disconnect cabinet from bottom mounting brackets.
-
Ensure cabinet is cool to the touch before moving.
-
Carefully remove cabinet from table and move to area for servicing.
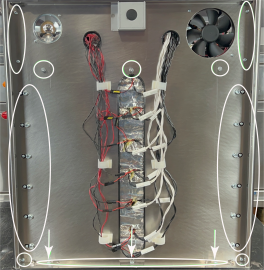
Accessing the Shelf Heater Assembly
-
Using a cross tip bit, remove the 4 screws holding the top cap.
-
Using a cross tip bit, or S2 square bit, remove 2 screws, one left and one right on each side panel, and then lift and remove both panels.
-
Using a S2 square bit, remove the 2 screws holding the control panels on the left, right, front, and back.
-
Using a S2 square bit, remove the screws holding the bottom corner screws of the cabinet.
-
Using a 3/8 in. socket driver, remove the 6 hex nuts holding the inner panels, 3 on the mid-top and 3 on the bottom. Repeat for both sides.
-
Using a S2 square bit, and 3/8 in. socket driver, starting from the top, remove all heater cavity and bezel screws. Repeat for both sides.
-
Disconnect top and bottom probe and heater connections for the cavity you are servicing.
-
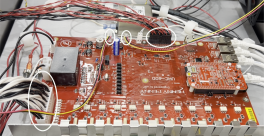
Carefully disconnect the main heater harness, probe harness, and both fan connections from the I/O board in the top of the cabinet.
-
Carefully pull sides out, and then push back both the left and right inner panels, to give enough access to the bezel opening for the bezel removal tools.
-
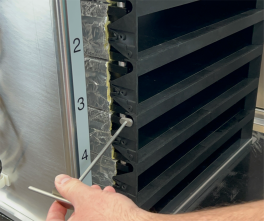
Insert the bezel removal tools, into both left and right sides, of the top bezel.
-
Once tools are in all the way, turn 90 degrees (upward or downward) and remove bezel (pull out).
-
Repeat for the bottom bezel.
-
Repeat for the top and bottom bezel, on the opposite side of the shelf. Note: Top and bottom, and then front and back for a total of four.
-
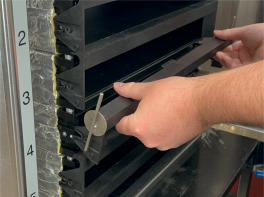
Using needle nose pliers, carefully lift the heater shelf above the one being serviced enough to pull the spacers out and discard.
-
Repeat for all corners on the top and bottom, front and back of the shelf you are replacing.
-
Slide left and right inner panels back into original position but do not tighten.
-
Re-install all heater and bezel screws except for heater shelf being serviced. This allows for easier heater shelf removal for future servicing.
-
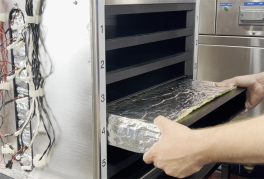
Carefully remove heater shelf being cautious of the wiring.
-
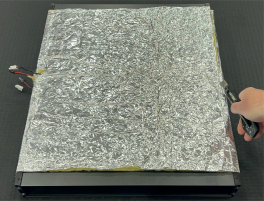
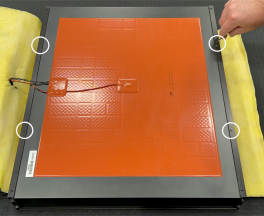
Using a utility knife, carefully cut down the edge of the rail opposite the harness side and fold back the heater insulation.
-
Using a 3/32 in. hex key, carefully remove the 4 set screws holding the faulty heater from the side rails.
-
Remove faulty heater by sliding it out from the rails.
-
Insert new heater and line up edges evenly to edge of rails.
-
Using a 3/32 in. hex key, carefully tighten the 4 set screws to snug to hold heater in place.
-
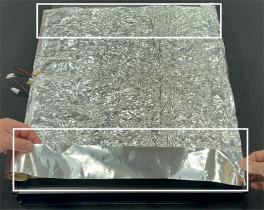
Re-attach insulation using the aluminum tape supplied in the kit, by applying a strip of tape to the top and bottom, front and/or back edges.
-
Working in reverse, complete steps 18 through 1 and return cabinet to operation.
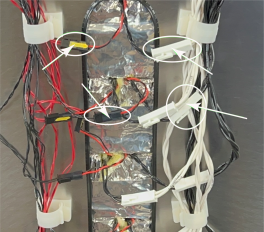
Note: Top heater probe wires should be marked with yellow paint and have red colored wires. The bottom probe wires will be black in color and have no paint markings. The heater top power wire will be white and the bottom power wire black in color.
Removing the Shelf Heater Assembly
Note: Each shelf plate has a top and bottom bezel, on the front and back of each set of shelves.
![]()
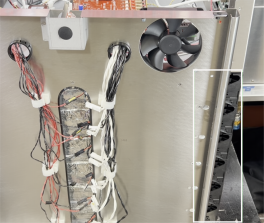
IMPORTANT!: DO NOT tighten heater shelf bolts, you can tighten down bezel screws.
Note: The wiring can be tucked into the side rail and behind the inner panel to help remove the heater shelf.
Replacing the Heater
Note: This will help when re-inserting shelf heater back into the cabinet.
Related Content
Troubleshooting the E-4A Cabinet Control Enclosure Overheating
Troubleshooting the E-4B Heat Sink Probe Overheated
Troubleshooting the E-5 Error Code Shelf Temperature Too Hot
Troubleshooting the E-6A Error Code Temp Probe Open
Troubleshooting the E-210 Cooling Fan Failure
Troubleshooting the E-216 Shelf temp too low
Installing the Power Cord Anti-Rotation Bracket
Replacing the UHC 600 Power Supply
Replacing the I/O Control Board
Reference