Replacing the FlexFusion Space$aver Plus and Team Blower Shaft Seal and Lock Washer
Fan wheel puller 10016069
Socket wrench 7 mm
Slotted-head screwdriver
locking washer 10028883
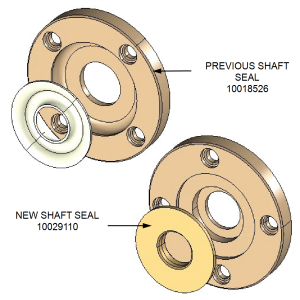
shaft seal 10029110
Overview
Comparing Versions of Locking Washer and Shaft Seal
Procedure

|
To avoid electrical shock or property damage, disconnect power before installing or servicing equipment. A qualified technician must perform the service procedures. |
-
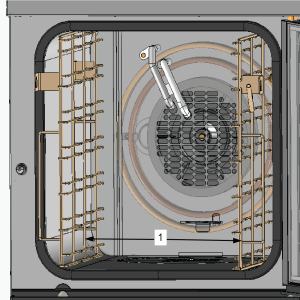
Removing the suspension racks (1):
-
Open the cooking chamber door.
-
Remove the two suspension racks.
-
-
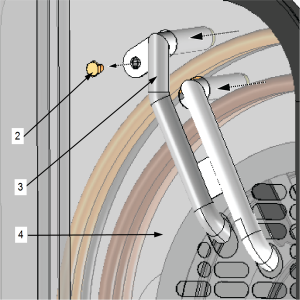
Removing the air diverter:
-
Dismantle hexagon head screw (2).
-
Pull off water inlet pipe (3).
-
Remove air baffle (4).
-
-
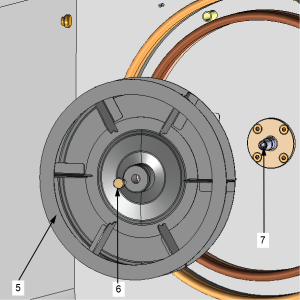
Removing the fan wheel:
-
Loosen the screw of the fan wheel (5).
-
Loosen fan wheel with fan wheel puller (6).
-
Pull the fan wheel off the motor shaft (7).
-
-
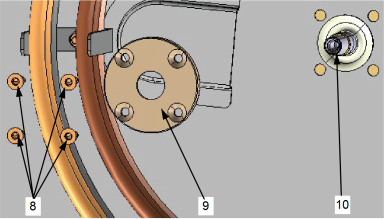
Removing the shaft seal:
-
Remove the screws on the locking disc (8).
-
Pull the locking disc off the motor shaft (9).
-
Pull the shaft seal off the motor shaft (10).
-
-
Installing the shaft seal:
-
Fit new shaft seal 10029110. Observe the installation direction!
-
Install new locking washer 10028883.
-
-
The remaining parts are assembled in the reverse order.
Tighten the screws only hand-tight. The torque should be 1 Nm.
Concept Information
Related Content
FlexFusion Space$aver Combiovens
Replacing the FSE Liquid Cleaning Pump with New Style
Creating the Cookie and Breakfast Bars Recipe for Wendy's FlexFusion SpaceSaver Combi Ovens
Changing a Standard Six or Ten Grid Gas Unit into a Stacked, Bottom Unit
Setting Up the Grease Collection System
Troubleshooting the Wendy's FlexFusion SpaceSaver Liquid Cleaner Pump Failure
Reference
FlexFusion Space$aver and Space$aver Plus Combiovens
FlexFusion Space$aver and Space$aver Plus G2 Combiovens
FlexFusion Space$aver Team Combiovens
FlexFusion Space$aver Team G2 Combiovens
CombiOven Service Video Archive