Changing a Standard Six or Ten Grid Gas Unit into a Stacked, Bottom Unit
screwdriver
nutdriver
Silicone seal
Graphite seal
Self-adhesive cover
Flue pipe for 6 grid
Flue pipe for 10 grid
Flue pipe extension
Insulation flue pipe 6 grid
Insulation flue pipe 10 grid
Procedure

|
To avoid electrical shock or property damage, disconnect power before installing or servicing equipment. A qualified technician must perform the service procedures. |
-
Be sure that the unit is disconnected from power and gas supply. Be sure to have access to the back wall of the unit.
-
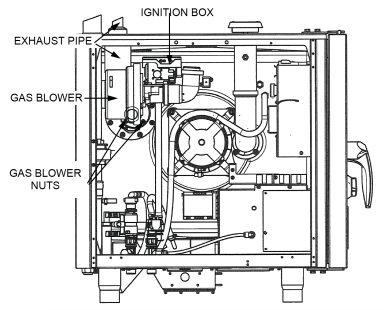
Remove left side wall from the unit.
-
For 6 grid models the gas blower has to be removed.
-
Dismount the ignition box by removing the mounting screw and the plugs.
-
Then, remove the four nuts which hold the blower. Now the nuts of the flue pipe are accessible.
-
-
Remove the insulation from the flue pipe.
-
Remove the four nuts which attach the flue pipe to the cooking chamber. Be careful not to push the bolts through the cooking chamber.
-
Dismount the flue pipe and the graphite seal. Be sure that the seal is completely removed.
-
-
Close the hole in the top of the Combi with the self-adhesive cover. Clean the top prior mounting.
-
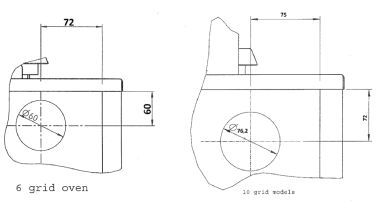
Punch a hole in the back wall with the dimensions according to the drawings.
Caution: The 6 grid and 10 grid have different hole positions!
-
Mount the silicon seal in the back wall and place a small amount of liquid detergent inside the seal for easier mounting of the flue pipe.
-
Mount a new graphite seal on the cooking chamber and mount the exhaust flue pipe.
-
Tighten the nuts with a torque of 8 Nm.
-
Check that the silicone seal and the insulation fits properly.
-
Take care that the black foil from the insulation does not touch the flue pipe.
-
-
Refit the insulation of the flue pipe. Some minor corrections of the insulation might be necessary. Fix the insulation with wire to hold it securely in place.
-
For 6 grid models, remount the gas blower and the ignition box.
Now the unit is prepared for the stacking kit.
Concept Information
Related Content
FlexFusion Platinum Combiovens
Troubleshooting the SPU Display
Troubleshooting a Blank Display on FlexFusion Team Combi Ovens
Unlocking and Deactivating the Lock Screen on FPE and FPG Combi Ovens
Repairing the CombiOven Door Seal
Troubleshooting FPE CombiOven Without Heat, Error Message, or Voltage
FlexFusion Platinum 701 / 702 Fan Defective Error Message
FlexFusion Platinum Troubleshooting the 702 Fan Defective Error Message
Setting Up the Grease Collection System
Updating the FlexFusion Platinum Wendy's Software and Cookbook
FlexFusion Space$aver Combiovens
Replacing the FSE Liquid Cleaning Pump with New Style
Creating the Cookie and Breakfast Bars Recipe for Wendy's FlexFusion SpaceSaver Combi Ovens
Replacing the FlexFusion Space$aver Plus and Team Blower Shaft Seal and Lock Washer
Troubleshooting the Wendy's FlexFusion SpaceSaver Liquid Cleaner Pump Failure
Reference
FlexFusion Platinum Electric G1 Combiovens
FlexFusion Platinum Electric G2 Combiovens
FlexFusion Platinum Gas G1 Combiovens
FlexFusion Platinum Gas G2 Combiovens
FlexFusion Platinum Gas 221 CombiOven
FlexFusion Platinum Team Combiovens
FlexFusion Platinum Team G2 Combiovens
CombiOven Service Video Archive
CombiOven Water Quality Specifications
Smart / Classic Combi Component Ohm Values
FlexFusion Space$aver and Space$aver Plus Combiovens
FlexFusion Space$aver and Space$aver Plus G2 Combiovens