Applies to:
![]()
Basic Operation
The following information walks you through a typical day of use.

|
Follow the instructions below to avoid oil overflowing the vat, which could result in serious burns, personal injury, fire, and/or property damage. |
-
To protect the oil when the fryer is not in immediate use, the fryer should be turned off.
-
Frying breaded products requires filtering to keep the oil clean. Oil should be skimmed frequently throughout the day and filtered thoroughly once a day.
-
Dispose oil if display shows “CHANGE OIL SOON” or if oil shows signs of excessive foaming or smoking.
-
Maintain the oil at the proper cooking level. Check and fill the reserve oil tank throughout the day.
-
Do not overload the baskets with product, or place product with extreme moisture content into baskets.

|
To avoid severe burns when pouring hot oil into vat, wear personal protective equipment (PPE) and take care to avoid splashing. |
|
|
To avoid personal injury, do not move fryer or filter pan while containing hot oil. The filter pan must be as far back under fryer as it will go, and the cover in place. Be sure the hole in the cover lines up with the drain before opening the drain. |
|
|
Burn Risk To avoid burns, follow on-screen prompts for Express Filter and Daily Filter. |
Failure to follow the Express Filter and Daily Filter procedures may cause the accumulation of crumbs and debris at the bottom of the fry vat, which may cause oil to spray out of the fryer.
|
|
The oil level must always be above the heating elements and at the proper oil level indicator on the rear of the vat. Failure to follow these instructions may result in fire, severe burns, and/or damage to the fryer. |
|
|
Fire Risk To avoid fire:
|
Impact to the heating elements may shift or stretch coils and cause a fire.
|
|
The oil level must always be above the heating elements and at the proper oil level indicator on the rear of the vat. Failure to follow these instructions may result in fire, severe burns, and/or damage to the fryer. |
|
|
Slipping Hazard To avoid personal injury, do not exceed filter pan capacity. To avoid overfilling the filter pan, drain only 1 vat at a time. Make sure the floor area around equipment is completely clean and dry to avoid slip risks. |
|
|
Always filter vats left to right. For protein fryers, always filter the fish vat last to prevent cross contamination of the oil. |
The fryer includes an auto-top-off feature which checks oil level and automatically replenishes oil to the fill line throughout the day from the JIB (Jug-in-Box). Auto top off activates after a few seconds in between cook cycles when no filtration's are being performed on other vats. In cases when either the JIB is empty, or when cook cycles continuously run without a pause for an extended period of time, the oil level may drop in the vat. In these cases, you can quickly pump oil from the JIB to the vat in the Oil & Filter menu.
When the JIB is empty, or when the message CHECK JIB appears in the display, replace the empty JIB with a new JIB.
Note: Some stores may use a BIB (Bag-in-Box) rather than a JIB. This is not a problem as the JIB tube on the fryer adjusts to fit both common JIB sizes as well as common BIB sizes. To replace the JIB follow these instructions:
-
Open the door in front of the JIB. Pull the empty JIB out from under the fryer.
-
Remove the JIB tube.
-
Discard the empty JIB.
-
Open the new JIB and completely remove and discard the paper or foil seal.
-
Insert the JIB tube into the new JIB until it reaches the bottom, then secure the cap down over the spout.
-
Slide the new JIB back onto the JIB shelf then close the door.
Note: Keep foil or paper seals from falling into the JIB, or blockage or damage to the JIB pump may result.
To help eliminate interruptions during your business day, perform this daily precheck before turning on the fryer:
-
Remove and store optional night covers.
-
Ensure the oil level is at the correct level in each vat.
-
Check the oil level in the JIB. Replace the JIB if it is empty.
-
Ensure the drain pan is clean, dry and has been properly assembled with a new filter pad.
Prior to using a vat, remove and store night covers. On 3 and 4 vat units, night covers may be stored under the right-most vat of the fryer.
Note: If only some vats are being used, night covers may remain on vats where the heat remains off. Night covers are an optional accessory for the fryer used to cover vats when not in use. These help reduce oil break down from oxygen, and keep airborne contaminates out of the oil. Night covers are also recommended for use during a deep clean procedure to cover adjacent vats.
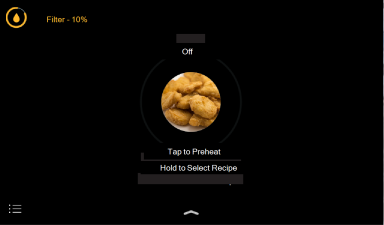
After performing the daily fryer precheck, turn the fryer on with the main power switch. After approximately 15 seconds, the Preheat screen is displayed. The heat however remains off to each vat until the Preheat button is tapped on each touchscreen control.
You have the option to turn on some, or all of the vats on the fryer.
-
To turn on the heat to a specific vat, tap to Preheat.
Note: The setpoint temperature of the oil is variable and can be changed in food items.
-
Verify the vat is filled with oil to the lower line, on the rear of the vat, and then tap Yes to continue.

The vat Preheats.
Tap the oil info icon to get detailed information on the oil in the vat. For split vats, there are two oil info icons. The icon in the upper left displays oil information for the left vat and the icon in the upper right displays oil info for the right vat.
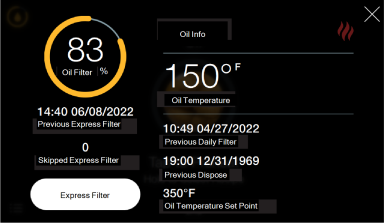
| Item | Name | Description |
|---|---|---|
| 1 | Oil filter percentage | Oil life remaining until the next filter. |
| 2 | Oil temperature | Current oil temperature. |
| 3 | Previous dispose | Time and date of the last time the oil was disposed on this vat. |
| 4 | Express filter button | Start an express filter to reset the filter percentage to 100%. |
| 5 | Previous filter | Time and date of when the last filter was performed on this vat. |
Cook your food items on the fryer following these steps:
-
Load your food item in the fry basket.
-
Once the vat is pre-heated, tap the vat you want to cook in.
-
Lower the fry basket in the oil.
-
Tap the start timer. The red timer indicator begins to move
-
If the timer cycle has the Shake Alert enabled, when the shake alert sounds, lift the basket up off of the bottom of the vat and shake the basket to loosen food items, then place the basket back into the oil.
-
When the red timer expires and the alert sounds, lift the basket out of the oil and place it on the basket hanger to allow excess oil to drain.
-
Tap the timer to stop the alert.


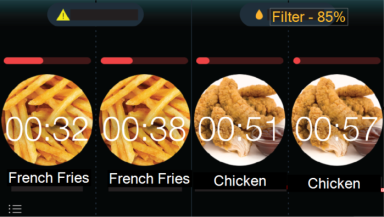
Cooking on the fryer keeps you aware not only of the time remaining for your food items, but also approximately how many more cooks remain until an express filter needs to be performed. The following is a breakdown of the single timer cooking screen.
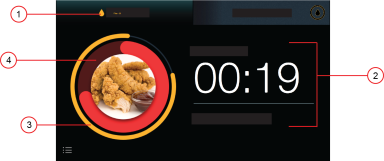
| Item | Name | Description |
|---|---|---|
| 1 | Oil info | Oil filter percentage. Tap and hold to view current oil temperature. |
| 2 | Cooking Info | Time remaining along with food item name. |
| 3 | Oil filter status ring | A visual of the oil filter percentage. Solid yellow ring when oil filter percentage equals 100%. Express filter is prompted when ring disappears at 0%. |
| 4 | Cooking progress ring | This ring fills in to indicate how much of the cooking cycle has completed. |
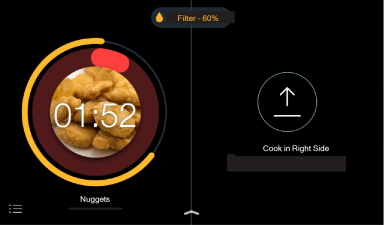
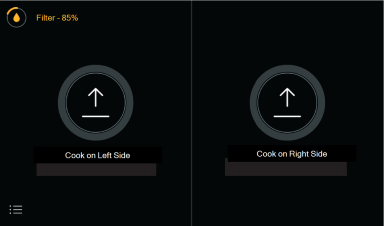
Full vats have two timers accessible on the touchscreen control; one for the left basket and one for the right basket.
-
Tap Cook in Left Side, and then select a food item. The timer begins to count down.
-
Tap Cook in Right Side, and then select a food item. The timer begins to count down.
Note: You can start one timer then press the opposite tab to start a timer for another basket.
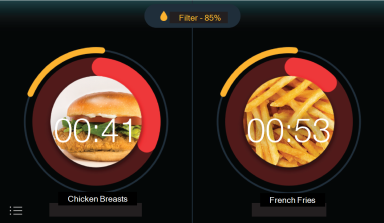
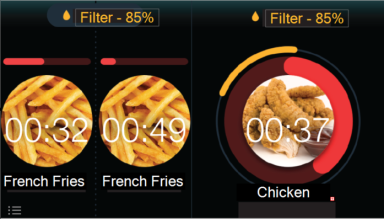
Split vats have four timers accessible from the touchscreen control: two for the left vat and two for the right vat.
-
To start a single left or right timer, tap the tab for either the left or right side then select the desired food item.
-
To start a second timer for either the left or right split vat, tap and hold the corresponding side of the touchscreen, select a food item, and the second split vat timer starts counting down.
For example, the top image shows three timers counting down. If you wanted to add another timer to the right vat, tap and hold the right side, select another food item and another timer appears for the bottom side. This allows you to have 3 or 4 timers counting down at the same time which works well if you use quarter sized baskets.
To stop a cook cycle, tap anywhere on the food item image, then tap on the stop icon.
![]()
After a cook cycle has been completed a repeat cook icon will appear over the previously cooked product on the display. To repeat a cook cycle, tap the repeat cook icon on the food item image. To select a different food item, swipe left or right and your available food items display.
![]()
These are grayed out food items which require an oil temperature change before cooking. Tapping on an incompatible food item opens a display which lets you know that either the oil needs to heat or cool down to a new setpoint.
As frying oil deteriorates, it produces by-products that impact the flavor and texture of the food. There is a “sweet spot” to oil where the oil degradation process reaches an optimum state. This sweet spot can be extended through proper oil management. This section provides an understanding of the oil management features on the fryer. Some of these features are explained in this section and some are cross referenced with links to other sections. All of these features help you improve the quality and consistency of product while reducing your oil costs.
-
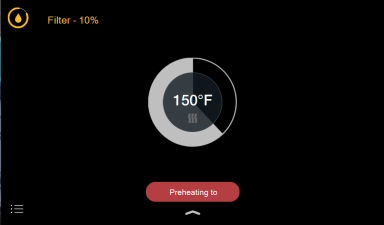
Preheat Mode - Protects oil by pulsing the heat on and off until the oil temperature reaches 180°F (82°C).
-
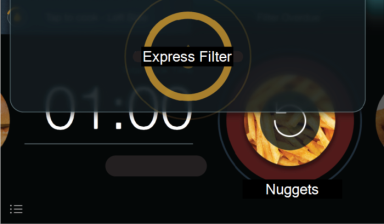
Express Filter - Removes frying by-products, such as crumb accumulation, which can degrade your oil. During normal operation and after a certain number of cooks, team members are prompted to perform an express filter. The express filter process requires the team member to skim the vat, but then after that, the filtration is fully automated. The fryer completes the entire express filter process, including bringing the oil back to set temperature, in as little as 3 minutes. Cooking doesn’t have to be stopped during an express filter, because as one vat is being filtered, the other vats can still be used for cooking.
-
Automatic Top Off - Monitors oil levels in each vat and automatically replenishes oil from JIB. Automatic top off extends the sweet spot of your oil by adding fresh oil to each vat on a regular basis.
Best Practice: Encourage team members to Filter when prompted and to manage filtration between busy periods. This helps extend the sweet spot of your oil and maximizes your oil life.
Throughout the day as food items are cooked, crumbs and other contaminates accumulate in the vat and periodically need to get removed with the automated Express Filter feature. Each food item in the menu includes a setting of how many of that item can be cooked before an Express Filter is required. Found in Settings > Food Item Settings > Type 1234 > Manage Food Item > Food Items.

As an example, products which produce more crumbs during cooking typically require a lower number for this setting, and products which produce fewer crumbs typically have a higher number for this setting. You may find that 15 cooks between Express Filters works well for fries, while a product with more breading such as chicken strips may require 8 cooks between Express Filters.
The touchscreen control lets team members know approximately how many cooks remain before the next Express Filter both from the oil filter percentage and also from the yellow filter status ring. The filter percentage starts at 100% for each vat, and as product is cooked, this percentage decreases. When the filter percentage reaches 0% in any vat, an Express Filter prompt appears indicating that it is time to filter.
Note: An express filter can also be started from Settings > Oil & Filter > Express Filter. Anytime an express filter is completed, the oil filter status returns to 100% and team members are ready for the next busy period.
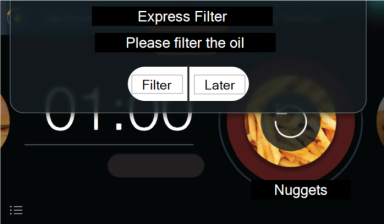
When performed, the fryer completes the entire Express Filter process, including bringing the oil back to set temperature, in 3 minutes or less with a properly maintained filter pan. As one vat is being filtered, the other vats can still be used for cooking. The Express Filter process is described in the following steps:
-
Tap express filter then select Filter to filter now, or select Later to delay filtration and continue cooking. Skim vat displays.
-
Use a skimming tool (not provided with the fryer) to remove floating crumbs and product from the surface of the oil, and then confirm by tapping Start Filter.
-
Drain / Wash - Oil drains to the filter pan and pumps to wash crumbs down the open drain.
-
Refill - Oil continues to pump and the drain valve closes to allow the oil to refill the vat.
-
Heating - As the vat fills, the heat turns on to raise the oil temperature back to frying temperature.
-
Once heated, Filter Complete displays followed by the cooking screen. Team members have the option to pause each step, followed by either resuming the step of stopping the Express Filter. Managing express filters during busy periods Team members have the option to perform an early express filter during slow frying periods to make sure an express filter doesn’t interrupt a busy frying period or rush. For example, if there is only 10% oil filter status remaining (1 or 2 cooks remaining) during a slow frying period, the team member can start an express filter early by tapping on the Oil Info Icon, then tapping Express Filter.
Note: When selecting Later, an alert icon displays next to the oil info icon and the Express Filter prompt displays after each additional cook until an express filter is performed.
End of day shutdown ensures a good start for team members the next day. Fryer shutdown checklist:
-
Perform a Daily Filter on each vat.
-
Remove, clean, and reassemble the filter pan with a new filter.
-
Remove and clean the basket hanger, clean the area behind the basket hanger and reinstall.
-
Turn off the main power switch.
-
Wipe down the touchscreen controls.
-
Wipe down the exterior of the fryer including the side panels, doors, and area around vats.
-
Place a night cover over each vat (if equipped).
The filter pan removes crumb accumulation and impurities from the oil during filtration. Throughout the day if filtration slows, it may be necessary to empty the crumb basket and to scrape smaller crumbs from the filter. At shutdown, remove and clean the filter pan assembly to ensure the filter pan is clean for the next day. Typically this would be done after the daily filter is completed on all vats. Filter pan shutdown steps are as follows:
Filter Pan Maintenance Throughout The Day
Filter pan maintenance may need to be performed periodically throughout the day if oil starts to pump slowly during express filters. Perform the following maintenance steps to increase oil flow during filtration:
-
Remove the filter pan by pulling (sliding) it out from under the fryer. The male and female connection separates.
-
Remove the filter pan lid and the crumb basket. Discard the crumbs in the crumb basket.
-
Using a vat scraper or spatula, gently scrape finer crumbs off of the top of the filter and discard.
-
Replace the crumb basket and the filter pan lid.
-
Reinstall the filter pan under the fryer and close the door.
Note: Ensure the filter pan connection is firmly seated.
Cleaning The Filter Pan
Use a food grade fryer cleaner permitted by local health codes. Using the correct Henny Penny O-rings and filter paper are vital. Order them from your technician or distributor.
-
Remove the filter pan by pulling (sliding) it out from under the fryer. The male and female connection separates.
-
Remove the O-rings from the connector, inspect and replace as needed.
Refer to O-ring Replacement.
-
Disassemble the filter pan, empty the crumb basket and discard the filter.
-
Wash and dry all components of the filter pan.
-
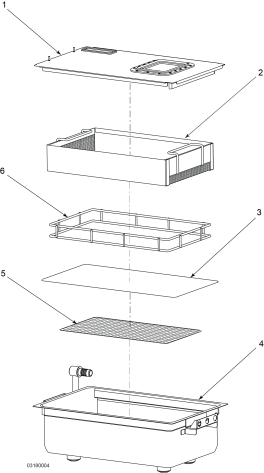
Reassemble the filter pan in the following order:
-
Place the filter screen (5) in the filter pan base (4).
-
Place filter paper (3) on top of the filter screen (5).
-
Place filter pan weight (6) on top of the filter paper (3).
-
Place crumb catcher (2) on top of the filter pan weight (6)..
-
Place filter pan lid (1) on top of the filter pan base (4).
-
-
Reinstall the filter pan under the fryer and close the door. NOTE: Ensure the filter pan connection is firmly seated.
Slide the basket hanger up and then pull toward you to remove. Clean both the basket hanger and the area behind the basket hanger, then re-install.
At the end of the day, turn the main power switch to the off position.
INFO: Heat to each vat shuts down when turning off the main power switch as well as each touchscreen control