Replacing the Solenoid Valves
Each vat has a solenoid plumbed-into the oil return lines. They are normally closed, but open when power is supplied, such as, the controls are filling the vats.

|
To avoid electrical shock or property damage, move the power switch to OFF and disconnect power. |
Checkout
-
Remove both top and bottom rear panels, or a side panel, depending upon the location of the solenoid.
-
Follow the wires from solenoid and through conduit and then cut wires. Strip wires back and take an ohm reading:
| 120 Volts-60Hertz | 50 Ohms |
| 220-240 Volts-50Hertz | 230 Ohms |
Replacing
-
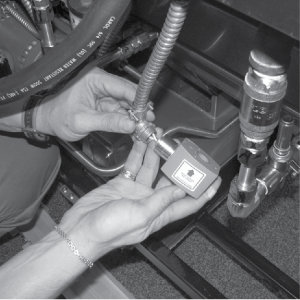
Using a 1 inch wrench, loosen the front and rear fittings to solenoid.
-
Remove the conduit from the fryer and pull the solenoid assembly from the fryer.
-
Remove the conduit from the solenoid.
-
Remove elbow and fittings from solenoid stem assembly, and attach them to new solenoid, using pipe sealent on the threads.
-
Reattach the conduit to new solenoid, threading the wires through the conduit.
-
Reattach the solenoid assembly to the fryer.
-
Reattach the conduit to fryer and connect the wires to the fryer using wire nuts.
-
Replace rear side panels or rear panels and reconnect power to the fryer.
Related Content
Replacing the Drain Valve Actuator
Replacing the Filter Motor Relay
Replacing the Gas Control Valves
Replacing the Filter and JIB Lights
Replacing the Filter Pan Switch
LVG 10X Troubleshooting the E-18 Level Probe Error Code
Troubleshooting the E-60 AIF Communication Failure
LVG 10X Troubleshooting the Oil Not Pumping Error Code
Reference