Replacing Heating Contactors (Electric Only)
screwdriver
multimeter
Each well of an electric fryer requires two switching contactors. The first in line is the primary contactor and the second in line is the heat contactor. When open, the primary contactor does not allow power to flow to the heat contactor. When closed, the primary supplies voltage to the heat contactor. When the heat contactor is open, no voltage is supplied to the heating elements. When the heat contactor closes, voltage is supplied to the heating elements.
Checkout (Power Removed)

|
To avoid electrical shock or property damage, move the power switch to OFF and disconnect power. |
-
Remove electrical power supplied to the unit.
-
Remove the control panel.
-
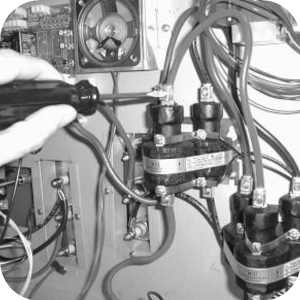
Perform a check on the contactor.
Electromechanical Contactor
| Test Points | Results |
|---|---|
| From 30 to 34 | Open circuit |
| From 31 to 35 | Open circuit |
| From 32 to 36 | Open circuit |
| From 33 to 37 | Ohm reading 5 to 6 |
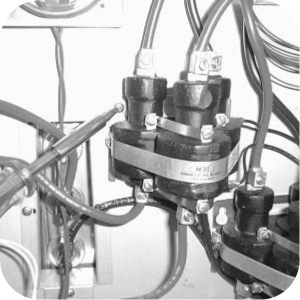
Mercury Contactor
| Test Points | Results |
|---|---|
| From 30 to 34 | Open circuit |
| From 31 to 35 | Open circuit |
| From 32 to 36 | Open circuit |
| From 33 to 37 | Ohm reading 1700 |
Checkout (Power Supplied)
The following checks are performed with the wall circuit breaker closed and the main power switch in the ON position.
|
|
Shock Hazard To avoid electrical shock or property damage, disconnect power before installing or servicing equipment. Lowering the control board exposes the technician to 240 VAC electricity inside the fryer. |
-
Re-apply power to unit and turn power switch ON.
-
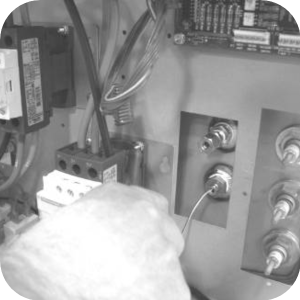
Check voltage.
| Test Points | Results |
|---|---|
| From terminal 34 to 35 | The voltage should read the same at each terminal |
| From terminal 35 to 36 | |
| From terminal 34 to 36 |
Replacing Mercury Contactor
|
|
To avoid electrical shock or property damage, move the power switch to OFF and disconnect power. |
If either contactor is defective it must be replaced.
-
With control panel removed and power off.
-
Remove only the wires directly connected to the contactor being replaced.
-
Label the wires for replacement.
-
Loosen the screws securing the contactor bracket to the shroud.
-
Remove the contactor from the bracket.
-
Reinstall.
Replacing the Electromechanical Contactor
|
|
To avoid electrical shock or property damage, move the power switch to OFF and disconnect power. |
-
Remove only the wires directly connected to the contactor being replaced. Label the wires for replacement.
-
Remove nuts securing the contactor to the shroud.
-
Remove the contactor from unit.
-
Reinstall.
Related Content
Replacing the Blower Motor Assembly
Replacing Heating Elements (Electric Only)
Replacing the High Limit Temperature Control (Electric Units)
Replacing the High Temperature Limit Control (Gas Units)
Replacing the Flame Sensor (Gas Units)
Replacing the Pilot / Ignitor Assembly
Replacing the Gas Control Valve Assembly
Replacing the Temperature Probe
OGA-OFG 32X Ignition Module Retrofit
OFG/OGA 32X Replacing Gas Valve Kit
OFE 32X Installing the Spreader Bar
OFE 32X Chick-Fil-A Element Bracket
Troubleshooting the OFG 32X Fryer Stuck in Ignition Loop
Troubleshooting the OFG 32X Fryer E-4 Control Overheating Error Code
Troubleshooting the OFE and OFG 32X Fryer E-5 Oil Overheating Error Code
Troubleshooting the OFE and OFG 32X Fryer E-6 Temperature Probe Error Code
Troubleshooting the OFE and OFG 32X Fryer E-10 High Limit Error Code
Troubleshooting the OFE and OFG 32X Fryer E-20A Fan Sensor Stuck Closed Error Code
Troubleshooting the OFG 32X Fryer E-20B Pressure Switch Stuck Error Code
Troubleshooting the OFG 32X Fryer E-20D Ignition Failure Error Code
Troubleshooting the OFE 32X Fryer E-26 Heat Amps Locked Error Code
Troubleshooting the OFE and OFG 32X Fryer E-92 24V Circuit Overload Error Code
Troubleshooting the OFE 32X Fryer W-1 Low Voltage Warning
Troubleshooting the OFE 32X Fryer W-2 Slow Heating Warning
Troubleshooting the OFE 32X Fryer W-3 Was Not Ready Warning
Troubleshooting the OFE 32X Fryer W-4 Slow Cooking Warning
Troubleshooting the OFE 32X Fryer W-5 Slow Cooking Warning
Troubleshooting the OFE 32X Fryer W-6 Slow Cooking Warning
Troubleshooting the OFE 32X Fryer W-7 Low Amps Warning
Troubleshooting the OFE 32X Fryer W-9 Discard Product Warning
Reference