Replacing the Air Temperature Probe
crosshead screwdriver
multimeter or ohmmeter
3/4 inch wrench

|
To avoid electrical shock or property damage, disconnect power before installing or servicing equipment. A qualified technician must perform the service procedures. |
-
Using a crosshead screwdriver, remove the four screws securing the front panel.
-
Lower panel, remove connectors from the back, and remove panel from unit.
-
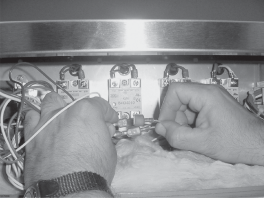
Unplug the wires to the probe.
-
Using a multimeter, or ohmmeter, check across the probe terminals for the correct ohms using the RTD Resistance Chart.
 RTD Resistance Chart
Temperature (Fahrenheit) Temperature (Celsius) Resistance Ohms 50 10,00 1 039,02 60 15,56 1 060,65 70 21,11 1 082,24 80 26,67 1 103,80 90 32,22 1 125,32 100 37,78 1 146,81 110 43,33 1 168,26 120 48,89 1 189,67 130 54,44 1 211,05 140 60,00 1 232,39 150 65,56 1 253,70 160 71,11 1 274,97 170 76,67 1 296,20 180 82,22 1 317,40 185 85,00 1 327,99 190 87,78 1 338,57 200 93,33 1 359,69 210 98,89 1 380,79 212 100,00 1 385,00 220 104,44 1 401,84 230 110,00 1 422,86 240 115,56 1 443,85 250 121,11 1 464,79 260 126,67 1 485,71 270 132,22 1 506,58 280 137,78 1 527,43 290 143,33 1 548,23 300 148,89 1 569,00 310 154,44 1 589,73 320 160,00 1 610,43 325 162,78 1 620,77 330 165,56 1 631,09 340 171,11 1 651,72 350 176,67 1 672,31 360 182,22 1 692,86 365 185,00 1 703,13 370 187,78 1 713,38 380 193,33 1 733,87 390 198,89 1 754,31 400 204,44 1 774,72 410 210,00 1 795,10 420 215,56 1 815,44 430 211,11 1 835,74 440 226,67 1 856,01 If the probe proves faulty, continue onto step 5.
-
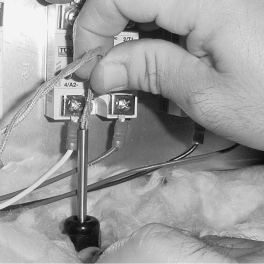
Using a 3/4" wrench, loosen probe strain relief and pull the probe from the unit.
-
Slide new probe through the strain relief, extending the probe about 1" (25.4 mm) into the cabinet area.
-
Plug probe wires to the unit, tighten the strain relief, and replace front panel. Unit is now ready for use.
Related Content
Replacing the Food Probe Receptacle
Replacing the Air Heater High Limit
Replacing the Vent Motor Microswitch
Replacing the Fuse and Fuse Holder
HHC 99X Troubleshooting the E-5 Air Temp Sensor Failed Error Code
HHC 99X Troubleshooting the E-80 Vent Stuck or Bad Switch Error Code
Installing HHC Vent Motor Retrofit
Reference