Replacing the Hubmounted Filter Pump and Motor
Removing the Hubmounted Filter Pump and Motor Assembly

|
To avoid electrical shock or property damage, move the power switch to OFF and disconnect power. |
|
NOTICE - |
The following procedure only applies to units with serial numbers after to BH1810136. Follow procedure associated with serial number indication, otherwise property damage may occur. |
-
Using a 5/8 inch wrench, loosen the front, flexible line fitting, on the pump.
-
Open the door to the left of the hubmounted filter pump and motor assembly.
-
Using a 1 inch wrench, loosen the compression fitting from the plug and play.
-
Open the door to the right of the hubmounted filter pump and motor assembly.
-
Remove the JIB and the ignition module cover.
-
Using the 3/8 inch wrench, remove the 3/8 inch nut at the top of the inside of the ignition box.
-
Using the 3/8 inch wrench, remove the three 3/8 inch nuts on the back of the ignition box.
-
Using a bungee cord, secure the ignition box out of the way.
-
Open the motor access panel.

-
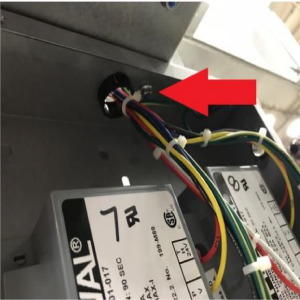
Remove the M1 and M2 terminal connectors and unscrew the conduit connector.
-
Using the 3/8 inch wrench, remove the two 3/8 inch nuts on the plug and play support bracket.
-
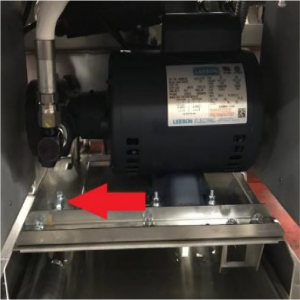
Remove the two 7/16 inch bolts from the front of the motor bracket.
-
Reach around the module box housing and remove the last 7/16 inch bolt from the motor bracket.
-
Remove the hubmounted filter pump and motor assembly.
Installing the Hubmounted Filter Pump and Motor Assembly
-
Place the hubmounted filter pump and motor assembly on the motor bracket and feed the wires back into the motor.
-
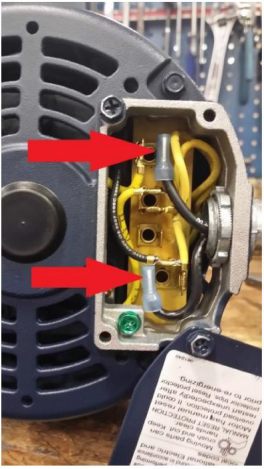
Connect the M1 terminal connector to terminal 1 and the M2 terminal connector to terminal 4.
-
Tighten the conduit connector.
-
Reinstall motor access panel onto motor.
-
Remove ignition box from bungee cord and reinstall using 3/8 inch wrench.
-
Finger thread the three 7/16 inch bolts into the motor bracket. (Do not tighten)
-
Attach and hand tighten the flexible line fitting and plug and play connection.
-
Reinstall plug and play support bracket, finger tightening the two 3/8 inch nuts.
-
Slide in drain pan until it latches to ensure proper plug and play and drain pan alignment.
-
Pull the motor towards the front of the fryer as far as possible.
-
Tighten the three motor bolts, plug and play compression fitting, flexible line fitting, and nuts on plug and play bracket.
Related Content
Replacing the Selector Valve Motor Encoder
Replacing the Flange Mount Filter Pump and Motor
Adjusting the Drain Valve Actuator
Troubleshooting Oil Not Pumping
Replacing the Bulk Fill Selector Valve
Troubleshooting the Check Pan Message on Evolution Elite Fryers
Replacing the EEG Fryer Generation 4 Selector Valve Motor
Troubleshooting EEG 16X and 24X E-15 Drain Open Error Code
Troubleshooting EEG 16X and 24X E-18 Level Probe Failure Error Code
Troubleshooting EEG 16X and 24X Oil Not Pumping Error Code
EEG E 82D Error Code Troubleshooting
Reference