Applies to:
ALL CUSTOMERS
Replacing Drain Switch
Cross-tip Driver
5/16 Wrench, Socket, or Nut Driver
Side Cutters
Wire Strippers
Needle Nose Pliers
Drain Switch - Spring Lever
Hard Stop Bracket
Mounting Nuts - x3
P-Clip
Lever Nuts - x2
Zip Tie
Kit number
140957
Estimated Time
30 minutes

|
To avoid electrical shock or property damage, disconnect power before installing or servicing equipment. A qualified technician must perform the service procedures. |
|
|
Only perform this procedure when the unit is cool or severe burns may result. |
Follow these instructions to replace the button style drain switch on fryers with manual drains.
Removing Push Button Switch
-
Turn power switch off.
-
Ensure fryer is cool to the touch before moving.
-
Pull out the fryer and unplug from power source.
-
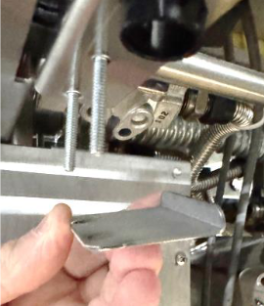
Using a cross-tip driver, unscrew the screws holding control and lower panel down of vat you are servicing.
-
Open door under control.
-
Using a 5/16 inch nut driver, remove the two nuts securing the drain switch cover.
-
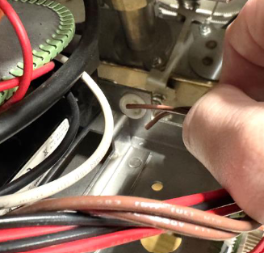
Remove switch and cut wires behind spade terminals.
-
Pull drain switch wires up into the control compartment.
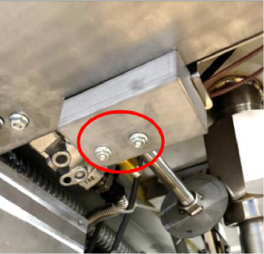
Installing Bracket and Spring Lever Switch
-
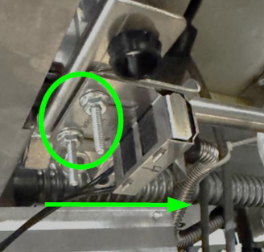
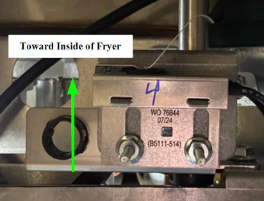
Install stop bracket onto switch mounting studs with lip of bracket facing up and toward the inside of fryer.
-
Install new spring lever switch with lever pointed towards the inside of the fryer.
-
Adjust switch towards the inside of fryer until slots bottom out.
-
Secure switch with two 5/16 inch nuts provided and tighten.
-
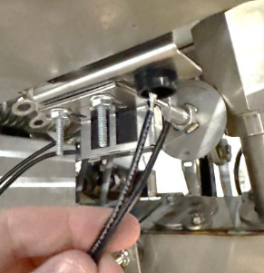
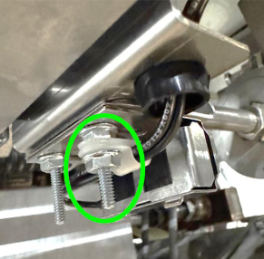
Route switch wires up through grommet on bracket and into the control compartment.
-
Install p-clip onto switch wires and mount to the right most stud. Secure wires using 5/16 inch nut provided.
-
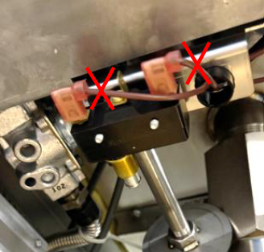
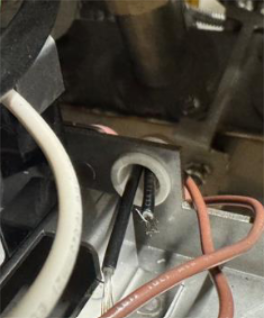
Strip all four drain switch wires back 3/8 in.
-
Install both lever nuts securing drain switch wires shown in image. NOTE: Wire connections do not matter as long as one black switch wire is with one brown.
-
Secure drain switch wires to fryer wiring using zip tie provided.
-
Working in reverse, complete steps 5 to 1 in the Removing Push Button Switch section above and return fryer to service.
|
|
Testing Spring Lever Switch
-
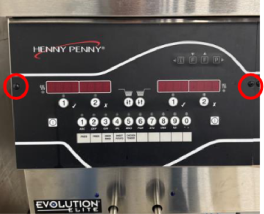
Turn control to the OFF position using either power button. (For split vats, turn the side off using the same side power button.)
-
Verify there is no oil in the filter pan and it is clean.
-
Pull drain handle all the way out and allow any oil to drain down to the filter pan. Then, push handle back in to close the drain.
-
Press and hold the P (Program) button in the top right of control for 6-8 seconds until you reach level 2.
-
Tap the P button until you see Tech Mode.
-
Enter code 11221122.
-
Tap the P button until you reach T-17. You should see HDE on the screen.
-
Pull the drain handle all the way to engage the switch and close it all the way again. Make sure the "D" is showing up and disappearing.
-
If needed, adjust the nut on the drain rod if it is not engaging / disengaging properly with switch.
-
After testing is complete, close the drain.
-
Press and hold the P button until control returns to OFF position.
-
Press and hold either of the F buttons on a full vat until you see Filter menu. (For split vats, press and hold the same side you need to fill back up.)
-
Tap the down arrow F button until you get to step 5.
-
Fill from pan and start the filling process by tapping the check mark button.
-
Once the vat is filled, stop the process by tapping the X button.
-
Make sure all oil has been removed from filter pan (restart fill process again if oil is still in pan).
-
Tap the X button again to get to the main filter menu.
-
Tap the down arrow F button until you see exit and exit the filter menu by tapping on the check mark.
-
Turn vat back ON for operation.
Related Content
Replacing the Selector Valve Motor Encoder
Replacing the Flange Mount Filter Pump and Motor
Replacing the Hubmounted Filter Pump and Motor
Adjusting the Drain Valve Actuator
Troubleshooting Oil Not Pumping
Replacing the Bulk Fill Selector Valve
Troubleshooting the Check Pan Message on Evolution Elite Fryers
Replacing the EEG Fryer Generation 4 Selector Valve Motor
Troubleshooting EEG 16X and 24X E-15 Drain Open Error Code
Troubleshooting EEG 16X and 24X E-18 Level Probe Failure Error Code
Troubleshooting EEG 16X and 24X Oil Not Pumping Error Code
EEG E 82D Error Code Troubleshooting
Smart Touch Software Installation Instructions
Replacing the Selector Valve Motor Encoder
Replacing the Flange Mount Filter Pump and Motor
Replacing the Hubmounted Filter Pump and Motor
Adjusting the Drain Valve Actuator
Troubleshooting Oil Not Pumping
Troubleshooting the EEG 25X E-15 Drain Open Error Code
Troubleshooting the EEG 25X Oil Not Pumping Error Code
Reference
EEG 16X and 24X Plumbing Diagram