Replacing the Heating Contactors
Description
Each electric fryer requires two switching contactors. One is the primary contactor and the second in line is the heat contactor. When open, the primary contactor allows no power to flow to the heat contactor. When closed, the primary contactor completes the timer circuit and the high limit (heat) circuit. It also supplies power to the heat contactor which is controlled by the themostat.
Checkout(Power Removed)

|
To avoid electrical shock or property damage, move the power switch to OFF and disconnect power. |
-
Remove electrical power supplied to the fryer.
-
Remove the control panel and insert it in the slot above the door.
-
Perform a check on the contactor as follows:
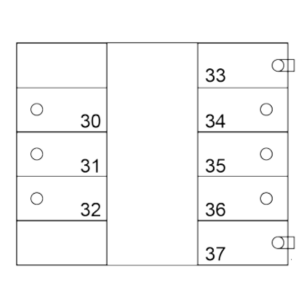
Test Points Results From 23 to 29 Open Circuit From 24 to 28 Open Circuit From 25 to 27 Open Circuit From 30 to 34 Open Circuit From 31 to 35 Open Circuit From 32 to 36 Open Circuit From 22 to 26 Ohm reading 415 From 33 to 37 Ohm reading 415
Primary Contactor
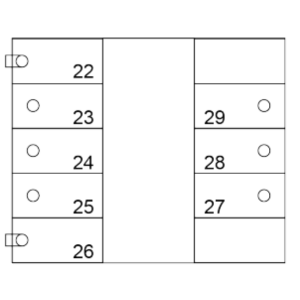
Heat Contactor
Checkout (Power Supplied)
-
With power re-applied, set the thermostat to its maximum temperature.
-
On fryers using single phase power, check voltage.
-
From pin D on circuit breaker to terminal 34.
-
From pin D on circuit breaker to terminal 35.
-
From pin D on circuit breaker to terminal 36.
-
The voltage should read the same at each terminal. It should correspond to the voltage rating slated on the data plate.
-
-
On fryers using three-phase power, check voltage.
-
For the Heat Contactor:
-
From terminal 34 to 35.
-
From terminal 35 to 36.
-
From terminal 24 to 36.
-
The voltage should read the same at each terminal. It should correspond to the voltage rating slated on the data plate.
-
-
For the Primary Contactor:
-
From terminal 27 to 28.
-
From terminal 28 to 29.
-
From terminal 27 to 29.
-
The voltage should read the same at each terminal. It should correspond to the voltage rating slated on the data plate.
-
Replacement Square D
|
|
To avoid electrical shock or property damage, move the power switch to OFF and disconnect power. |
If either contactor is defective, it must be replaced.
-
Remove only those wires directly connected to the contactor being replaced. Label the wires.
-
Remove the two mounting screws on the base plate and remove contactor.
-
Install the new contactor and tighten the two mounting screws.
-
Connect the labeled wires to their respective positions.
-
Install the control panel.
-
Reconnect power to the fryer and test the fryer for proper operation.
Replacement Mercury
|
|
To avoid electrical shock or property damage, move the power switch to OFF and disconnect power. |
-
Remove only those wires directly connected to the contactor being replaced. Label the wires.
-
On the mercury heat contactor, use a 5/16 in. socket or nut-driver and loosen four nuts securing contactor to shroud. Slide contactor up and then pull out through the slotted holes in the base of the contactor.
-
On the primary contactor, remove two mounting screws on the base plate and remove contactor.
-
Install the new contactor and tighten the two mounting screws.
-
Connect the labeled wires to their respective positions.
-
Install the control panel.
-
Reconnect power to the fryer and test the fryer for proper operation.
Related Content
Replacing the High Temperature Limit Control
Calibrating The Standard Single Stage Thermostat
Replacing the Temperature Probe
Replacing the Heating Elements
Replacing the Main Power Switch
Temperature Probe Gauge Instructions
Troubleshooting the PFE 500 and 561 E-5 Oil Overheating Error Code
Troubleshooting PFE 561 E-6 Temperature Probe Error Code
Troubleshooting PFE 561 E-10 High Limit Error Code
Troubleshooting PFE 500 and 561 E-26 Heat Amps Locked On Error Code
Troubleshooting an E-92 Error Code
Troubleshooting PFE 561 E-92 24V Current Limiter (Fuse) Trip Error Code
Troubleshooting Oil Melting or Heating Slowly
Troubleshooting PFE 500 W-1 Low Voltage Warning
Troubleshooting PFE 500 W-2 Slow Heating Warning
Troubleshooting PFE 500 W-3 Was Not Ready Warning
Troubleshooting PFE 500 W-4 Slow Cooking Warning
Troubleshooting PFE 500 W-5 Slow Cooking Warning
Troubleshooting PFE 500 W-6 Slow Cooking Warning
Troubleshooting PFE 500 W-9 Discard Product Warning
Reference