Error Codes
|
DISPLAY |
CAUSE |
PANEL BOARD CORRECTION |
|---|---|---|
|
“E-4” |
Control board overheating |
Turn switch to OFF position, then turn switch back to ON; if “E-4” continues, the board is getting too hot; check for signs of overheating behind the control panel; once panel cools down the controls should return to normal; if “E-4” persists, have control panel replaced |
|
“E-5” |
Oil overheating |
Turn switch to OFF position, then back to ON; if “E-5” continues, the heating circuits and temperature probe should be checked; once the unit cools down, the controls should return to normal; if “E-5” persists, have control panel replaced |
|
“E-6” |
Temperature probe failure |
Turn switch to OFF position, then back to ON; if the “E-6” continues, the temperature probe should be checked; once the probe is repaired, or replaced, the controls should return to normal; if “E-6” persists, have control panel replaced |
| “E-6 A” | Temperature probe open | Turn switch to OFF position, then turn switch back to ON; if display shows “E-6”, have the temperature probe checked |
| “E-6 B” | Temperature probe shorted | Turn switch to OFF position, then turn switch back to ON; if display shows “E-6” have the temperature probe checked |
|
“E-10” |
High limit |
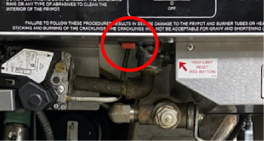
Allow oil to cool, and then reset the high limit. If the high limit does not reset, the high limit must be replaced. To reset the high limit:
|
| "E-15" | Drain switch failure | Close drain, using the drain valve handle; if display still failure shows “E-15”, have the drain microswitch checked |
| “E-20 A” | Vacuum switch failure (stuck closed) | Press the timer button to try the ignition process again, and if “E-20 A” persist, check the air switch |
| “E-20 B” | Draft fan or vacuum switch failure (stuck open) | Press the timer button to try the ignition process again and if “E-20 B” persist, check the vacuum switch or the blower motor |
| “E-20 C” | Ignition modules not responding | Press the timer button to try the ignition process again; if “E-20 C” persists, check the ignition module, the spark ignitor per Pilot/Ignitor Module Section, the I/O board |
|
“E-20 D” |
Pilots not lit or no flame sense |
Press the timer button to try the ignition process again; if “E-20 D” persists, check the ignition module, the I/O board per Control & I/O Boards Section or the flame sense |
| “E-25” | Heat amps too high | Heating elements drawing too much current; have heat circuit checked |
| “E-26” | Heat amps locked on | Heating elements are drawing current when controls are not calling for heat; have controls and heat circuit checked |
| “E-27” | Heat amps too low | Heating elements current is lower than expected; have heat circuit checked |
|
“E-31” |
Elements not hinged all the way down |
Check to make sure the elements are hinged all way down into the vat; check for obstructions under elements way down |
|
“E-41” |
Programming failure |
Turn switch to OFF position, then back to ON; if display shows “E-41”, the control should be re- initialized (See Programming Section) if the error code persists, have control panel replaced |
| “E-47” | Analog converter chip or 12 volt supply failure | Turn switch to OFF, then back to ON, if “E-47” persists, have the I/O board, or the PC board replaced; if speaker tones are quiet, probably I/O board failure |
| “E-48” | Input system error | Have PC board replaced |
| “E-70 B” | Faulty power switch, or switch wiring; faulty I/O board | Have power switch checked, along with its wiring; have Input/Output board replaced if necessary |
| “E-70” | Faulty power switch, or switch wiring; faulty I/O board | Have power switch checked, along with its wiring; have Input/Output board replaced if necessary |
|
“E-71” |
Pump motor relay failure or wiring problem |
Replace relay if contacts are stuck closed; check wiring on POWER/PUMP switch, or at wall receptacle; L1 and N may be reversed |
|
“E-92” |
24 VAC fuse on I/O board open |
Have components, in 24-volt circuit (I.E., hi limit, drain switch) checked for shorts |
| “E-32, FAN FAIL ERROR, CHECK BLOWER, CLEAN DILUTIONBOX, CALL HENNY PENNY SERVICE” | Air pressure switch open; clogged dilution box or faulty blower; open drain switch; open high limit |
Clean dilution box or replace blower if necessary; have drain switch checked; allow oil to cool and reset high limit or have high limit checked. Resetting High Limit:
|
CE Only - Along with the previous error codes, CE units have the following self-diagnostic error codes:
|
DISPLAY |
CAUSE |
PANEL BOARD CORRECTION |
|---|---|---|
|
“E-10” |
High limit |
Allow oil to cool, and then reset the high limit. If the high limit does not reset, the high limit must be replaced. To reset the high limit:
|
|
“E-15” |
Drain switch |
Close the drain, using the drain valve handle; if display still shows “E-15”, have the drain microswitch checked |
|
“E-20A” |
Air pressure switch failure |
Press the timer button to try the ignition process again, and if “E-20A” persists, call Henny Penny’s Service (stuck closed) Department |
| “E-20B” | Draft fan or air pressure switch failure (stuck open) | Press the timer button to try the ignition process again, and if “E-20B” persists, call Henny Penny’s Service Department |
|
“E-20C” |
Left gas module failure |
Press the timer button to try the ignition process again, and if “E-20C” persists, call Henny Penny’s Service Department |
| “E-20D” | Right module failure | Press the timer button to try the ignition process again, and if “E-20D” persists, call Henny Penny’s Service Department |
|
“E-20E” |
Both modules failure |
Press the timer button to try the ignition process again, and if “E-20E” persists, call Henny Penny’s Service Department |
| “E-20F” | Left module no flame sense | Press the timer button to try the ignition process again, and if “E-20F” persists, call Henny Penny’s Service Department |
|
“E-20G” |
Right module no flame sense |
Press the timer button to try the ignition process again, and if “E-20G” persists, call Henny Penny’s Service Department |
| “E-20H” | Both modules no flame sense | Press the timer button to try the ignition process again, and if “E-20H” persists, call Henny Penny’s Service Department |


Related Content
Information about the 390 and 392 Fryers
Installing the 390 and 392 Fryers
Operating the 390 and 392 Fryers
Programming the 390 and 392 Fryers
Troubleshooting the 390 and 392 Fryers
Inspecting the Counterweight Cables
Troubleshooting the SMS 20 Control Countdown
Troubleshooting the SMS Control Online Projection System (OPS) Connection
Replacing the High Temperature Limit Control
Replacing the Temperature Probe
Replacing the Gas Control Valve
Replacing the Flame Sensor Assembly
Replacing the Ignition Modules
Replacing the Ignitor Assembly
Replacing High Limit Thermocouple
Testing and Replacing the Power/Pump Switch
Replacing the Drain Valve and Extension
Replacing the Drain Microswitch
Replacing the Lid Counterweight Cables
Reference