Replacing Lid Cover Assembly

|
To avoid personal injury or property damage, before starting this procedure, move the main power switch to the off position. Disconnect the main circuit breakers at the circuit breaker box or unplug service cord from wall receptacle. |
Lid Cover Assembly
Description
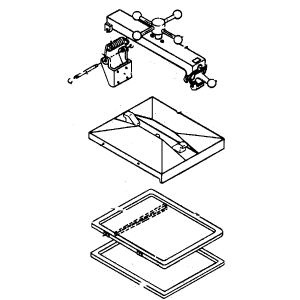
In general the spindle, the limit stop, the cover, the hinge, the inner and the reversible gasket comprise the lid cover assembly.
Lid Cover Removal
The lid cover is easily removable for cleaning or service.
-
Close the lid cover and turn spindle counterclockwise until it stops.
-
Pull the lid release pin on front of the crossbar, lift the latch and raise the crossbar.
-
The cover can now be removed from vat.
Lid Cover Installation
-
Place the lid cover on the vat.
-
Thread the spindle counterclockwise until it is completely extended.
-
Align the rear retaining hook on lid cover in the center slot of the crossbar.
-
Push the crossbar down and pull out on lid release pin.
-
Push the lid to rear of vat and latch the crossbar to the lid cover.
-
Release the pin.
-
Check that lid cover is fastened properly before raising.