Replacing the Air Probe
multimeter or ohmmeter
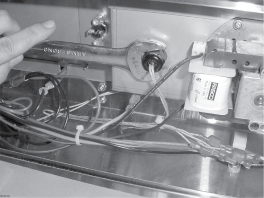
crosshead screwdriver
3/4” wrench

|
To avoid electrical shock or property damage, disconnect power before installing or servicing equipment. A qualified technician must perform the service procedures. |
-
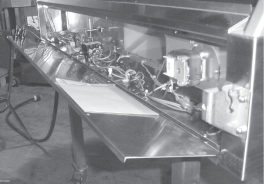
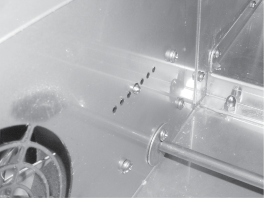
Remove the crosshead screws securing the bottom, rear cover and let hinge down.
-
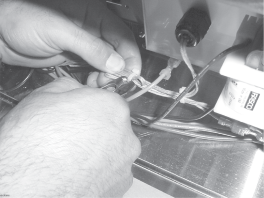
Cut wires ties to probe wires.
-
Unplug the probe from the wire harness.
-
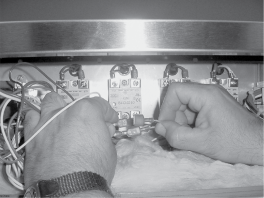
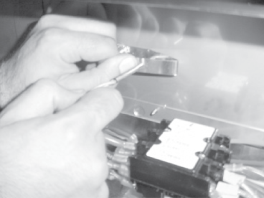
Using a multimeter or ohmmeter, check across the probe terminals for the correct ohms using the RTD Resistance Chart. If the probe proves faulty, continue onto step 5. If probe is good, replace wire ties on wires.
 RTD Chart
Fº
0
1
2
3
4
5
6
7
8
9
10
Cº
-320
20.44
20.20
19.96
19.72
19.48
19.24
19.00
18.76
18.52
-195
-310
22.83
22.59
22.35
22.11
21.87
21.63
21.39
21.16
20.92
20.68
20.44
-190
-300
25.20
24.97
24.73
24.49
24.25
24.02
23.78
23.54
23.30
23.06
22.83
-184
-290
27.57
27.33
27.10
26.86
26.62
26.39
26.15
25.91
25.68
25.44
25.20
-179
-280
29.93
29.69
29.46
29.22
28.98
28.75
28.51
28.28
28.04
27.81
27.57
-173
-270
32.27
32.04
31.80
31.57
31.34
31.10
30.87
30.63
30.40
30.16
29.93
-168
-260
34.61
34.38
34.14
33.91
33.68
33.44
33.21
32.98
32.74
32.51
32.27
-162
-250
36.94
36.71
36.47
36.24
36.01
35.78
35.54
35.31
35.08
34.84
34.61
-157
-240
39.26
39.03
38.80
38.56
38.33
38.10
37.87
37.64
37.40
37.17
36.94
-151
-230
41.57
41.34
41.11
40.88
40.65
40.42
40.19
39.95
39.72
39.49
39.26
-145
-220
43.88
43.65
43.42
43.19
42.96
42.73
42.49
42.26
42.03
41.80
41.57
-140
-210
46.17
45.94
45.71
45.48
45.26
45.03
44.80
44.57
44.34
44.11
43.88
-134
-200
48.46
48.23
48.00
47.78
47.55
47.32
47.09
46.86
46.63
46.40
46.17
-129
-190
50.74
50.52
50.29
50.06
49.83
49.60
49.38
49.15
48.92
48.69
48.46
-123
-180
53.02
52.79
52.56
52.34
52.11
51.88
51.65
51.43
51.20
50.97
50.74
-118
-170
55.29
55.06
54.83
54.61
54.38
54.15
53.93
53.70
53.47
53.25
53.02
-112
-160
57.55
57.32
57.10
56.87
56.65
56.42
56.19
55.97
55.74
55.51
55.29
-107
-150
59.81
59.58
59.35
59.13
58.90
58.68
58.45
58.23
58.00
57.78
57.55
-101
-140
62.06
61.83
61.61
61.38
61.16
60.93
60.71
60.48
60.26
60.03
59.81
-95
-130
64.30
64.08
63.85
63.63
63.40
63.18
62.95
62.73
62.50
62.28
62.06
-90
-120
66.54
66.31
66.09
65.87
65.64
65.42
65.20
64.97
64.75
64.52
64.30
-84
-110
68.77
68.55
68.33
68.10
67.88
67.66
67.43
67.21
66.99
66.76
66.54
-79
-100
71.00
70.78
70.55
70.33
70.11
69.89
69.66
69.44
69.22
68.99
68.77
-73
-90
73.22
73.00
72.78
72.56
72.33
72.11
71.89
71.67
71.45
71.22
71.00
-68
-80
75.44
75.22
75.00
74.78
74.55
74.33
74.11
73.89
73.67
73.45
73.22
-62
-70
77.66
77.43
77.21
76.99
76.77
76.55
76.33
76.11
75.88
75.66
75.44
-57
-60
79.86
79.64
79.42
79.20
78.98
78.76
78.54
78.32
78.10
77.88
77.66
-51
-50
82.07
81.85
81.63
81.41
81.19
80.97
80.75
80.53
80.31
80.09
79.86
-45
-40
84.27
84.05
83.83
83.61
83.39
83.17
82.95
82.73
82.51
82.29
82.07
-40
-30
86.47
86.25
86.03
85.81
85.59
85.37
85.15
84.93
84.71
84.49
84.27
-34
-20
88.66
88.44
88.22
88.00
87.78
87.56
87.34
87.13
86.91
86.69
86.47
-29
-10
90.85
90.63
90.41
90.19
89.97
89.75
89.54
89.32
89.10
88.88
88.66
-23
0
93.03
92.82
92.60
92.38
92.16
91.94
91.72
91.50
91.29
91.07
90.85
0
0
93.03
93.25
93.47
93.69
93.91
94.12
94.34
94.56
94.78
95.00
95.21
0
10
95.21
95.43
95.65
95.87
96.09
96.30
96.52
96.74
96.96
97.17
97.39
-12
20
97.39
97.61
97.83
98.04
98.26
98.48
98.70
98.91
99.13
99.35
99.57
-7
30
99.57
99.78
100.00
100.22
100.43
100.65
100.87
101.09
101.30
101.52
101.74
-1
40
101.74
101.95
102.17
102.39
102.60
102.82
103.04
103.25
103.47
103.69
103.90
4
50
103.90
104.12
104.34
104.55
104.77
104.98
105.20
105.42
105.63
105.85
106.07
10
60
106.07
106.28
106.50
106.71
106.93
107.15
107.36
107.58
107.79
108.01
108.23
15
70
108.23
108.44
108.66
108.87
109.09
109.30
109.52
109.73
109.95
110.17
110.38
21
80
110.38
110.60
110.81
111.03
111.24
111.46
111.67
111.89
112.10
112.32
112.53
27
90
112.53
112.75
112.96
113.18
113.39
113.61
113.82
114.04
114.25
114.47
114.68
32
100
114.68
114.90
115.11
115.33
115.54
115.76
115.97
116.18
116.40
116.61
116.83
38
110
116.83
117.04
117.26
117.47
117.68
117.90
118.11
118.33
118.54
118.76
118.97
43
120
118.97
119.18
119.40
119.61
119.82
120.04
120.25
120.47
120.68
120.89
121.11
49
130
121.11
121.32
121.53
121.75
121.96
122.18
122.39
122.60
122.82
123.03
123.24
54
140
123.24
123.46
123.67
123.88
124.09
124.31
124.52
124.73
124.95
125.16
125.37
60
150
125.37
125.59
125.80
126.01
126.22
126.44
126.65
126.86
127.08
127.29
127.50
65
160
127.50
127.71
127.93
128.14
128.35
128.56
128.78
128.99
129.20
129.41
129.62
71
170
129.62
129.84
130.05
130.26
130.47
130.68
130.90
131.11
131.32
131.53
131.74
77
180
131.74
131.96
132.17
132.38
132.59
132.80
133.01
133.23
133.44
133.65
133.86
82
190
133.86
134.07
134.28
134.50
134.71
134.92
135.13
135.34
135.55
135.76
135.97
88
200
135.97
136.19
136.40
136.61
136.82
137.03
137.24
137.45
137.66
137.87
138.08
93
210
138.08
138.29
138.51
138.72
138.93
139.14
139.35
139.56
139.77
139.98
140.19
99
220
140.19
140.40
140.61
140.82
141.03
141.24
141.45
141.66
141.87
142.08
142.29
104
230
142.29
142.50
142.71
142.92
143.13
143.34
143.55
143.76
143.97
144.18
144.39
110
240
144.39
144.60
144.81
145.02
145.23
145.44
145.65
145.86
146.07
146.28
146.49
115
250
146.49
146.70
146.91
147.11
147.32
147.53
147.74
147.95
148.16
148.37
148.58
121
260
148.58
148.79
149.00
149.21
149.41
149.62
149.83
150.04
150.25
150.46
150.67
127
270
150.67
150.88
151.08
151.29
151.50
151.71
151.92
152.13
152.33
152.54
152.75
132
280
152.75
152.96
153.17
153.38
153.58
153.79
154.00
154.21
154.42
154.62
154.83
138
290
154.83
155.04
155.25
155.46
155.66
155.87
156.08
156.29
156.49
156.70
156.91
143
300
156.91
157.12
157.33
157.53
157.74
157.95
158.15
158.36
158.57
158.78
158.98
149
310
158.98
159.19
159.40
159.61
159.81
160.02
160.23
160.43
160.64
160.85
161.05
154
320
161.05
161.26
161.47
161.67
161.88
162.09
162.29
162.50
162.71
162.91
163.12
160
330
163.12
163.33
163.53
163.74
163.95
164.15
164.36
164.57
164.77
164.98
165.18
165
340
165.18
165.39
165.60
165.80
166.01
166.21
166.42
166.63
166.83
167.04
167.24
171
350
167.24
167.45
167.66
167.86
168.07
168.27
168.48
168.68
168.89
169.09
169.30
177
360
169.30
169.51
169.71
169.92
170.12
170.33
170.53
170.74
170.94
171.15
171.35
182
370
171.35
171.56
171.76
171.97
172.17
172.38
172.58
172.79
172.99
173.20
173.40
188
380
173.40
173.61
173.81
174.02
174.22
174.43
174.63
174.83
175.04
175.24
175.45
193
390
175.45
175.65
175.86
176.06
176.26
176.47
176.67
176.88
177.08
177.29
177.49
199
400
177.49
177.69
177.90
178.10
178.30
178.51
178.71
178.92
179.12
179.32
179.53
204
410
179.53
179.73
179.93
180.14
180.34
180.55
180.75
180.95
181.16
181.36
181.56
210
420
181.56
181.77
181.97
182.17
182.38
182.58
182.78
182.98
183.19
183.39
183.59
215
430
183.59
183.80
184.00
184.20
184.40
184.61
184.81
185.01
185.22
185.42
185.62
221
440
185.62
185.82
186.03
186.23
186.43
186.63
186.84
187.04
187.24
187.44
187.65
227
450
187.65
187.85
188.05
188.25
188.45
188.66
188.86
189.06
189.26
189.46
189.67
232
460
189.67
189.87
190.07
190.27
190.47
190.67
190.88
191.08
191.28
191.48
191.68
238
470
191.68
191.88
192.09
192.29
192.49
192.69
192.89
193.09
193.29
193.49
193.70
243
480
193.70
193.90
194.10
194.30
194.50
194.70
194.90
195.10
195.30
195.50
195.71
249
490
195.71
195.91
196.11
196.31
196.51
196.71
196.91
197.11
197.31
197.51
197.71
254
500
197.71
197.91
198.11
198.31
198.51
198.71
198.91
199.11
199.31
199.51
199.71
260
510
199.71
199.91
200.11
200.31
200.51
200.71
200.91
201.11
201.31
201.51
201.71
265
520
201.71
201.91
202.11
202.31
202.51
202.71
202.91
203.11
203.31
203.51
203.71
271
530
203.71
203.91
204.11
204.31
204.51
204.71
204.90
205.10
205.30
205.50
205.70
277
540
205.70
205.90
206.10
206.30
206.50
206.70
206.89
207.09
207.29
207.49
207.69
282
550
207.69
207.89
208.09
208.29
208.48
208.68
208.88
209.08
209.28
209.48
209.67
288
560
209.67
209.87
210.07
210.27
210.47
210.67
210.86
211.06
211.26
211.46
211.66
293
570
211.66
211.85
212.05
212.25
212.45
212.64
212.84
213.04
213.24
213.44
213.63
299
580
213.63
213.83
214.03
214.23
214.42
214.62
214.82
215.02
215.21
215.41
215.61
304
590
215.61
215.80
216.00
216.20
216.40
216.59
216.79
216.99
217.18
217.38
217.58
310
600
217.58
217.77
217.97
218.17
218.37
218.56
218.76
218.96
219.15
219.35
219.55
315
610
219.55
219.74
219.94
220.13
220.33
220.53
220.72
220.92
221.12
221.31
221.51
321
620
221.51
221.70
221.90
222.10
222.29
222.49
222.68
222.88
223.08
223.27
223.47
327
630
223.47
223.66
223.86
224.06
224.25
224.45
224.64
224.84
225.03
225.23
225.42
332
640
225.42
225.62
225.82
226.01
226.21
226.40
226.60
226.79
226.99
227.18
227.38
338
660
229.33
229.52
229.72
229.91
230.11
230.30
230.49
230.69
230.88
231.08
231.27
349
670
231.27
231.47
231.66
231.86
232.05
232.24
232.44
232.63
232.83
233.02
233.21
354
680
233.21
233.41
233.60
233.80
233.99
234.18
234.38
234.57
234.77
234.96
235.15
360
690
235.15
235.35
235.54
235.73
235.93
236.12
236.31
236.51
236.70
236.89
237.09
365
700
237.09
237.28
237.47
237.67
237.86
238.05
238.25
238.44
238.63
238.83
239.02
371
710
239.02
239.21
239.41
239.60
239.79
239.98
240.18
240.37
240.56
240.75
240.95
377
720
240.95
241.14
241.33
241.52
241.72
241.91
242.10
242.29
242.49
242.68
242.87
382
730
242.87
243.06
243.26
243.45
243.64
243.83
244.02
244.22
244.41
244.60
244.79
388
740
244.79
244.98
245.18
245.37
245.56
245.75
245.94
246.13
246.33
246.52
246.71
393
750
246.71
246.90
247.09
247.28
247.47
247.67
247.86
248.05
248.24
248.43
248.62
399
760
248.62
248.81
249.00
249.20
249.39
249.58
249.77
249.96
250.15
250.34
250.53
404
770
250.53
250.72
250.91
251.10
251.30
251.49
251.68
251.87
252.06
252.25
252.44
410
780
252.44
252.63
252.82
253.01
253.20
253.39
253.58
253.77
253.96
254.15
254.34
416
790
254.34
254.53
254.72
254.91
255.10
255.29
255.48
255.67
255.86
256.05
256.24
421
800
256.24
256.43
256.62
256.81
257.00
257.19
257.38
257.57
257.76
257.95
258.14
427
810
258.14
258.33
258.52
258.70
258.89
259.08
259.27
259.46
259.65
259.84
260.03
432
820
260.03
260.22
260.41
260.60
260.78
260.97
261.16
261.35
261.54
261.73
261.92
438
830
261.92
262.11
262.29
262.48
262.67
262.86
263.05
263.24
263.43
263.61
263.80
443
840
263.80
263.99
264.18
264.37
264.56
264.74
264.93
265.12
265.31
265.50
265.68
449
850
265.68
265.87
266.06
266.25
266.44
266.62
266.81
267.00
267.19
267.37
267.56
454
860
267.56
267.75
267.94
268.12
268.31
268.50
268.69
268.87
269.06
269.25
269.44
460
870
269.44
269.62
269.81
270.00
270.18
270.37
270.56
270.75
270.93
271.12
271.31
466
880
271.31
271.49
271.68
271.87
272.05
272.24
272.43
272.61
272.80
272.99
273.17
471
890
273.17
273.36
273.55
273.73
273.92
274.11
274.29
274.48
274.67
274.85
275.04
477
900
275.04
275.22
275.41
275.60
275.78
275.97
276.15
276.34
276.53
276.71
276.90
482
910
276.90
277.08
277.27
277.46
277.64
277.83
278.01
278.20
278.38
278.57
278.75
488
920
278.75
278.94
279.13
279.31
279.50
279.68
279.87
280.05
280.24
280.42
280.61
493
930
280.61
280.79
280.98
281.16
281.35
281.53
281.72
281.90
282.09
282.27
282.46
499
940
282.46
282.64
282.83
283.01
283.20
283.38
283.56
283.75
283.93
284.12
284.30
504
950
284.30
284.49
284.67
284.86
285.04
285.22
285.41
285.59
285.78
285.96
286.14
510
960
286.14
286.33
286.51
286.70
286.88
287.06
287.25
287.43
287.62
287.80
287.98
515
970
287.98
288.17
288.35
288.53
288.72
288.90
289.08
289.27
289.45
289.64
289.82
521
980
289.82
290.00
290.19
290.37
290.55
290.73
290.92
291.10
291.28
291.47
291.65
527
990
291.65
291.83
292.02
292.20
292.38
292.56
292.75
292.93
293.11
293.30
293.48
532
1000
293.48
293.66
293.84
294.03
294.21
294.39
294.57
294.76
294.94
295.12
295.30
538
1010
295.30
295.48
295.67
295.85
296.03
296.21
296.40
296.58
296.76
296.94
297.12
543
1020
297.12
297.31
297.49
297.67
297.85
298.03
298.21
298.40
298.58
298.76
298.94
549
1030
298.94
299.12
299.30
299.49
299.67
299.85
300.03
300.21
300.39
300.57
300.75
554
1040
300.75
300.94
301.12
301.30
301.48
301.66
301.84
302.02
302.20
302.38
302.56
560
1050
302.56
302.75
302.93
303.11
303.29
303.47
303.65
303.83
304.01
304.19
304.37
565
1060
304.37
304.55
304.73
304.91
305.09
305.27
305.45
305.63
305.81
305.99
306.17
571
1070
306.17
306.35
306.53
306.71
306.89
307.07
307.25
307.43
307.61
307.79
307.97
577
1080
307.97
308.15
308.33
308.51
308.69
308.87
309.05
309.23
309.41
309.59
309.77
582
1090
309.77
309.95
310.13
310.31
310.49
310.67
310.85
311.02
311.20
311.38
311.56
588
1100
311.56
311.74
311.92
312.10
312.28
312.46
312.64
312.81
312.99
313.17
313.35
593
1110
313.35
313.53
313.71
313.89
314.07
314.24
314.42
314.60
314.78
314.96
315.14
599
1120
315.14
315.31
315.49
315.67
315.85
316.03
316.21
316.38
316.56
316.74
316.92
604
1130
316.92
317.10
317.27
317.45
317.63
317.81
317.98
318.16
318.34
318.52
318.70
610
1140
318.70
318.87
319.05
319.23
319.41
319.58
319.76
319.94
320.12
320.29
320.47
615
1150
320.47
320.65
320.82
321.00
321.18
321.36
321.53
321.71
321.89
322.06
322.24
621
1160
322.24
322.42
322.59
322.77
322.95
323.13
323.30
323.48
323.66
323.83
324.01
627
1170
324.01
324.18
324.36
324.54
324.71
324.89
325.07
325.24
325.42
325.60
325.77
632
1180
325.77
325.95
326.12
326.30
326.48
326.65
326.83
327.00
327.18
327.36
327.53
638
1190
327.53
327.71
327.88
328.06
328.24
328.41
328.59
328.76
328.94
329.11
329.29
643
1200
329.29
329.46
329.64
329.82
329.99
330.17
330.34
330.52
330.69
330.87
331.04
649
1210
331.04
331.22
331.39
331.57
331.74
331.92
332.09
332.27
332.44
332.62
332.79
654
1220
332.79
332.97
333.14
333.32
333.49
333.67
333.84
334.01
334.19
334.36
334.54
660
1230
334.54
334.71
334.89
335.06
335.24
335.41
335.58
335.76
335.93
336.11
336.28
665
1240
336.28
336.45
336.63
336.80
336.98
337.15
337.32
337.50
337.67
337.85
338.02
671
1250
338.02
338.19
338.37
338.54
338.71
338.89
339.06
339.23
339.41
339.58
339.75
677
1260
339.75
339.93
340.10
340.27
340.45
340.62
340.79
340.97
341.14
341.31
341.49
682
1270
341.49
341.66
341.83
342.01
342.18
342.35
342.52
342.70
342.87
343.04
343.21
688
1280
343.21
343.39
343.56
343.73
343.90
344.08
344.25
344.42
344.59
344.77
344.94
693
1290
344.94
345.11
345.28
345.46
345.63
345.80
345.97
346.14
346.32
346.49
346.66
699
1300
346.66
346.83
347.00
347.18
347.35
347.52
347.69
347.86
348.03
348.21
348.38
704
1310
348.38
348.55
348.72
348.89
349.06
349.23
349.41
349.58
349.75
349.92
350.09
710
1320
350.09
350.26
350.43
350.60
350.78
350.95
351.12
351.29
351.46
351.63
351.80
715
1330
351.80
351.97
352.14
352.31
352.48
352.66
352.83
353.00
353.17
353.34
353.51
721
1340
353.51
353.68
353.85
354.02
354.19
354.36
354.53
354.70
354.87
355.04
355.21
727
1350
355.21
355.38
355.55
355.72
355.89
356.06
356.23
356.40
356.57
356.74
356.91
732
1360
356.91
357.08
357.25
357.42
357.59
357.76
357.93
358.10
358.27
358.44
358.61
738
1370
358.61
358.78
358.95
359.12
359.28
359.45
359.62
359.79
359.96
360.13
360.30
743
1380
360.30
360.47
360.64
360.81
360.98
361.14
361.31
361.48
361.65
361.82
361.99
749
1390
361.99
362.16
362.33
362.49
362.66
362.83
363.00
363.17
363.34
363.51
363.67
754
1400
363.67
363.84
364.01
364.18
364.35
364.52
364.68
364.85
365.02
365.19
365.36
760
1410
365.36
365.52
365.69
365.86
366.03
366.20
366.36
366.53
366.70
366.87
367.03
765
1420
367.03
367.20
367.37
367.54
367.70
367.87
368.04
368.21
368.37
368.54
368.71
771
1430
368.71
368.88
369.04
369.21
369.38
369.55
369.71
369.88
370.05
370.21
370.38
777
1440
370.38
370.55
370.71
370.88
371.05
371.21
371.38
371.55
371.71
371.88
372.05
782
1450
372.05
372.21
372.38
372.55
372.71
372.88
373.05
373.21
373.38
373.55
373.71
788
1460
373.71
373.88
374.04
374.21
374.38
374.54
374.71
374.87
375.04
375.21
375.37
793
1470
375.37
375.54
375.70
375.87
376.04
376.20
376.37
376.53
376.70
376.86
377.03
799
1480
377.03
377.19
377.36
377.53
377.69
377.86
378.02
378.19
378.35
378.52
378.68
804
1490
378.68
378.85
379.01
379.18
379.34
379.51
379.67
379.84
380.00
380.17
380.33
810
1500
380.33
380.50
380.66
380.83
380.99
381.16
381.32
381.48
381.65
381.81
381.98
815
1510
381.98
382.14
382.31
382.47
382.64
382.80
382.96
383.13
383.29
383.46
383.62
821
1520
383.62
383.79
383.95
384.11
384.28
384.44
384.60
384.77
384.93
385.10
385.26
827
1530
385.26
385.42
385.59
385.75
385.91
386.08
386.24
386.41
386.57
386.73
386.90
832
1540
386.90
387.06
387.22
387.39
387.55
387.71
387.88
388.04
388.20
388.36
388.53
838
1550
388.53
388.69
388.85
389.02
389.18
389.34
389.50
389.67
389.83
389.99
390.16
843
1560
390.16
390.32
390.48
849
Using a 3/4” wrench, loosen probe strain relief and pull the probe from the unit.
Install new probe in reverse order, extending the probe 1/8” into cabinet.
Some probes are held into place by a probe bracket instead of a strain relief. Press on the edge of the bracket to relax the tension on the probe and then pull probe from unit. Extend the new probe about 1/4” into cabinet.