Applies to:
![]()
Replacing the Control
Cross Tip Driver
Small Cross Tip Driver
1/4 in. Socket Driver
USB with current software update
Display Board
Kit number
140892
Estimated Time
1 hour
The control needs to be replaced when there is control failure determined by proper troubleshooting.
ATTENTION! Setting up the control to Primary or Secondary is required. Follow the instructions in the Setting Up New Controlsection shown below. The power MUST be turned OFF on the unit for 30 seconds after the controls have been set up and any software update is required.
ATTENTION! A software update may be required after replacing the display. Follow the instructions in the Preparing USB (Software) section shown below. WARRANTY WILL NOT BE COVERED IF A SECOND TRIP IS REQUIRED TO UPDATE SOFTWARE.
Preparing USB (Software)
-
If you are a Henny Penny service provider, access the Extranet to download the latest software for the UHC 600 cabinet.
-
Obtain a blank USB drive. NOTE: Use a high quality, plastic, 16 gigabit (no larger), version 2.0, USB drive.
-
Download the file. When download is completed, right click and select Extract All.
-
On the left panel of the File Manager, select your USB drive which is attached to the computer. Your USB should have only one file displayed (for example, menu_20240214_110641.json). If so, you are ready to complete a software update.
NOTE: If your computer saves the .json file in a folder on the USB drive, remove the .json file from the folder or failure can occur. Ensure all other files and folders are removed from the USB drive. Only the .json file should remain on the USB drive.

|
To avoid electrical shock or property damage, disconnect power before installing or servicing equipment.A qualified technician must perform the installation. |
Replacing the Control
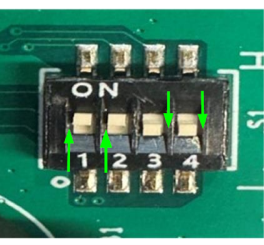
IMPORTANT! Check the positions of the dip switches on the back of the HMI before installing. Switches 1 & 2 should be up, 3 & 4 should be down, see image below.
-
Turn the power switch off.
-
Ensure unit is cool to the touch.
-
Unplug from the power source.
-
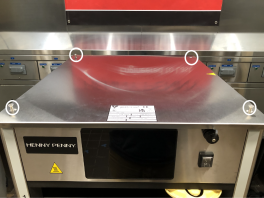
Using a cross tip bit, remove the four screws on the top of the cabinet and remove top cap.
-
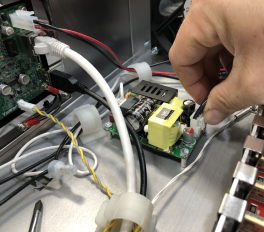
Front Control replacement only: Unplug the connections on the power supply board.

-
Front Control replacement only: Using a 1/4 in. socket driver, remove the 4 nuts securing the power supply board, and then move the board to the side.
-
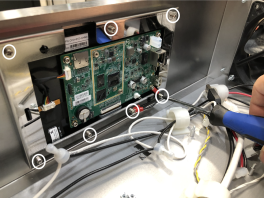
Unplug all connectors from the control.
-
Using a small cross tip screwdriver, remove the 7 mounting screws.
-
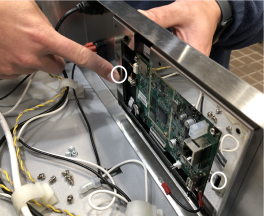
Press and squeeze in the two tabs holding the mounting plate onto the display. IMPORTANT! Hold onto the front of the display to keep it from falling.
-
Remove control.
-
Working in reverse, complete steps 10 through 1 and return cabinet to operation.
IMPORTANT! Follow the Setting Up New Control and Preparing USB (Software) steps after replacing the control.
Setting Up New Control
-
Turn power on. NOTE: A hidden setup screen is available from the display screen.
-
When the McDonald's display screen appears, press and hold the top right corner of the screen for 3 seconds or until the Hidden Setup screen displays.
Hidden Setup Screen
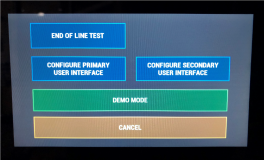
-
Select either Configure Primary User Interface when replacing the front display or Configure Secondary User Interface when replacing the rear display. The control restarts. Note: If the wrong selection is pressed, you will need to begin with step 1 again and select the correct option. If prompted to enter code, enter 11221122.
-
Once the control is loaded, press the Settings button and scroll to verify time, date, serial number, and model. NOTE: To edit the information, select the Lock button in the bottom left corner and enter code 1122. Save before exiting.
-
After setting up the control, proceed with doing a software update (if required, controls come pre-loaded with new software so update may be needed for other display). Please use the software update video (shown below) for more information. NOTE: Software update only needs to be completed on the PRIMARY control (front side of unit with power switch).
-
Once the software is updated, update the customer Daypart menus, if needed. Use the Daypart menu programming video for more information.
Display Screen

IMPORTANT! Turn unit power OFF for at least 30 seconds after control set up and software update.
Related Content
Troubleshooting an Unresponsive Control
Troubleshooting the E-200 SD Card Missing or Unable to Read
Troubleshooting the E-205 Upload Failure from USB
Troubleshooting the E-220 Communication Loss with both Control Panels
Troubleshooting the E-220A I/O board loss of network connectivity
Troubleshooting a Low Battery or Battery Failure
Replacing the I/O Control Board
Replacing the UHC 600 Power Supply
Installing the Power Cord Anti-Rotation Bracket
Reference