Network Connection Types
Understanding Network Connections
Installation Options
-
For new Wi-Fi enabled units, there is a device called a "dongle" located at the back of the control panel. It resembles a USB drive and is inserted into the first (furthest left) control panel. It looks like a USB drive and plugs into the connectivity board on the back of the control panel. The dongle is labeled with a MAC (Media Access Control) address. The MAC address must be added to the customer’s network configuration (e.g., IP whitelisting, ARP table, DNS server, etc.).
-
For older units that were shipped and installed without a dongle, a retrofit kit containing the dongle can be purchased and installed. The MAC address is printed on a label attached to the dongle. To ensure proper connectivity, the MAC address must be added to the customer’s network configuration (e.g., IP whitelisting, ARP table, DNS server, etc.). NOTE: Not available yet.
Wi-Fi Dongle
A small device called a dongle is plugged into the back of the first (furthest left) control panel. It looks like a USB drive and plugs into the connectivity board on the back of the control panel. It acts as a Wi-Fi radio, allowing the control panel to connect to the operator’s Wi-Fi network via a line of sight access point. To use it, you must enable Wi-Fi on the control and set up the connection. Additionally, the dongle's MAC Address must be setup on the customer's network (i.e., white-listing the McDonald's eBOSS network). The dongle has a white label attached displaying its MAC address.
Wi-Fi Gateway
If the dongle's Wi-Fi signal is weak, meaning connections are not available or above the required signal thresh-hold, which is 0 to -80 dBm, a gateway is recommend. The signal strength must be 0 to -80 dBm for the dongle to transfer data efficiently. Any business grade Cellular Gateway router will work with the dongle to extend and strengthen the signal, and then connect to the Cloud directly. Henny Penny recommends the Intwine Connect model ICG-150 gateway.
Data Transmission
Once connected to the operators network the data packets from the fryer (appliance) transmits to the internet cloud and then to the Henny Penny Data Center.
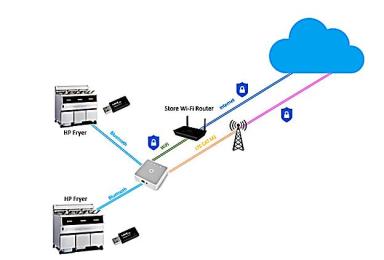
Henny Penny Data Center
The Henny Penny Data Center monitors each connected appliance and gathers information to determine state of operational health, and then transmits that data to the operator's HENNYLINK™ portal dashboard on their cellphone, tablet, laptop, etc.
HENNYLINK™ portal Dashboard
An application that can be logged into or downloaded to an electronic device (i.e., mobile device, etc.) and is used to monitor individual fryer data to determine operational health.
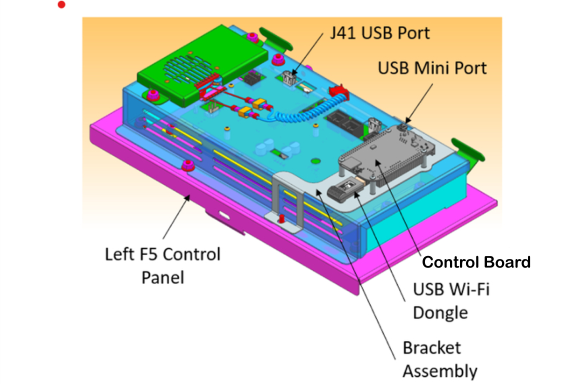
Reseating or Installing a Dongle
-
Remove the top, center screw holding the control in place.
-
Lower the control so you can see the back panel. The dongle is seated (inserted) into the Control Board, which is attached to the back of the control with screws.
- Note the MAC address on the dongle by pulling firmly on the dongle to unseat it from the connectivity board. The MAC address is on the white label attached to the dongle.
- Reinstall the USB dongle into the USB port on the (same as above) connectivity board. Ensure it's seated firmly.
Gateway Overview
Gateway Hardware
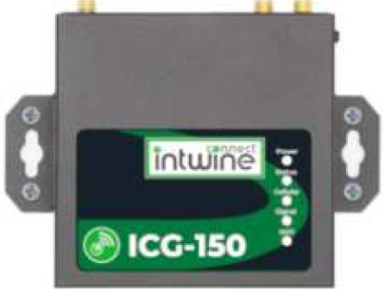
IMPORTANT: Henny Penny doesn't sell or support a cellular gateway but recommends the model ICG-150 cellular gateway.
The dongle signal strength requirement is 0 to -80 dBm. If the signal is weak it will slow communication. If the dongle cannot connect to the restaurant's network, at the required signal strength, then a cellular gateway router will need to be installed.
Any gateway connectivity device can be used to enhance or boost the signal on the Wi-Fi network or to direct connect the fryer to the Internet. The information below is provided as reference material. For detailed gateway information refer to the model ICG-150 cellular gateway.
What's in the Box
-
1 × ICG‑150 unit
-
2 × 4G LTE antennas
-
1 × Wi‑Fi antenna
-
1 × 12 V⎓1 A power supply
-
1 × 5 ft Ethernet cable
-
1 × Mounting bracket kit
Front View
- Top/Front View: LEDS for:
Power
Fault
SIM failure
Cellular signal (levels 0–30 color-coded red/yellow/green)
Wi-Fi Status (Steady or Blinking)
Back View
-
Rear view ports:
-
Dual SIM card slots
-
Primary and diversity cellular antenna connectors
-
Wi‑Fi antenna connector
-
WAN/LAN Ethernet ports
-
Power input and reset button
-
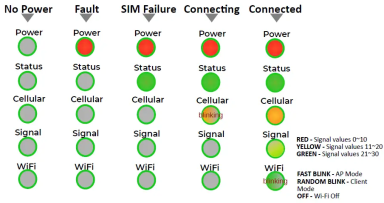
LED Indicator Guide
The LED indicators on the top panel of the ICG-150 are used to visually communicate the status of the router. The below chart can be used to determine it’s state and cellular connection.
Wall Hanging Installation
-
Fix the hanging ear to both sides of the device with the provided screws.
-
Fix the hanging ear to the wall with screws selected based on the wal type (not provided)
-
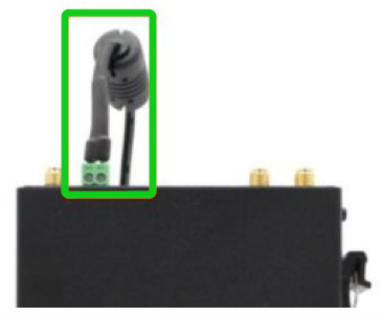
Remove power terminal from router.
-
Unscrew the locking screw on the power terminal.
-
Insert the power cable into the terminal and lock the screws.
Related Content
How to Enable Network Connectivity
Troubleshooting the Access Point Connection
Troubleshooting the Cloud Connection
Troubleshooting the User License Agreement (ULA)
Troubleshooting the IP Address
Troubleshooting the Radio (Dongle)
Troubleshooting Radio Software Setup
Troubleshooting Signal Strength
Managing Over the Air Connectivity Software Updates
Updating Connectivity Software
Reference
OFE 51X Software (without Connectivity)