Replacing the Pressure Switch
crosstip screwdriver
17/32 step bit
Needle nose pliers
Pressure switch .80
Pressure switch tube – 11in
Edge grommet
Kit number
140939
Estimated Time
30 minutes

|
Only perform this procedure when the unit is cool or severe burns may result. |
|
|
To avoid electrical shock or property damage, disconnect power before installing or servicing equipment. A qualified technician must perform the service procedures. |
|
|
Burn Risk To avoid burns, do not move the fryer while containing hot oil. |
-
Turn the power switch off.
-
Ensure fryer is cool to the touch before moving.
-
Pull out the fryer, and then unplug from the power source.
-
Remove Rear blower shroud.
NOTE: These steps only apply to replacing the right vat (from the front) pressure switch on a split vat behind the ATO pump, otherwise replacement is one for one.
-
Remove pressure switch using a crosstip driver or bit.
-
Using needle nose pliers, carefully disconnect the switch wires.
-
Disconnect tube from switch.
-
Using the grommet in the kit, push it onto the left bottom edge of the bracket.
-
Using the new tube from the kit, attach it to the nozzle of the switch.
-
Place switch in mounting location and re-attach wires.
-
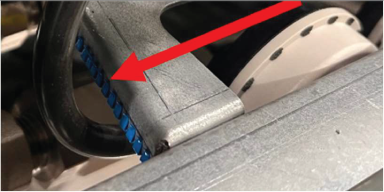
Rotate switch so the nozzle faces towards the left and mount back to frame.
-
Route tube under and around the left side and re-attach to splitter. Example in the step 8 image.
-
Working in reverse, complete steps 3 through 1 and return fryer to service.
Related Content
Replacing the High Limit Thermocouple
Replacing the High Limit Control
Replacing the Temperature Probe
Replacing the Gas Valve Solenoid Coil
Troubleshooting the Solid State High Limit
LVG 20X Troubleshooting the E-5 Oil Overheating Error Code
LVG 20X Troubleshooting the E-6 Temperature Probe Fail Error Code
LVG 20X Troubleshooting the E-10 High Limit Error Code
LVG 20X Troubleshooting the E-20A Fan Sensor Stuck On Error Code
LVG 20X Troubleshooting the E-20B No Draft Check Fan Error Code
LVG 20X Troubleshooting the E-20D Ignition Failure Error Code
LVG 20X Troubleshooting the E-22 No Heat Error Code
LVG 200 Generation 2 to Generation 4 Selector Valve Retrofit
Reference