Replacing the Pressure Switch
crosstip screwdriver
17/32 step bit
Needle nose pliers
Pressure switch .80
Pressure switch tube – 11in
Edge grommet
Kit number
140939
Estimated Time
30 minutes

|
Only perform this procedure when the unit is cool or severe burns may result. |
|
|
To avoid electrical shock or property damage, disconnect power before installing or servicing equipment. A qualified technician must perform the service procedures. |
|
|
Burn Risk To avoid burns, do not move the fryer while containing hot oil. |
-
Turn the power switch off.
-
Ensure fryer is cool to the touch before moving.
-
Pull out the fryer, and then unplug from the power source.
-
Remove rear blower shroud.
-
Remove the switch housing using a crosstip driver or bit.
-
Using needle nose pliers, carefully disconnect the switch wires.
-
Disconnect the tube from the switch.
-
Remove switch from the
-
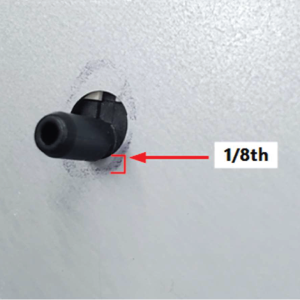
Using a step bit or bit, open the switch nozzle opening of the box to about 17/32. (roughly another 1/8th of an inch on the side facing the inside of the fryer). This should allow enough room for the new switch nozzle to pass through.
-
Attach new switch, wires, and tube.

-
Re-silastic nozzle opening.
-
Working in reverse, complete steps 4 through 1 and return fryer to service.
Related Content
Replacing the Main Power Switch
Replacing the High Temperature Limit Control
Replacing the Temperature Probe
Replacing the Air Pressure Switches
Troubleshooting the Solid State High Limit
Troubleshooting EEG 16X and 24X E-5 Oil Overheating Error Code
Troubleshooting EEG 16X and 24X E-6 Temperature Probe Failure Error Code
Troubleshooting EEG 16X and 24X E-10 High Limit Error Code
Troubleshooting EEG 16X and 24X E-20A Fan Sensor Failure Error Code
Troubleshooting EEG 16X and 24X E-20B No Draft Check Fan Error Code
Troubleshooting EEG 16X and 24X E-20D Ignition Failure Error Code
Troubleshooting EEG 16X and 24X E-22 No Heat Error Code
Smart Touch Software Installation Instructions
Replacing the Bulk Fill Selector Valve
Replacing the EEG Fryer Generation 4 Selector Valve Motor
Replacing the High Temperature Limit Control
Replacing the Temperature Probe
Replacing the Air Pressure Switches
Replacing the Main Power Switch
Troubleshooting the Solid State High Limit
Troubleshooting EEG 25X E-4 Control Overheating Error Code
Troubleshooting EEG 25X E-5 Oil Overheating Error Code
Troubleshooting EEG 25X E-6 Temperature Probe Failure Error Code
Troubleshooting EEG 25X E-10 High Limit Error Code
Troubleshooting the EEG 25X E-18 Level Probe Failure Error Code
Troubleshooting EEG 25X E-20A Fan Sensor Stuck On Error Code
Troubleshooting EEG 25X E-20B No Draft Check Fan Error Code
Troubleshooting EEG 25X E-20D Ignition Failure Error Code
Troubleshooting EEG 25X E-22 No Heat Error Code
Reference
EEG 16X and 24X Plumbing Diagram