Troubleshooting the E-10 (A-Y) High Limit Tripped Error Code
Overview
The E-10 high limit tripped error indicates that the temperature at the high limit exceeded its trip point of 575°F (300°C). This can occur due to various reasons, including low oil levels, lack of filtration, crumb buildup around the high limit thermocouple and heating elements, excessive carbon buildup from infrequent deep cleaning, loose temperature probes, or issues with the contactor not turning off from the control board.
There are two high limit modules and thermocouples in this system.
E-10 Errors
The following list provides detail around the letter that appears after the E-10 code:
-
E-10A: High limit tripped while the main probe was at or above 300°F (148°C).
-
E-10B: High limit tripped while the main probe was below 300°F (148°C).
-
E-10C: High limit tripped while cooking. This typically occurs when user skips filtering and skips performing deep cleans.
-
E-10D: High limit tripped less than five minutes after filtering, and the control returned to cook mode on its own after detecting that the oil was pumped up.
-
E-10F: High limit tripped while filtering (includes quick filter, daily filter, polish, dispose, drain pan fill from pan).
-
E-10M: High limit tripped while in melt mode.
-
E-10S: High limit tripped while in startup mode but not during filter operations.
-
E-10Y: High limit tripped less than five minutes after the user responded "yes" to the "is pot filled" message. This typically occurs when the oil has not filled back up to the pot and is at least at the bottom fill line.
Call Avoidance
To help the end user resolve the issue without a service call:
-
Drain the oil: Ensure the vat is empty.
-
Clean the heating elements: Brush all crumbs down the drain.
-
Pump up the oil: Fill to the appropriate line (lower fill line for room temperature oil, upper fill line for cooking temperature oil).
-
Wait 15 minutes: ensure 15 minutes or more has elapsed since the high limit trip to allow time for the oil to cool.
-
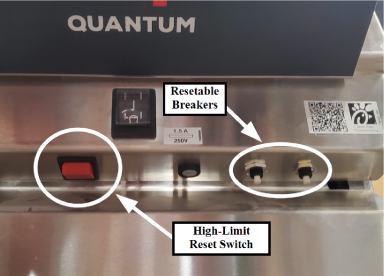
Reset the high limit: Press and hold the high limit reset switch located below the display control for five seconds. If it doesn't reset, try pressing and holding the white breakers next to the high limit switch for five seconds. If the breakers reset the high limit, service is still required to replace the switch, however the customer can continue to use the fryer.
-
If the high limit is tripping intermittently, ensure regular filtration and deep cleaning of the vats to prevent crumb and carbon buildup.
Field Troubleshooting
If call avoidance steps do not resolve the issue, proceed with the following field troubleshooting steps.
Recommended Parts:
CFE 5XX Open Fryer Series
-
High limit thermocouple
-
High limit reset switch
-
High limit module
-
Control board
Recommended Tools:
-
Multimeter
-
Basic hand tools (screwdrivers, pliers, etc.)
-
1/2 in. wrench
-
5/16 in. wrench
Troubleshooting a High Limit Reset
If the high limit continually trips or won't reset, do the following:
-
Initial Checks: Verify all steps from the call avoidance section.
-
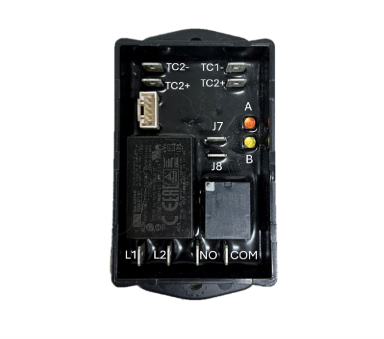
Module Lights: Lower the control board for the vat giving the high limit error. Check the high limit modules.
-
Amber light steady, red light off: Module not tripped.
-
Red light on, amber light off: High limit tripped.
-
Red light on, amber light flashing: Fault with the module or thermocouple.
-
-
-
Module Light Flashing: Refer to the blink code chart for a full list of blink codes and replace the faulty part based on the blink code information.
-
No LEDs: If there are no LEDs on one or more modules and an E-10 error, check incoming power to the module. If line voltage is present, replace the module; otherwise, troubleshoot wiring for open circuit faults.
-
LEDs in a normal Amber light steady state: If the amber LEDs on both modules are in a steady on state, however the E-10 High Limit Tripped error still displays on the control, unplug connector P13 and perform a continuity check on pin1 and 8, then perform a continuity check on pins 3 and 4. This checks to ensure the relay is indeed closed at each module. If there is continuity on both sets of pins and this connector, and this connector is securely connected to the control and the high limit tripped error persists, replace the control.
-
High Limit Reset Switch: Press the high limit reset switch while observing the high limit modules. If the LEDs do not turn off, check the continuity of the normally closed switch and replace if faulty.
-
Thermocouple Testing: Using needle nose pliers, unplug the

Troubleshooting an Intermittent High Limit Trip
-
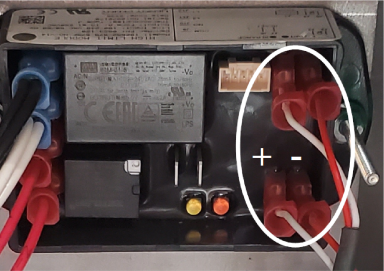
Intermittent E-10 Errors: Check for loose connections on the high limit module and reverse polarity on J type thermocouple connections (white wire to positive terminal, red wire to negative terminal).
Troubleshooting a High Limit Trip (oil temperatures exceeding 425°F (218°C))
-
Oil getting too hot E-10 errors: If there is amp draw to the heating element of the high limit tripping when there is no heat demand, test the heat contactor by removing a coil wire on the contactor, if the contactor still remains closed, replace the contactor. In the rare case the contactor opens when the coil voltage wire is removed, but closes when the coil wire is connected, then replace the control board.
Thermoelectric voltage as a function of temperature (°F); reference junctions at 32 °F.
| F | 0 | 1 | 2 | 3 | 4 | 5 | 6 | 7 | 8 | 9 | 10 |
|---|---|---|---|---|---|---|---|---|---|---|---|
| 50 | 0.507 | 0.535 | 0.563 | 0.592 | 0.620 | 0.649 | 0.677 | 0.705 | 0.734 | 0.762 | 0.791 |
| 60 | 0.791 | 0.819 | 0.848 | 0.876 | 0.905 | 0.933 | 0.962 | 0.991 | 1.019 | 1.048 | 1.076 |
| 70 | 1.076 | 1.105 | 1.134 | 1.162 | 1.191 | 1.220 | 1.249 | 1.277 | 1.306 | 1.335 | 1.364 |
| 80 | 1.364 | 1.364 | 1.392 | 1.421 | 1.450 | 1.479 | 1.508 | 1.566 | 1.594 | 1.623 | 1.652 |
| 90 | 1.652 | 1.681 | 1.710 | 1.739 | 1.768 | 1.797 | 1.826 | 1.855 | 1.884 | 1.913 | 1.942 |
| 100 | 1.942 | 1.972 | 2.001 | 2.030 | 2.059 | 2.088 | 2.117 | 2.146 | 2.175 | 2.205 | 2.234 |
| 110 | 2.234 | 2.263 | 2.292 | 2.322 | 2.351 | 2.380 | 2.409 | 2.439 | 2.468 | 2.497 | 2.527 |
| 120 | 2.527 | 2.556 | 2.585 | 2.615 |
2.644 |
2.673 | 2.703 | 2.732 | 2.762 | 2.791 | 2.821 |
| 130 | 2.821 | 2.850 | 2.880 | 2.909 | 2.938 | 2.968 | 2.997 | 3.027 | 3.057 | 3.086 | 3.116 |
| 140 | 3.116 | 3.145 | 3.175 | 3.204 | 3.234 | 3.264 | 3.293 | 3.323 | 3.353 | 3.382 | 3.412 |
| 150 | 3.412 | 3.442 | 3.471 | 3.501 | 3.531 | 3.560 | 3.590 | 3.620 | 3.650 | 3.679 | 3.709 |
| 160 | 3.709 | 3.739 | 3.769 | 3.798 | 3.828 | 3.858 | 3.888 | 3.918 | 3.948 | 3.977 | 4.007 |
| 170 | 4.007 | 4.037 | 4.067 | 4.097 | 4.127 | 4.157 | 4.187 | 4.217 | 4.246 | 4.276 | 4.306 |
| 180 | 4.306 | 4.336 | 4.366 | 4.396 | 4.426 | 4.456 | 4.486 | 4.516 | 4.546 | 4.576 | 4.606 |
| 190 | 4.606 | 4.636 | 4.666 | 4.696 | 4.726 | 4.757 | 4.787 | 4.817 | 4.847 | 4.877 | 4.907 |
| 200 | 4.907 | 4.937 | 4.967 | 4.997 | 5.028 | 5.058 | 5.088 | 5.118 | 5.148 | 5.178 | 5.209 |
| 210 | 5.209 | 5.239 | 5.269 | 5.299 | 5.329 | 5.360 | 5.390 | 5.420 | 5.450 | 5.480 | 5.511 |
| 220 | 5.511 | 5.571 | 5.571 | 5.602 | 5.632 | 5.662 | 5.692 | 5.723 | 5.753 | 5.783 | 5.814 |
| 230 | 5.814 | 5.874 | 5.874 | 5.905 | 5.935 | 5.965 | 5.996 | 6.026 | 6.056 | 6.087 | 6.117 |
| 240 | 6.117 | 6.178 | 6.178 | 6.208 | 6.239 | 6.269 | 6.299 | 6.330 | 6.360 | 6.391 | 6.421 |
| 250 | 6.421 | 6.452 | 6.482 | 6.512 | 6.543 | 6.573 | 6.604 | 6.634 | 6.665 | 6.695 | 6.726 |
| 260 | 6.726 | 6.756 | 6.787 | 6.817 | 6.848 | 6.878 | 6.909 | 6.939 | 6.970 | 7.000 | 7.031 |
| 270 | 7.031 | 7.061 | 7.092 | 7.122 | 7.153 | 7.184 | 7.214 | 7.245 | 7.275 | 7.306 | 7.336 |
| 280 | 7.336 | 7.367 | 7.398 | 7.428 | 7.459 | 7.489 | 7.520 | 7.550 | 7.581 | 7.612 | 7.642 |
| 290 | 7.642 | 7.673 | 7.704 | 7.734 | 7.765 | 7.795 | 7.826 | 7.857 | 7.887 | 7.918 | 7.949 |
| 300 | 7.949 | 7.979 | 8.010 | 8.041 | 8.071 | 8.102 | 8.133 | 8.163 | 8.194 | 8.225 | 8.255 |
| 310 | 8.255 | 8.286 | 8.317 | 8.347 | 8.378 | 8.409 | 8.439 | 8.470 | 8.501 | 8.532 | 8.562 |
| 320 | 8.562 | 8.593 | 8.624 | 8.654 | 8.685 | 8.716 | 8.747 | 8.777 | 8.808 | 8.839 | 8.869 |
| 330 | 8.869 | 8.900 | 8.931 | 8.962 | 8.992 | 9.023 | 9.054 | 9.085 | 9.115 | 9.146 | 9.177 |
| 340 | 9.177 | 9.208 | 9.238 | 9.269 | 9.300 | 9.331 | 9.362 | 9.392 | 9.423 | 9.454 | 9.485 |
| 350 | 9.485 | 9.515 | 9.546 | 9.577 | 9.608 | 9.639 | 9.669 | 9.700 | 9.731 | 9.762 | 9.793 |
| 360 | 9.793 | 9.823 | 9.854 | 9.885 | 9.916 | 9.947 | 9.977 | 10.008 | 10.039 | 10.070 | 10.101 |
| 370 | 10.101 | 10.131 | 10.162 | 10.193 | 10.224 | 10.255 | 10.285 | 10.316 | 10.647 | 10.378 | 10.409 |
| 380 | 10.409 | 10.440 | 10.470 | 10.501 | 10.532 | 10.563 | 10.594 | 10.625 | 10.655 | 10.686 | 10.717 |
| 390 | 10.717 | 10.748 | 10.779 | 10.810 | 10.840 | 10.871 | 10.902 | 10.933 | 10.964 | 10.995 | 11.025 |
| 400 | 11.025 | 11.056 | 11.087 | 11.118 | 11.149 | 11.180 | 11.211 | 11.241 | 11.272 | 11.303 | 11.334 |
| 410 | 11.334 | 11.365 | 11.396 | 11.426 | 11.457 | 11.488 | 11.519 | 11.550 | 11.581 | 11.612 | 11.642 |
| 420 | 11.642 | 11.673 | 11.704 | 11.735 | 11.766 | 11.797 | 11.828 | 11.858 | 11.889 | 11.920 | 11.951 |
| 430 | 11.951 | 11.982 | 12.013 | 12.044 | 12.074 | 12.105 | 12.136 | 12.167 | 12.198 | 12.229 | 12.260 |
| 440 | 12.260 | 12.290 | 12.321 | 12.352 | 12.383 | 12.414 | 12.445 | 12.476 | 12.506 | 12.537 | 12.568 |
| 450 | 12.568 | 12.599 | 12.630 | 12.661 | 12.691 | 12.722 | 12.753 | 12.784 | 12.815 | 12.846 | 12.877 |
| 460 | 12.877 | 12.907 | 12.938 | 12.969 | 13.000 | 13.031 | 13.062 | 13.093 | 13.123 | 13.154 | 13.185 |
| 470 | 13.185 | 13.216 | 13.247 | 13.278 | 13.308 | 13.339 | 13.370 | 13.401 | 13.432 | 13.463 | 13.494 |
| 480 | 13.494 | 13.524 | 13.555 | 13.586 | 13.617 | 13.648 | 13.679 | 13.709 | 13.740 | 13.771 | 13.802 |
| 490 | 13.802 | 13.833 | 13.864 | 13.894 | 13.925 | 13.956 | 13.987 | 14.018 | 14.049 | 14.079 | 14.110 |
| 500 | 14.110 | 14.141 | 14.172 | 14.203 | 14.233 | 14.264 | 14.295 | 14.326 | 14.357 | 14.388 | 14.418 |
| 510 | 14.418 | 14.449 | 14.480 | 14.511 | 14.542 | 14.573 | 14.603 | 14.634 | 14.665 | 14.696 | 14.727 |
| 520 | 14.727 | 14.757 | 14.788 | 14.819 | 14.850 | 14.881 | 14.911 | 14.942 | 14.973 | 15.004 | 15.035 |
| 530 | 15.035 | 15.065 | 15.096 | 15.127 | 15.158 | 15.189 | 15.219 | 15.250 | 15.281 | 15.312 | 15.343 |
| 540 | 15.343 | 15.373 | 15.404 | 15.435 | 15.466 | 15.496 | 15.527 | 15.558 | 15.589 | 15.620 | 15.650 |
| 550 | 15.650 | 15.681 | 15.712 | 15.743 | 15.773 | 15.804 | 15.835 | 15.866 | 15.897 | 15.927 | 15.958 |
| 560 | 15.958 | 15.989 | 16.020 | 16.050 | 16.081 | 16.112 | 16.143 | 16.173 | 16.204 | 16.235 | 16.266 |
| 570 | 16.266 | 16.296 | 16.327 | 16.358 | 16.389 | 16.419 | 16.450 | 16.481 | 16.512 | 16.542 | 16.573 |
| 580 | 16.573 | 16.604 | 16.635 | 16.665 | 16.696 | 16.727 | 16.758 | 16.788 | 16.819 | 16.850 | 16.881 |
| 590 | 16.881 | 16.911 | 16.942 | 16.973 | 17.003 | 17.034 | 17.065 | 17.096 | 17.126 | 17.157 | 17.188 |
Thermoelectric voltage as a function of temperature (°C); reference junctions at 0 °C.
| C | 0 | 1 | 2 | 3 | 4 | 5 | 6 | 7 | 8 | 9 | 10 |
|---|---|---|---|---|---|---|---|---|---|---|---|
| 50 | 2.585 | 2.638 | 2.691 | 2.744 | 2.797 | 2.850 | 2.903 | 2.956 | 3.009 | 3.062 | 3.116 |
| 60 | 3.116 | 3.169 | 3.222 | 3.275 | 3.329 | 3.382 | 3.436 | 3.489 | 3.543 | 3.596 | 3.650 |
| 70 | 3.650 | 3.703 | 3.757 | 3.810 | 3.864 | 3.918 | 3.971 | 4.025 | 4.079 | 4.133 | 4.187 |
| 80 | 4.187 | 4.240 | 4.294 | 4.348 | 4.402 | 4.456 | 4.510 | 4.564 | 4.618 | 4.672 | 4.726 |
| 90 | 4.726 | 4.781 | 4.835 | 4.889 | 4.943 | 4.997 | 5.052 | 5.106 | 5.160 | 5.215 | 5.269 |
| 100 | 5.269 | 5.323 | 5.378 | 5.432 | 5.487 | 5.541 | 5.595 | 5.650 | 5.705 | 5.759 | 5.814 |
| 110 | 5.814 | 5.868 | 5.923 | 5.977 | 6.032 | 6.087 | 6.141 | 6.196 | 6.251 | 6.306 | 6.360 |
| 120 | 6.360 | 6.415 | 6.470 | 6.525 | 6.579 | 6.634 | 6.689 | 6.744 | 6.799 | 6.854 | 6.909 |
| 130 | 6.909 | 6.964 | 7.019 | 7.074 | 7.129 | 7.184 | 7.239 | 7.294 | 7.349 | 7.404 | 7.459 |
| 140 | 7.459 | 7.514 | 7.569 | 7.624 | 7.679 | 7.734 | 7.789 | 7.844 | 7.900 | 7.955 | 8.010 |
| 150 | 8.010 | 8.065 | 8.120 | 8.175 | 8.231 | 8.286 | 8.341 | 8.396 | 8.452 | 8.507 | 8.562 |
| 160 | 8.562 | 8.618 | 8.673 | 8.728 | 8.783 | 8.839 | 8.894 | 8.949 | 9.005 | 9.060 | 9.115 |
| 170 | 9.115 | 9.171 | 9.226 | 9.282 | 9.337 | 9.392 | 9.448 | 9.503 | 9.559 | 9.614 | 9.669 |
| 180 | 9.669 | 9.725 | 9.780 | 9.836 | 9.891 | 9.947 | 10.002 | 10.057 | 10.113 | 10.168 | 10.224 |
| 190 | 10.224 | 10.279 | 10.335 | 10.390 | 10.446 | 10.501 | 10.557 | 10.612 | 10.668 | 10.723 | 10.779 |
| 200 | 10.779 | 10.834 | 10.890 | 10.945 | 11.001 | 11.056 | 11.112 | 11.167 | 11.223 | 11.278 | 11.334 |
| 210 | 11.334 | 11.389 | 11.445 | 11.501 | 11.556 | 11.612 | 11.667 | 11.723 | 11.778 | 11.834 | 11.889 |
| 220 | 11.889 | 11.945 | 12.000 | 12.056 | 12.111 | 12.167 | 12.222 | 12.278 | 12.334 | 12.389 | 12.445 |
| 230 | 12.445 | 12.500 | 12.556 | 12.611 | 12.667 | 12.722 | 12.778 | 12.833 | 12.889 | 12.944 | 13.000 |
| 240 | 13.000 | 13.056 | 13.111 | 13.167 | 13.222 | 13.278 | 13.333 | 13.389 | 13.444 | 13.500 | 13.555 |
| 250 | 13.555 | 13.611 | 13.666 | 13.722 | 13.777 | 13.833 | 13.888 | 13.944 | 13.999 | 14.055 | 14.110 |
| 260 | 14.110 | 14.166 | 14.221 | 14.277 | 14.332 | 14.388 | 14.443 | 14.499 | 14.554 | 14.609 | 14.665 |
| 270 | 14.665 | 14.720 | 14.776 | 14.831 | 14.887 | 14.942 | 14.998 | 15.053 | 15.109 | 15.164 | 15.219 |
| 280 | 15.219 | 15.275 | 15.330 | 15.386 | 15.441 | 15.496 | 15.552 | 15.607 | 15.663 | 15.718 | 15.773 |
| 290 | 15.773 | 15.829 | 15.884 | 15.940 | 15.995 | 16.050 | 16.106 | 16.161 | 16.216 | 16.272 | 16.327 |
| 300 | 16.327 | 16.383 | 16.438 | 16.493 | 16.549 | 16.604 | 16.659 | 16.715 | 16.770 | 16.825 | 16.881 |
| 310 | 16.881 | 16.936 | 16.991 | 17.046 | 17.102 | 17.157 | 17.212 | 17.268 | 17.323 | 17.378 | 17.434 |
| 320 | 17.434 | 17.489 | 17.544 | 17.599 | 17.655 | 17.710 | 17.765 | 17.820 | 17.876 | 17.931 | 17.986 |
| 330 | 17.986 | 18.041 | 18.097 | 18.152 | 18.207 | 18.262 | 18.318 | 18.373 | 18.428 | 18.483 | 18.538 |
| 340 | 18.538 | 18.594 | 18.649 | 18.704 | 18.759 | 18.814 | 18.870 | 18.925 | 18.980 | 19.035 | 19.090 |
| 350 | 19.090 | 19.146 | 19.201 | 19.256 | 19.311 | 19.366 | 19.422 | 19.477 | 19.532 | 19.587 | 19.642 |
| 360 | 19.642 | 19.697 | 19.753 | 19.808 | 19.863 | 19.918 | 19.973 | 20.028 | 20.083 | 20.139 | 20.194 |
| 370 | 20.194 | 20.249 | 20.304 | 20.359 | 20.414 | 20.469 | 20.525 | 20.580 | 20.635 | 20.690 | 20.745 |
| 380 | 20.745 | 20.800 | 20.855 | 20.911 | 20.966 | 21.021 | 21.076 | 21.131 | 21.186 | 21.241 | 21.297 |
| 390 | 21.297 | 21.352 | 21.407 | 21.462 | 21.517 | 21.572 | 21.627 | 21.683 | 21.738 | 21.793 | 21.848 |
| 400 | 21.848 | 21.903 | 21.958 | 22.014 | 22.069 | 22.124 | 22.179 | 22.234 | 22.289 | 22.345 | 22.400 |
| 410 | 22.400 | 22.455 | 22.510 | 22.565 | 22.620 | 22.676 | 22.731 | 22.786 | 22.841 | 22.896 | 22.952 |
| 420 | 22.952 | 23.007 | 23.062 | 23.117 | 23.172 | 23.228 | 23.283 | 23.338 | 23.393 | 23.449 | 23.504 |
| 430 | 23.504 | 23.559 | 23.614 | 23.670 | 23.725 | 23.780 | 23.835 | 23.891 | 23.946 | 24.001 | 24.057 |
| 440 | 24.057 | 24.112 | 24.167 | 24.223 | 24.278 | 24.333 | 24.389 | 24.444 | 24.499 | 24.555 | 24.610 |
| 450 | 24.610 | 24.665 | 24.721 | 24.776 | 24.832 | 24.887 | 24.943 | 24.998 | 25.053 | 25.109 | 25.164 |
| 460 | 25.164 | 25.220 | 25.275 | 25.331 | 25.386 | 25.442 | 25.497 | 25.553 | 25.608 | 25.664 | 25.720 |
| 470 | 25.720 | 25.775 | 25.831 | 25.886 | 25.942 | 25.998 | 26.053 | 26.109 | 26.165 | 26.220 | 26.276 |
| 480 | 26.276 | 26.332 | 26.387 | 26.443 | 26.499 | 26.555 | 26.610 | 26.666 | 26.722 | 26.778 | 26.834 |
| 490 | 26.834 | 26.889 | 26.945 | 27.001 | 27.057 | 27.113 | 27.169 | 27.225 | 27.281 | 27.337 | 27.393 |
| 500 | 27.393 | 27.449 | 27.505 | 27.561 | 27.617 | 27.673 | 27.729 | 27.785 | 27.841 | 27.897 | 27.953 |
| 510 | 27.953 | 28.010 | 28.066 | 28.122 | 28.178 | 28.234 | 28.291 | 28.347 | 28.403 | 28.460 | 28.516 |
| 520 | 28.516 | 28.572 | 28.629 | 28.685 | 28.741 | 28.798 | 28.854 | 28.911 | 28.967 | 29.024 | 29.080 |
| 530 | 29.080 | 29.137 | 29.194 | 29.250 | 29.307 | 29.363 | 29.420 | 29.477 | 29.534 | 29.590 | 29.647 |
| 540 | 29.647 | 29.704 | 29.761 | 29.818 | 29.874 | 29.931 | 29.988 | 30.045 | 30.102 | 30.159 | 30.216 |
Related Content
Troubleshooting the E5 Oil Too Hot Error Code
Troubleshooting the E-6 Main Temperature Probe Failed Error Code
Troubleshooting the E-19 Protection Probe Failed Warning
Troubleshooting the E-25 Heat Amps Too High Error Code
Troubleshooting the E-26 Heat Amps Locked On Error Code
Troubleshooting the E-30 Circuit Breaker Tripped Error Code
Troubleshooting the E-70B Power Switch or Wiring Failure Error Code
Troubleshooting the E-75 Contactor Near End-of-Life Error Code
Troubleshooting the W-2 Slow Heat Up Warning
Troubleshooting the W-4 Slow Cooking Warning
Troubleshooting the W-6 Slow Cooking Warning
Troubleshooting the W-7 Low Amps Warning
Troubleshooting the W-9 Discard Product Warning
CFE 5XX Replacing the Heating Element
CFE 5XX Replacing High Limit Thermocouple
CFE 5XX Replacing Bottom Probe
CFE-5XX Replacing Temperature/Level/Auxiliary Probe
Reference