Bulk Oil Retrofit Move
Adjustable wrench
1-1/16" torque wrench
7/16" nut driver or wrench
1/4" drill bit
Drill
Measuring tape
Pen or Marker
Kit number
140937 and 140938
Estimated Time
45 minutes
These instructions explain the retrofit to move existing bulk fill/dispose rear connections on a four vat fryer.

|
Only perform this procedure when the fryer is cool or severe burns may result. |
IMPORTANT: All Braided Flex Hose connections should be torqued to 43ft-lbs to prevent damage and/or leaking.
Retrofitting Procedure
-
Turn the power switch off.
-
Ensure fryer is cool to the touch before moving.
-
Pull out the fryer, and then unplug from the power source.
-
Carefully remove any hose connections currently connected to the bulk fill and bulk dispose rear connections.
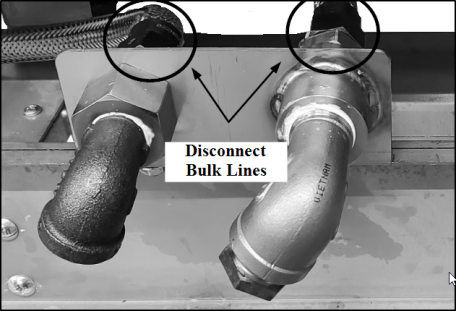
-
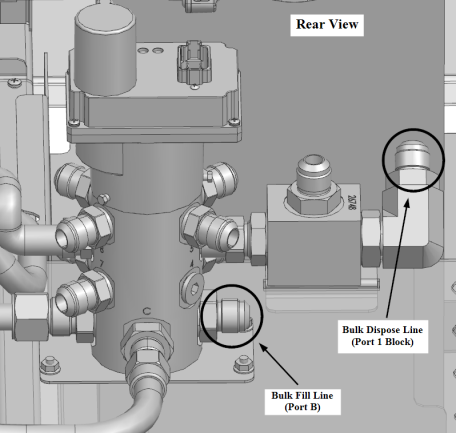
Using a 1-1/16" wrench, disconnect the bulk dispose line from the selector valve side on Port 1 block connection elbow and the bulk fill line from Port B and the dispose connections and remove flex lines from fryer.
IMPORTANT! The bulk fill line should have a mesh screen inside the hose on the rear side connection. Make sure to remove the mesh screen and set aside to be reused.
-
Using a measuring tape, measure from the inside of the right frame post to 8.5 in. and make the first mark. Then measure 3.25 inches from there and make the second mark.
-
Using a 1/4 in. drill bit, carefully drill new mounting holes in the rear frame, clear off any residual metal shavings and dispose of properly.
-
Using a 7/16 nut driver, remove the two nuts securing the exiting bulk assembly and install it into the new position on the far right and secure with nuts.
-
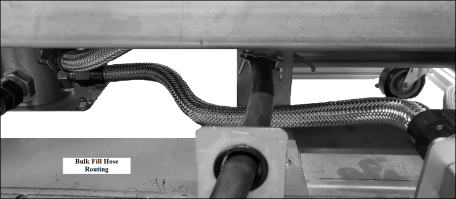
Using the new 18" flex hose from the kit, install the mesh screen into one side of the flex line and connect hose to the bulk fill fitting on the rear bulk assembly and tighten. Route the other end under the power cord on the fryer and connect it to Port B and tighten.

-
Using the second hose supplied in the kit, complete the same connections to the rear dispose line and Port 1 connections and tighten. Reconnect the Port 2 connection and tighten if removed previously.
-
NOTE: Make sure to route the dispose line to prevent kinked bends and to prevent contact with interlock cable if present. See example shown.
-
Working in reverse, complete steps 4 through 1 and return fryer to service.
NOTE: For Vacuum Dispose options, disconnect the dispose line from Port 1.
TIP: It may be easier to disconnect the flex line on Port 2 from the front of the fryer to disconnect Port 1 and Port B.
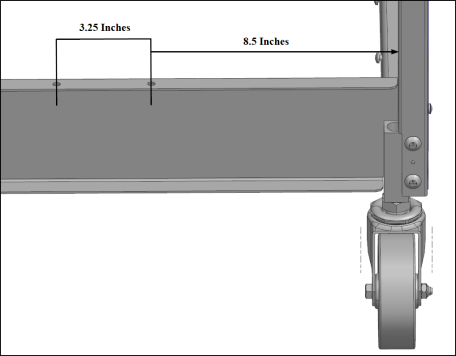

NOTE: Make sure the center for the hole start is roughly 1/8th below the line shown in the rear frame.
Related Content
Troubleshooting a Blank Display
CE Filter Motor Cover Retrofit
Bulk Dispose and Fill Retrofit
Retrofitting Adjustable Filter Pan Guide Rail
Troubleshooting the Check JIB Message
Selector Valve Port Configurations
Replacing the Selector Valve Motor
Troubleshooting a Change Pad Reminder XX hrs. Error
Troubleshooting a Drain Pan Switch Failure
Troubleshooting an E-82D Selector Valve Error
Reference
OFE 51X Software (without Connectivity)
OFE 51X Software (Connectivity)
LVE 300 Software (without Connectivity)