Applies to:
![]()
Troubleshooting Vat Overfill
temperature and level probes (3)
drain valve
drain valve o-ring
drain valve actuator
PMU board

|
To avoid electrical shock or property damage, disconnect power before installing or servicing equipment. A qualified technician must perform the service procedures. |
Overview
The oil level of a vat increases above the upper fill line when the vat is in use. The ATO (auto top off) system maintains oil at the upper-level line when the fryer is in the on position. The oil level should not increase above this line. For more information on this system see ATO System Theory of Operation. For this service issue, it is important to narrow down whether the fault is from the probes not giving a correct reading, a crew member leaving excess oil in the filter pan, or from a leaking drain valve.
Call Avoidance
Perform these steps first to avoid having to go to the restaurant and adding value for your customer:
-
Instruct the customer to drain oil to the filter pan then inspect level probes and temperature probes. The level probes are at the front of the vat toward the top and the temp probe is at the rear of the vat toward the bottom.
-
Ask the customer to remove any breading, carbon build up or other debris from these probes using a small cleaning brush.
-
Once probes are clean, have the customer fill the vat and test.
NOTE: If the temp probe or level probes are insulated with debris, they will not properly sense the temperature of the oil and cause overfilling.
-
Ensure no oil remains in the filter pan after filtration. If a vat is turned on, but oil is low, the ATO feature will add oil from the JIB to top off the vat. The next time a crew member filters, the excess oil from the filter pan will pump up to the vat causing it to fill above the upper fill line.
If the previous steps do not resolve the issue and the auto top off system continues to add oil to an already full vat, a service call will be needed.
To temporarily stop oil from rising above the fill line, the customer can disable ATO temporarily by:

-
Navigate to Settings > Advanced > type 1122.
-
Tap Oil & Filter Configuration.
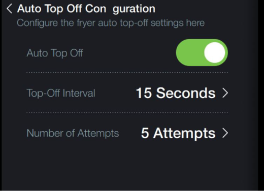
-
Toggling ATO Configuration.
Field Troubleshooting
Troubleshooting probe issues
-
Double check steps from call avoidance section.
-
Ensure oil level is at or above the top fill line.
-
Enter the service level in the control by:
-
Tapping Settings.
-
Tapping Service.
-
Entering code 1122.
-
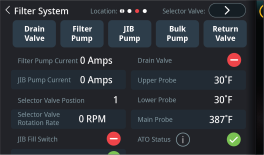
Tapping Filter System.
-
-
From this screen, compare the temperature of the left probe, right probe and main probe.
When all three probes are touching hot oil, they would all read within 0 – 3°F (0-2°C) of each other and this would satisfy the ATO system. When a difference greater than 15°F (9°C) occurs between both level probes and temperature probe, this triggers a vat low state where the ATO system starts to add oil to the vat.
-
Drain the oil from the vat to the filter pan by:
-
Tapping Settings.
-
Tapping Oil & Filter.
-
Tapping Drain To Pan.
-
-
Ensure probes are clean, straight and extend into the vat ¾ ” (19 mm).
-
If the faulty probe is bent or damaged, replace it.
-
If the probes do not extend far enough into the vat, they will need to be adjusted out to the correct depth and tightened to 180 in lbs.
-
-
For undamaged probes that do not match the temperature of the oil, fill the vat with oil, take a temperature reading near the probe and take an ohm reading of the probe.
-
Compare the results with the RTD Resistance chart. If the probe reading is not within +/- 5% from the reading from the chart, replace the probe.
 RTD Resistance Chart
Temperature (Fahrenheit) Temperature (Celsius) Resistance Ohms 50 10,00 1 039,02 60 15,56 1 060,65 70 21,11 1 082,24 80 26,67 1 103,80 90 32,22 1 125,32 100 37,78 1 146,81 110 43,33 1 168,26 120 48,89 1 189,67 130 54,44 1 211,05 140 60,00 1 232,39 150 65,56 1 253,70 160 71,11 1 274,97 170 76,67 1 296,20 180 82,22 1 317,40 185 85,00 1 327,99 190 87,78 1 338,57 200 93,33 1 359,69 210 98,89 1 380,79 212 100,00 1 385,00 220 104,44 1 401,84 230 110,00 1 422,86 240 115,56 1 443,85 250 121,11 1 464,79 260 126,67 1 485,71 270 132,22 1 506,58 280 137,78 1 527,43 290 143,33 1 548,23 300 148,89 1 569,00 310 154,44 1 589,73 320 160,00 1 610,43 325 162,78 1 620,77 330 165,56 1 631,09 340 171,11 1 651,72 350 176,67 1 672,31 360 182,22 1 692,86 365 185,00 1 703,13 370 187,78 1 713,38 380 193,33 1 733,87 390 198,89 1 754,31 400 204,44 1 774,72 410 210,00 1 795,10 420 215,56 1 815,44 430 211,11 1 835,74 440 226,67 1 856,01 -
If the probe reading is in range, ensure the probe has a secure connection at the PMU board.
-
If the connection is secure, but it still reads incorrectly, replace the PMU board.
If there were no issues with probes, continue to Troubleshooting Drain Valve Issues.
Troubleshooting Drain Valve Issues
With all vats hot and drain valves in the closed position, remove the filter pan, and inspect the drain trough for oil leaks.
Inspect the gasket from the down pipe to trough to ensure the seal is maintained.
If oil continues to drip from the drain trough with all valves in the closed position, narrow down which valve is damaged by turning off each vat. Wait and observe. The oil level will decrease from the vat with the leaking drain valve.
NOTE: When vats are off, they do not top off, so oil loss will be visible.
Inspect the leaking drain valve.
If the ball valve is damaged, replace the drain valve and o-ring.
If the drain valve does not fully close, adjust the drain valve actuator. Replace the actuator if unable to adjust.
Other Possibilities
Ensure the overfilling is not due to a crew member manually overfilling the vat without the manager knowing.
Related Content
Troubleshooting the Check JIB Message
Selector Valve Port Configurations
Replacing the Selector Valve Motor
Troubleshooting a Change Pad Reminder XX hrs. Error
Troubleshooting a Drain Pan Switch Failure
Troubleshooting an E-82D Selector Valve Error
CE Filter Motor Cover Retrofit
Retrofitting Adjustable Filter Pan Guide Rail
Reference
LVE 300 Software (without Connectivity)