Applies to:

Replacing the GMU Board
 Required tools
-
Drill with crosstip bit or screwdriver
-
3/8 in (10 mm) socket or nut driver
-
Basic hand tools
Kit contentsGMU board
Standoffs
Estimated Time
30 minutes

|
Only perform this procedure when the fryer is cool or severe burns may result. |
Preparing Fryer
-
Turn power switch off.
-
Ensure fryer is cool to the touch before moving.
-
Pull out the fryer and unplug from power source.
Replacing the GMU Board
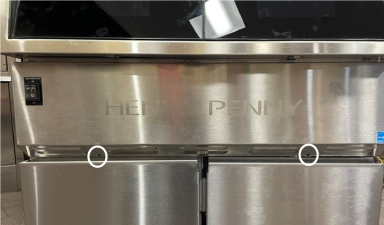
-
Remove 2, 3, or 4 screws, depending on fryer, securing front cover using drill with crosstip bit or screwdriver.
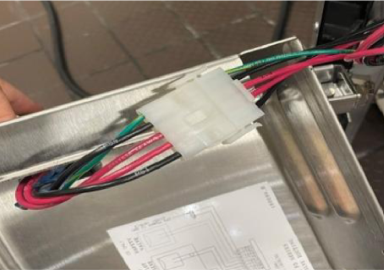
-
Unplug wire connector. Then, remove cover and set aside.
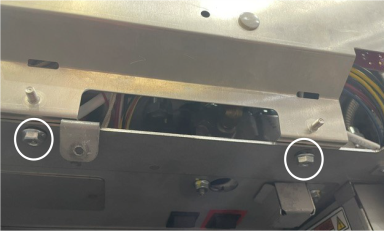
-
Using 3/8 in (10 mm) socket or nut driver, remove 2 nuts securing GMU bracket. Lower bracket to service position, replace nuts, and hand tighten to secure.
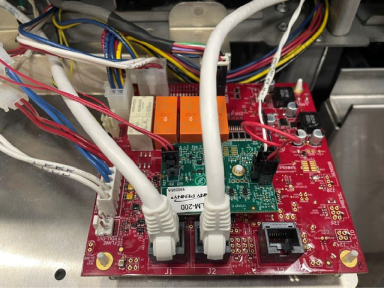
-
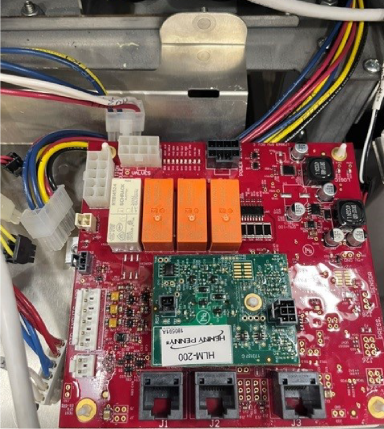
Remove all wires connected to GMU and high limit board.
-
Pull high limit board and standoff from GMU board and set it aside.
-
Pull GMU board and standoffs from bracket and discard.
-
Locate new standoffs from kit and snap into place on bracket.
-
Locate new GMU board from kit and snap into place on standoffs.
-
Replace high limit board and standoff onto new GMU board.
-
Plug all wire connectors back onto GMU and high limit boards.
-
Remove nuts securing GMU bracket, place bracket back into operation position, replace nuts and tighten using 3/8 in (10 mm) socket or nut driver.
-
Plug in wire connection to power switch on front cover, place cover back into position on fryer, replace screws, and tighten using drill with crosstip bit or screwdriver.
-
In reverse order, complete steps 3 through 1 in Preparing Fryer, and return fryer to operation.
NOTE: Take a picture or note position of wires before removing them.
Related Content
Troubleshooting an E-4 Error VIU/OMS/GMU Board Overheating
Troubleshooting an E-5 Oil Too Hot Error Code
Troubleshooting an E-6 (A-B) Temperature Probe Failed Error Code
Troubleshooting an E-10 High Limit Error Code
Troubleshooting the E-20 (A-B) Pressure Switch Stuck Closed/Open Error Code
Troubleshooting the E-20 C Pilot Valve Signal Not Detected Error Code
Troubleshooting the E-20 D Gas Ignition Failure No MV Signal Error Code
Troubleshooting the E-20 (J-K) PV2/MV2 Jumper Missing (Split Vat Only) Error Code
Troubleshooting the E-20 M GMU Relay Failure (MV) Error Code
Troubleshooting the E-20 S Safety Relay Failure Error Code
Troubleshooting an E-21 Slow Heat Recovery Error Code
Troubleshooting an E-22 No Heat Error Code
Troubleshooting the E-93T Transformer 24 VAC Failure/Not Connected Error Code
Replacing Temperature and Level Probe
Replacing Blower Control Board
Troubleshooting an E-4 Error VIU/OMS/GMU Board Overheating
Troubleshooting an E-5 Oil Too Hot Error Code
Troubleshooting an E-6 (A-B) Temperature Probe Failed Error Code
Troubleshooting an E-10 High Limit Error Code
Troubleshooting the E-20 (A-B) Pressure Switch Stuck Closed/Open Error Code
Troubleshooting the E-20 C Pilot Valve Signal Not Detected Error Code
Troubleshooting the E-20 D Gas Ignition Failure No MV Signal Error Code
Troubleshooting the E-20 (J-K) PV2/MV2 Jumper Missing (Split Vat Only) Error Code
Troubleshooting the E-20 M GMU Relay Failure (MV) Error Code
Troubleshooting the E-20 S Safety Relay Failure Error Code
Troubleshooting an E-22 No Heat Error Code
Troubleshooting the E-21 Slow Heat Recovery Error Code
Troubleshooting the E-93T Transformer 24 VAC Failure/Not Connected Error Code
Reference